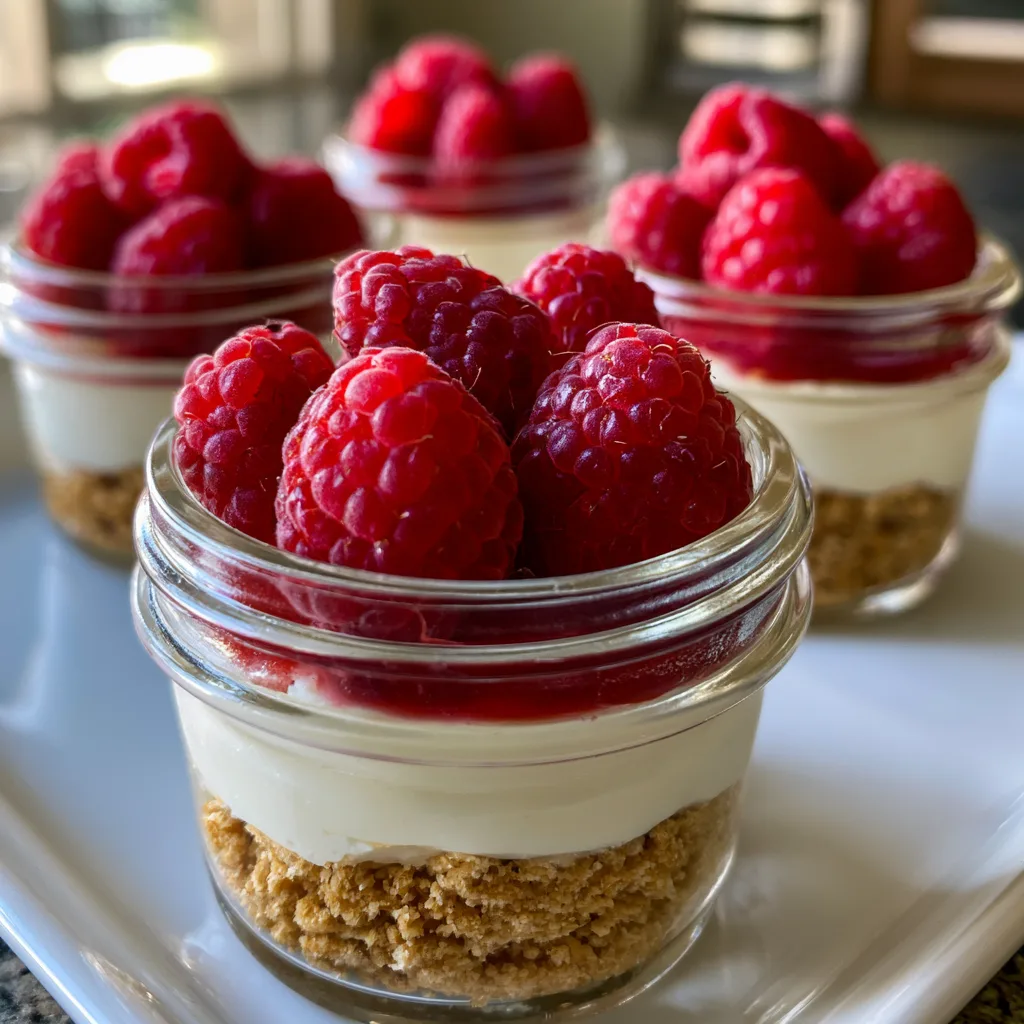
Introduction to No-Bake Raspberry Cheesecake Jars – Single-Serve Summer Dessert Idea
As summer rolls in, I find myself craving light, refreshing desserts that don’t require turning on the oven. That’s where these delightful No-Bake Raspberry Cheesecake Jars come in! They’re the perfect solution for busy days when you want something sweet without the fuss. Plus, they look so pretty, making them a fantastic way to impress family and friends. Each jar is a little treasure filled with creamy goodness and vibrant raspberries. Trust me, these single-serve delights will become your go-to summer treat!
Why You’ll Love This No-Bake Raspberry Cheesecake Jars
These No-Bake Raspberry Cheesecake Jars are a dream come true for busy moms and professionals alike. They come together in just 20 minutes, making them a quick and easy dessert option. The creamy texture paired with the tartness of fresh raspberries creates a flavor explosion that’s simply irresistible. Plus, they’re served in individual jars, so everyone gets their own little slice of heaven without the mess. What’s not to love?
Ingredients for No-Bake Raspberry Cheesecake Jars
Gathering the right ingredients is half the fun! Here’s what you’ll need to whip up these delightful No-Bake Raspberry Cheesecake Jars:
- Graham cracker crumbs: These form the base of your cheesecake, giving it that classic crunch. You can crush whole graham crackers if you prefer a fresher taste.
- Unsalted butter: Melted butter binds the crumbs together, creating a rich, buttery crust. Unsalted is best to control the overall saltiness.
- Cream cheese: The star of the show! Softened cream cheese provides that creamy, dreamy texture we all love in cheesecake.
- Powdered sugar: This sweetens the cream cheese mixture without the graininess of granulated sugar, ensuring a smooth finish.
- Vanilla extract: A splash of vanilla adds warmth and depth to the flavor, making each bite even more delightful.
- Heavy whipping cream: Whipped to perfection, this ingredient lightens the cream cheese mixture, giving it that airy texture.
- Fresh raspberries: These juicy gems not only add a pop of color but also a tartness that balances the sweetness of the cheesecake.
- Extra raspberries for garnish: A few more berries on top make for a beautiful presentation and a burst of flavor with each spoonful.
For those with dietary restrictions, feel free to use gluten-free graham crackers for the crust. You can also swap out raspberries for other berries like strawberries or blueberries if you prefer. The exact quantities for each ingredient are listed at the bottom of the article for easy printing!
How to Make No-Bake Raspberry Cheesecake Jars
Now that you have all your ingredients ready, let’s dive into the fun part—making these No-Bake Raspberry Cheesecake Jars! Follow these simple steps, and you’ll have a delicious dessert in no time.
Step 1: Prepare the Crust
Start by mixing the graham cracker crumbs with the melted butter in a bowl. You want the crumbs to be evenly coated, almost like wet sand. This will help form a sturdy crust.
Next, take your mixture and press it firmly into the bottom of each jar. I like to use the back of a spoon for this. Make sure it’s packed tightly; this will give you a nice base to hold all that creamy goodness!
Step 2: Make the Cream Cheese Mixture
In a separate bowl, beat the softened cream cheese, powdered sugar, and vanilla extract together until smooth. You want it to be creamy and free of lumps. This is where the magic begins!
Don’t rush this step. Take your time to mix it well. The smoother the mixture, the better your cheesecake will taste!
Step 3: Whip the Cream
Now, grab another bowl and whip the heavy cream until stiff peaks form. This means when you lift the whisk, the cream should hold its shape. It’s like fluffy clouds in a bowl!
Gently fold the whipped cream into the cream cheese mixture. Use a spatula and be careful not to deflate the whipped cream. This step is crucial for that light, airy texture we all love in a cheesecake.
Step 4: Assemble the Jars
Time to layer! Start by spooning the cream cheese mixture over the crust in each jar. Use a generous amount; you want it to be creamy and satisfying.
Next, add a layer of fresh raspberries on top. I like to scatter them around for a burst of color and flavor. Repeat the layers until the jars are filled, finishing with a beautiful layer of raspberries on top.
Step 5: Chill and Serve
Once your jars are assembled, pop them in the refrigerator for at least two hours. This chilling time allows the flavors to meld and the cheesecake to set.
When you’re ready to serve, take them out and enjoy! You can even add a sprig of mint for a pop of color. These No-Bake Raspberry Cheesecake Jars are sure to impress!
Tips for Success
- Make sure your cream cheese is at room temperature for easy mixing.
- Use a rubber spatula to fold in the whipped cream gently; this keeps it light and fluffy.
- Chill the jars overnight for even better flavor and texture.
- Experiment with different berries for a fun twist on the classic recipe.
- Keep extra jars on hand for last-minute gatherings or sweet cravings!
Equipment Needed
- Glass jars or dessert cups: Any small container works, even mason jars!
- Mixing bowls: Use any size you have on hand; just make sure they’re sturdy.
- Electric mixer or whisk: A hand mixer makes it easier, but a whisk works too.
- Spatula: Essential for folding and serving the cheesecake mixture.
Variations
- For a chocolate twist, add cocoa powder to the cream cheese mixture for a rich chocolate raspberry cheesecake.
- Try using flavored cream cheese, like strawberry or vanilla, for an extra layer of taste.
- For a tropical vibe, swap raspberries for diced mango or pineapple, and add a hint of coconut extract.
- Make it vegan by using dairy-free cream cheese and coconut cream instead of heavy whipping cream.
- Add a layer of lemon curd between the cheesecake and raspberries for a zesty surprise!
Serving Suggestions
- Pair these jars with a refreshing iced tea or lemonade for a perfect summer combo.
- Serve alongside a light salad for a balanced meal that satisfies your sweet tooth.
- For a beautiful presentation, garnish with mint leaves or a dusting of powdered sugar.
- Consider adding a scoop of vanilla ice cream on the side for extra indulgence!
FAQs about No-Bake Raspberry Cheesecake Jars
Can I make these No-Bake Raspberry Cheesecake Jars in advance?
Absolutely! These jars can be made a day in advance. Just keep them covered in the refrigerator. This allows the flavors to meld beautifully, making them even more delicious!
What can I substitute for raspberries?
If raspberries aren’t your favorite, feel free to swap them out! Strawberries, blueberries, or even blackberries work wonderfully. Each berry brings its unique flavor to the mix.
How long do these jars last in the fridge?
These No-Bake Raspberry Cheesecake Jars can last up to three days in the fridge. Just make sure they’re covered to keep them fresh and tasty!
Can I freeze these jars?
While I recommend enjoying them fresh, you can freeze the jars. Just remember to leave some space at the top, as the filling will expand. Thaw them in the fridge before serving.
What’s the best way to serve these jars?
For a lovely presentation, serve them chilled with a sprig of mint on top. You can also drizzle some raspberry sauce over them for an extra touch of sweetness!
Final Thoughts
Creating these No-Bake Raspberry Cheesecake Jars is more than just making a dessert; it’s about crafting sweet moments with loved ones. Each jar is a little celebration, bursting with flavor and joy. I love how easy they are to prepare, making them perfect for busy days or spontaneous gatherings. Plus, the vibrant raspberries add a touch of summer magic! Whether you’re enjoying them after a family dinner or sharing them at a picnic, these jars are sure to bring smiles. So, grab your ingredients and let the deliciousness unfold—your taste buds will thank you!
No-Bake Raspberry Cheesecake Jars: A Must-Try Summer Delight!
- Total Time: 2 hours 20 minutes
- Yield: 4 servings 1x
- Diet: Vegetarian
Description
A delicious and easy-to-make no-bake raspberry cheesecake served in jars, perfect for summer.
Ingredients
- 1 cup graham cracker crumbs
- 1/4 cup unsalted butter, melted
- 8 oz cream cheese, softened
- 1/2 cup powdered sugar
- 1 tsp vanilla extract
- 1 cup heavy whipping cream
- 1 cup fresh raspberries
- Extra raspberries for garnish
Instructions
- In a bowl, mix graham cracker crumbs and melted butter until combined.
- Press the mixture into the bottom of each jar to form the crust.
- In another bowl, beat the cream cheese, powdered sugar, and vanilla extract until smooth.
- In a separate bowl, whip the heavy cream until stiff peaks form.
- Gently fold the whipped cream into the cream cheese mixture until well combined.
- Layer the cream cheese mixture over the crust in each jar.
- Add a layer of fresh raspberries on top of the cream cheese mixture.
- Repeat the layers until the jars are filled, finishing with raspberries on top.
- Chill in the refrigerator for at least 2 hours before serving.
Notes
- For a gluten-free version, use gluten-free graham crackers.
- Feel free to substitute raspberries with other berries like strawberries or blueberries.
- These jars can be made a day in advance for convenience.
- Prep Time: 20 minutes
- Cook Time: 0 minutes
- Category: Dessert
- Method: No-Bake
- Cuisine: American
Nutrition
- Serving Size: 1 jar
- Calories: 350
- Sugar: 20g
- Sodium: 150mg
- Fat: 25g
- Saturated Fat: 15g
- Unsaturated Fat: 5g
- Trans Fat: 0g
- Carbohydrates: 30g
- Fiber: 2g
- Protein: 4g
- Cholesterol: 70mg