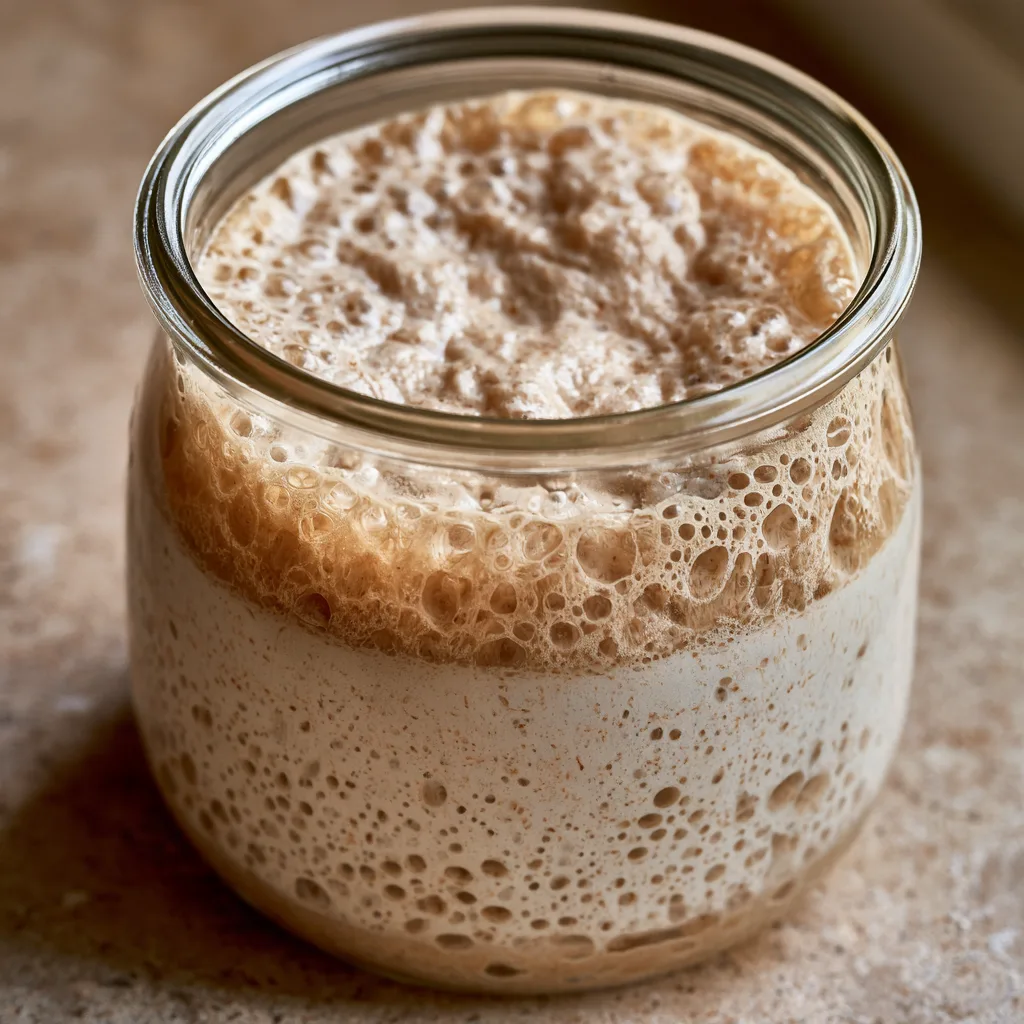
Introduction to How to Make a Sourdough Starter Without Yeast
Have you ever wanted to bake your own bread but felt overwhelmed by the thought of using commercial yeast? Well, let me tell you, learning how to make a sourdough starter without yeast is not only simple but also incredibly rewarding! This method allows you to harness the wild yeast present in the air and your kitchen. It’s a delightful way to create something special, even on the busiest of days. Imagine the aroma of freshly baked bread wafting through your home, impressing your loved ones and filling your heart with joy!
Why You’ll Love This How to Make a Sourdough Starter Without Yeast
This method is a game-changer for busy moms and professionals like us! It’s easy, requiring just flour and water, and it’s a fun project that the whole family can enjoy. Plus, the taste of homemade sourdough is simply unbeatable. You’ll savor the tangy flavor and chewy texture that only wild yeast can provide. It’s a delicious way to bring a little magic into your kitchen!
Ingredients for How to Make a Sourdough Starter Without Yeast
Creating a sourdough starter without yeast is all about simplicity and quality ingredients. Here’s what you’ll need:
- All-purpose flour: This is the backbone of your starter. It provides the necessary nutrients for the wild yeast to thrive. You can also experiment with whole wheat or rye flour for a different flavor.
- Water: Use filtered or bottled water for the best results. Tap water can contain chlorine, which may hinder yeast growth. The right water helps create a thriving environment for your starter.
- Additional flour and water: These will be used for feeding your starter as it develops. Keeping a consistent feeding schedule is crucial for a healthy sourdough starter.
For exact measurements, check the bottom of the article where you can find everything neatly laid out for printing. Remember, the quality of your ingredients can make a big difference in the final product!
How to Make a Sourdough Starter Without Yeast
Step 1: Combine Flour and Water
Start by grabbing a clean glass jar. This is where your sourdough starter will come to life! Add 1 cup of all-purpose flour and 1/2 cup of water. It’s like a little science experiment right in your kitchen!
Step 2: Mix Until Smooth
Now, take a spoon or spatula and mix the flour and water together. You want to ensure there are no dry flour spots. The mixture should be smooth and thick, almost like a pancake batter. This is where the magic begins!
Step 3: Cover and Let Sit
Once mixed, cover the jar loosely with a lid or a clean cloth. This allows air to flow in while keeping unwanted pests out. Let it sit at room temperature for 24 hours. Patience is key here, my friend!
Step 4: Check for Bubbles
After 24 hours, it’s time for the exciting part! Check your mixture for bubbles. If you see some, congratulations! Wild yeast is developing, and you’re on the right track. If not, don’t worry; sometimes it just takes a little longer.
Step 5: Feed the Starter
Now, it’s time to give your starter some love. Discard half of the mixture, about 1/2 cup. Then, add 1/2 cup of flour and 1/4 cup of water. Mix it well until it’s smooth again. This feeding process helps the wild yeast grow stronger!
Step 6: Repeat Feeding Process
Continue this feeding process every 24 hours for about 5 to 7 days. Each day, you’ll notice more bubbles and a delightful tangy smell. It’s like watching your little pet grow! Keep it in a warm spot, ideally between 70°F and 75°F.
Step 7: Ready to Use or Store
After about a week, your sourdough starter should be bubbly and double in size. At this point, it’s ready to use for baking! If you’re not using it right away, you can store it in the refrigerator. Just remember to feed it once a week to keep it happy!
Tips for Success
- Keep your starter in a warm spot, around 70°F to 75°F, for optimal yeast growth.
- Use filtered or bottled water to avoid chlorine, which can slow down fermentation.
- Be patient! Wild yeast takes time to develop, especially in cooler temperatures.
- Use a clean jar each time to prevent contamination.
- Mark the jar with a rubber band to track its growth.
Equipment Needed
- Glass jar: A clean glass jar is essential. You can also use a plastic container if that’s what you have on hand.
- Spoon or spatula: For mixing, any spoon will do. A spatula makes it easier to scrape the sides.
- Cloth or lid: A clean cloth or loose lid to cover the jar allows airflow while keeping dust out.
Variations
- Whole Wheat Flour: Swap out all-purpose flour for whole wheat flour for a nuttier flavor and added nutrients.
- Rye Flour: Using rye flour can enhance the fermentation process, giving your starter a unique taste and aroma.
- Herb-Infused Starter: Add dried herbs like rosemary or thyme to the mixture for a fragrant twist that pairs beautifully with savory breads.
- Fruit Juice: Incorporate a splash of apple or pineapple juice during the initial mixing to kickstart fermentation with natural sugars.
- Gluten-Free Option: Use a gluten-free flour blend to create a gluten-free sourdough starter. Just ensure it contains a mix of starches and proteins.
Serving Suggestions
- Pair with Cheese: Serve your sourdough bread with a selection of cheeses for a delightful charcuterie board.
- Enjoy with Soup: A warm bowl of tomato or vegetable soup complements the tangy flavor of sourdough perfectly.
- Top with Avocado: Spread ripe avocado on toasted sourdough for a nutritious breakfast or snack.
- Presentation: Slice your bread and arrange it on a wooden board for a rustic touch.
FAQs about How to Make a Sourdough Starter Without Yeast
Can I use whole wheat flour instead of all-purpose flour?
Absolutely! Whole wheat flour can add a nuttier flavor and more nutrients to your sourdough starter. Just remember, it may take a bit longer to develop wild yeast compared to all-purpose flour.
How do I know if my sourdough starter is ready to use?
Your sourdough starter is ready when it’s bubbly and has doubled in size within a few hours after feeding. It should also have a pleasant, tangy aroma. If it meets these criteria, you’re good to go!
What should I do if my starter isn’t bubbling?
If you don’t see bubbles, don’t panic! It might just need more time or a warmer environment. Ensure you’re feeding it regularly and using filtered water. Sometimes, wild yeast just takes a little longer to wake up!
Can I store my sourdough starter in the fridge?
Yes, you can! Once your starter is established, you can store it in the refrigerator. Just remember to feed it at least once a week to keep it healthy and active.
What can I bake with my sourdough starter?
The possibilities are endless! You can use your sourdough starter to make bread, pancakes, waffles, or even pizza dough. The unique flavor of wild yeast will elevate any recipe!
Final Thoughts
Creating a sourdough starter without yeast is more than just a baking project; it’s a journey filled with anticipation and joy. Each day brings new bubbles and growth, reminding us of the beauty of patience and nature’s magic. The satisfaction of baking with your homemade starter is unparalleled, as you savor the unique flavors that only wild yeast can provide. Whether you’re sharing warm slices with family or enjoying a quiet moment with a piece of toast, this experience brings warmth and connection to your kitchen. So, roll up your sleeves and let the adventure begin!
How to Make a Sourdough Starter Without Yeast Today!
- Total Time: 7 days
- Yield: 1 sourdough starter 1x
- Diet: Vegan
Description
Learn how to create a sourdough starter without using commercial yeast, using just flour and water to cultivate wild yeast.
Ingredients
- 1 cup all-purpose flour
- 1/2 cup water
- Additional flour and water for feeding
Instructions
- In a clean glass jar, combine 1 cup of all-purpose flour with 1/2 cup of water.
- Mix until there are no dry flour spots and the mixture is smooth.
- Cover the jar loosely with a lid or cloth to allow airflow.
- Let the mixture sit at room temperature for 24 hours.
- After 24 hours, check for bubbles. If you see some, it means wild yeast is developing.
- Feed the starter by discarding half of the mixture and adding 1/2 cup of flour and 1/4 cup of water. Mix well.
- Repeat the feeding process every 24 hours for about 5-7 days until the starter is bubbly and doubles in size.
- Once ready, you can use it for baking or store it in the refrigerator.
Notes
- Use filtered or bottled water for best results.
- Keep the starter in a warm place, ideally around 70°F to 75°F.
- Be patient; it may take longer in cooler temperatures.
- Prep Time: 5 minutes
- Cook Time: 0 minutes
- Category: Baking
- Method: Fermentation
- Cuisine: Bread
Nutrition
- Serving Size: 1 tablespoon
- Calories: 30
- Sugar: 0g
- Sodium: 0mg
- Fat: 0g
- Saturated Fat: 0g
- Unsaturated Fat: 0g
- Trans Fat: 0g
- Carbohydrates: 6g
- Fiber: 0g
- Protein: 1g
- Cholesterol: 0mg