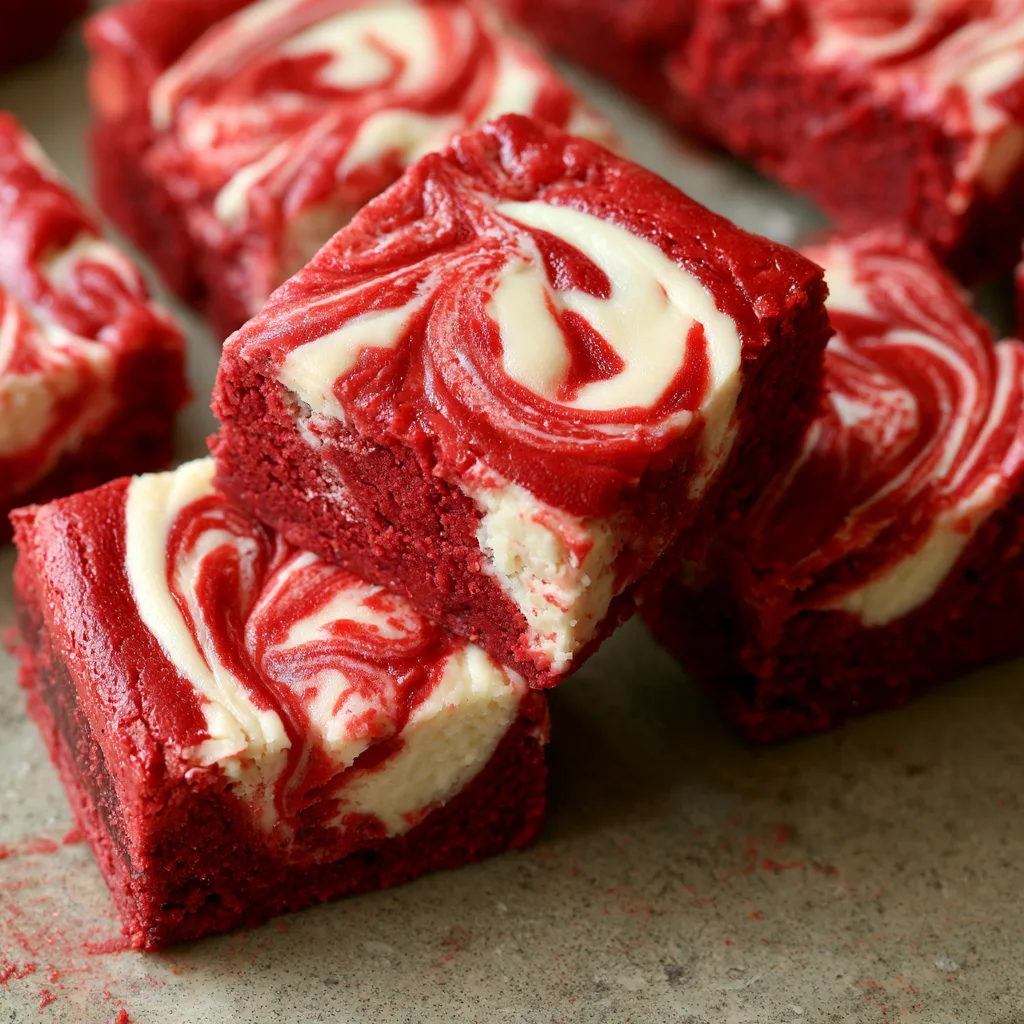
Introduction to Christmas Red Velvet Cheesecake Brownies
As the holiday season approaches, I find myself dreaming of festive treats that bring joy to my family. That’s where these Christmas Red Velvet Cheesecake Brownies come in! They’re not just a dessert; they’re a delightful way to spread cheer. Imagine rich, velvety brownies topped with a creamy cheesecake layer, perfect for impressing guests or satisfying your sweet tooth after a long day. Whether you’re a busy mom or a professional juggling tasks, this recipe is a quick solution that will make your holiday gatherings feel extra special. Let’s dive into this delicious adventure!
Why You’ll Love This Christmas Red Velvet Cheesecake Brownies
These Christmas Red Velvet Cheesecake Brownies are a game-changer for your holiday baking. They’re incredibly easy to whip up, making them perfect for busy days when time is tight. The combination of rich chocolatey flavor and creamy cheesecake is simply irresistible. Plus, they look stunning on any dessert table, adding a festive touch that will wow your family and friends. Trust me, they’ll be asking for seconds!
Ingredients for Christmas Red Velvet Cheesecake Brownies
Gathering the right ingredients is the first step to creating these festive Christmas Red Velvet Cheesecake Brownies. Here’s what you’ll need:
- Unsalted butter: This adds richness and moisture to the brownies. You can substitute with coconut oil for a dairy-free option.
- Granulated sugar: Sweetness is key! Brown sugar can be used for a deeper flavor.
- Large eggs: They bind the ingredients together and provide structure. For a vegan alternative, try flax eggs.
- Vanilla extract: This enhances the overall flavor. Pure vanilla is best, but imitation works too.
- All-purpose flour: The base of the brownies. Whole wheat flour can be a healthier substitute.
- Cocoa powder: This gives the brownies their chocolatey goodness. Opt for high-quality cocoa for richer flavor.
- Baking powder: This helps the brownies rise. Baking soda can be used in a pinch, but adjust the amount.
- Salt: Just a pinch enhances all the flavors. Sea salt adds a nice touch!
- Red food coloring: This gives the brownies their festive hue. Gel food coloring is more vibrant than liquid.
- Cream cheese: The star of the cheesecake layer! Make sure it’s softened for easy mixing.
- Powdered sugar: This sweetens the cheesecake layer and gives it a smooth texture.
- Additional egg: Another egg for the cheesecake layer helps it set perfectly.
- Vanilla extract (for cheesecake): Just like before, it adds depth to the cheesecake flavor.
For exact measurements, check the bottom of the article where you can find everything listed for easy printing. Happy baking!
How to Make Christmas Red Velvet Cheesecake Brownies
Now that we have our ingredients ready, let’s dive into the fun part—making these Christmas Red Velvet Cheesecake Brownies! Follow these simple steps, and you’ll have a festive treat that’s sure to impress.
Step 1: Preheat and Prepare
First things first, preheat your oven to 350°F (175°C). This ensures even baking. While the oven warms up, grab a 9×13 inch baking pan and grease it well. You can use butter or cooking spray. This step is crucial to prevent sticking later on!
Step 2: Make the Red Velvet Batter
In a large bowl, melt the unsalted butter. I usually do this in the microwave for about 30 seconds. Once melted, mix in the granulated sugar until it’s well combined. Next, add the eggs and vanilla extract. Stir until the mixture is smooth and creamy. This is where the magic begins!
Step 3: Combine Dry Ingredients
In another bowl, whisk together the all-purpose flour, cocoa powder, baking powder, and salt. This step is important to ensure even distribution of the dry ingredients. You want every bite to be just as delicious as the last!
Step 4: Mix Wet and Dry Ingredients
Now, gradually add the dry mixture to the wet ingredients. Stir gently until just combined. Be careful not to overmix! Finally, add the red food coloring. Mix until the batter is a beautiful, vibrant red. It’s like a holiday miracle in a bowl!
Step 5: Prepare the Cheesecake Layer
In a separate bowl, beat the softened cream cheese until it’s smooth. Then, mix in the powdered sugar, additional egg, and vanilla extract. Blend until creamy and luscious. This cheesecake layer is going to be the star of the show!
Step 6: Layer the Batter
Spread half of the red velvet batter into your prepared baking pan. Then, spoon the cheesecake mixture over this layer. Finally, dollop the remaining red velvet batter on top. Don’t worry about making it perfect; it’s all going to come together beautifully!
Step 7: Swirl and Bake
Using a knife, gently swirl the layers together. This creates a marbled effect that’s visually stunning. Now, pop the pan into the oven and bake for 30-35 minutes. Keep an eye on it! A toothpick inserted should come out clean. Once baked, let it cool before slicing into squares. Enjoy your festive creation!
Tips for Success
- Use room temperature ingredients for a smoother batter.
- Don’t overmix the batter; it can make the brownies tough.
- For a richer flavor, opt for high-quality cocoa powder.
- Let the brownies cool completely before slicing for cleaner edges.
- Experiment with toppings like whipped cream or festive sprinkles!
Equipment Needed
- 9×13 inch baking pan: A standard size for brownies; you can use an 8×8 inch pan for thicker brownies.
- Mixing bowls: Use medium and large bowls for mixing ingredients; any size will do!
- Whisk and spatula: Essential for mixing; a hand mixer can speed up the process.
- Measuring cups and spoons: Accurate measurements are key; a kitchen scale is a great alternative.
Variations
- Nutty Delight: Add chopped walnuts or pecans to the red velvet batter for a crunchy texture.
- Minty Fresh: Incorporate a few drops of peppermint extract into the cheesecake layer for a festive twist.
- Gluten-Free: Substitute all-purpose flour with a gluten-free blend to accommodate dietary needs.
- Vegan Option: Use flax eggs and dairy-free cream cheese for a plant-based version of these brownies.
- Chocolate Chip Surprise: Fold in mini chocolate chips into the red velvet batter for an extra chocolatey treat!
Serving Suggestions
- Pair these brownies with a scoop of vanilla ice cream for a delightful contrast.
- Serve with a dollop of whipped cream and a sprinkle of festive sprinkles on top.
- Complement with a warm cup of hot cocoa or spiced holiday tea.
- For a beautiful presentation, arrange brownies on a decorative platter with fresh berries.
FAQs about Christmas Red Velvet Cheesecake Brownies
Can I make these brownies ahead of time?
Absolutely! These Christmas Red Velvet Cheesecake Brownies can be made a day in advance. Just store them in an airtight container in the refrigerator. They’ll taste even better the next day as the flavors meld together!
How do I store leftovers?
To keep your brownies fresh, store them in an airtight container in the refrigerator. They’ll last for about a week. You can also freeze them for up to three months. Just make sure to wrap them tightly!
Can I use a different food coloring?
Yes! While red food coloring gives these brownies their festive look, you can use any color you like. Gel food coloring works best for vibrant hues, but liquid food coloring is fine too. Get creative!
What can I serve with these brownies?
These brownies pair wonderfully with a scoop of vanilla ice cream or a dollop of whipped cream. You can also serve them alongside a warm cup of hot cocoa or spiced tea for a cozy treat!
Can I make these brownies gluten-free?
Definitely! Just substitute the all-purpose flour with a gluten-free flour blend. This way, everyone can enjoy these delicious Christmas Red Velvet Cheesecake Brownies, regardless of dietary restrictions!
Final Thoughts
Making these Christmas Red Velvet Cheesecake Brownies is more than just baking; it’s about creating memories. The joy of watching my family’s faces light up as they take their first bite is priceless. These brownies bring a festive spirit to any gathering, making them a perfect addition to your holiday celebrations. Plus, they’re simple enough for even the busiest of moms to whip up. So, gather your loved ones, share some laughter, and indulge in these delightful treats. Trust me, they’ll become a cherished tradition in your home, just like they have in mine!
Print
Christmas Red Velvet Cheesecake Brownies that Wow!
- Total Time: 55 minutes
- Yield: 24 brownies 1x
- Diet: Vegetarian
Description
Deliciously festive red velvet brownies topped with a creamy cheesecake layer, perfect for Christmas celebrations.
Ingredients
- 1 cup unsalted butter
- 2 cups granulated sugar
- 4 large eggs
- 2 teaspoons vanilla extract
- 2 cups all-purpose flour
- 1/2 cup cocoa powder
- 1 teaspoon baking powder
- 1 teaspoon salt
- 1 tablespoon red food coloring
- 8 oz cream cheese, softened
- 1/2 cup powdered sugar
- 1 egg
- 1 teaspoon vanilla extract
Instructions
- Preheat the oven to 350°F (175°C) and grease a 9×13 inch baking pan.
- In a large bowl, melt the butter and mix in the granulated sugar until well combined.
- Add the eggs and vanilla extract, mixing until smooth.
- In another bowl, whisk together the flour, cocoa powder, baking powder, and salt.
- Gradually add the dry ingredients to the wet mixture, stirring until just combined.
- Stir in the red food coloring until the batter is evenly colored.
- In a separate bowl, beat the cream cheese until smooth, then add the powdered sugar, egg, and vanilla extract, mixing until creamy.
- Spread half of the red velvet batter into the prepared baking pan.
- Spoon the cheesecake mixture over the red velvet layer, then dollop the remaining red velvet batter on top.
- Use a knife to swirl the layers together gently.
- Bake for 30-35 minutes or until a toothpick inserted comes out clean.
- Allow to cool before slicing into squares and serving.
Notes
- For a richer flavor, use high-quality cocoa powder.
- Store leftovers in an airtight container in the refrigerator.
- These brownies can be frozen for up to 3 months.
- Prep Time: 20 minutes
- Cook Time: 35 minutes
- Category: Dessert
- Method: Baking
- Cuisine: American
Nutrition
- Serving Size: 1 brownie
- Calories: 250
- Sugar: 20g
- Sodium: 150mg
- Fat: 12g
- Saturated Fat: 7g
- Unsaturated Fat: 3g
- Trans Fat: 0g
- Carbohydrates: 32g
- Fiber: 1g
- Protein: 3g
- Cholesterol: 50mg