Introduction to Irresistible Halloween Dirt Cups Recipe
As the leaves turn and the air gets crisp, I find myself craving fun, festive treats that bring a smile to my family’s faces. That’s where my Irresistible Halloween Dirt Cups Recipe comes in! This delightful dessert is not only a quick solution for busy days, but it also adds a spooky twist to any Halloween gathering. With layers of creamy chocolate pudding, crushed cookies, and gummy worms, it’s a treat that’s sure to impress your loved ones. Plus, it’s so easy to make that even the busiest moms can whip it up in no time!
Why You’ll Love This Irresistible Halloween Dirt Cups Recipe
This Irresistible Halloween Dirt Cups Recipe is a game-changer for busy moms like us! It’s incredibly easy to make, taking just 20 minutes of prep time. The layers of rich chocolate pudding and crunchy cookies create a delightful texture that kids adore. Plus, it’s a no-bake dessert, so you can spend more time enjoying the festivities and less time in the kitchen. Trust me, your family will be begging for seconds!
Ingredients for Irresistible Halloween Dirt Cups Recipe
Gathering the right ingredients is half the fun! Here’s what you’ll need for my Irresistible Halloween Dirt Cups Recipe:
- Chocolate instant pudding mix: This is the star of the show, providing that rich, chocolatey flavor that everyone loves.
- Milk: You’ll need this to bring the pudding mix to life. Whole milk works best for a creamier texture, but feel free to use any milk you have on hand.
- Cream cheese: Softened cream cheese adds a delightful creaminess to the dessert, balancing the sweetness perfectly.
- Powdered sugar: This sweetener helps to create a smooth and luscious cream cheese mixture. It’s a must for that perfect sweetness!
- Whipped topping: This light and airy ingredient gives the dessert a fluffy texture. You can use store-bought or make your own if you’re feeling adventurous!
- Chocolate sandwich cookies: Crushed cookies add a crunchy layer that mimics dirt, making it a fun Halloween treat. You can use any brand you like!
- Gummy worms: These creepy crawlers are the finishing touch! They add a playful element that kids absolutely love.
For those who want to get creative, consider adding other Halloween-themed candies for decoration. You can find spooky sprinkles or even candy eyeballs to make your dirt cups extra festive!
Don’t worry about exact measurements just yet; you can find them at the bottom of the article, ready for printing. Let’s get cooking!
How to Make Irresistible Halloween Dirt Cups Recipe
Step 1: Prepare the Chocolate Pudding
Start by grabbing a mixing bowl and whisking together the chocolate pudding mix and milk. I like to use a whisk for a smooth consistency, but a fork works too! Keep whisking until there are no lumps, and the mixture is thick and creamy. This step is quick, taking just a few minutes. Once it’s ready, set it aside while you tackle the next layer of this delightful dessert.
Step 2: Make the Cream Cheese Mixture
In another bowl, beat the softened cream cheese and powdered sugar together. I recommend using an electric mixer for this part; it makes the process so much easier! Mix until the cream cheese is fluffy and the sugar is fully incorporated. This creamy mixture adds a rich texture to your dirt cups. Trust me, it’s worth the effort to get it just right!
Step 3: Combine with Whipped Topping
Now it’s time to fold in the whipped topping into your cream cheese mixture. Gently mix it in using a spatula, being careful not to deflate the whipped topping. This step is crucial for achieving that light, airy texture. The combination of cream cheese and whipped topping creates a heavenly layer that balances the chocolate pudding perfectly. You’ll want to savor every bite!
Step 4: Layer the Ingredients
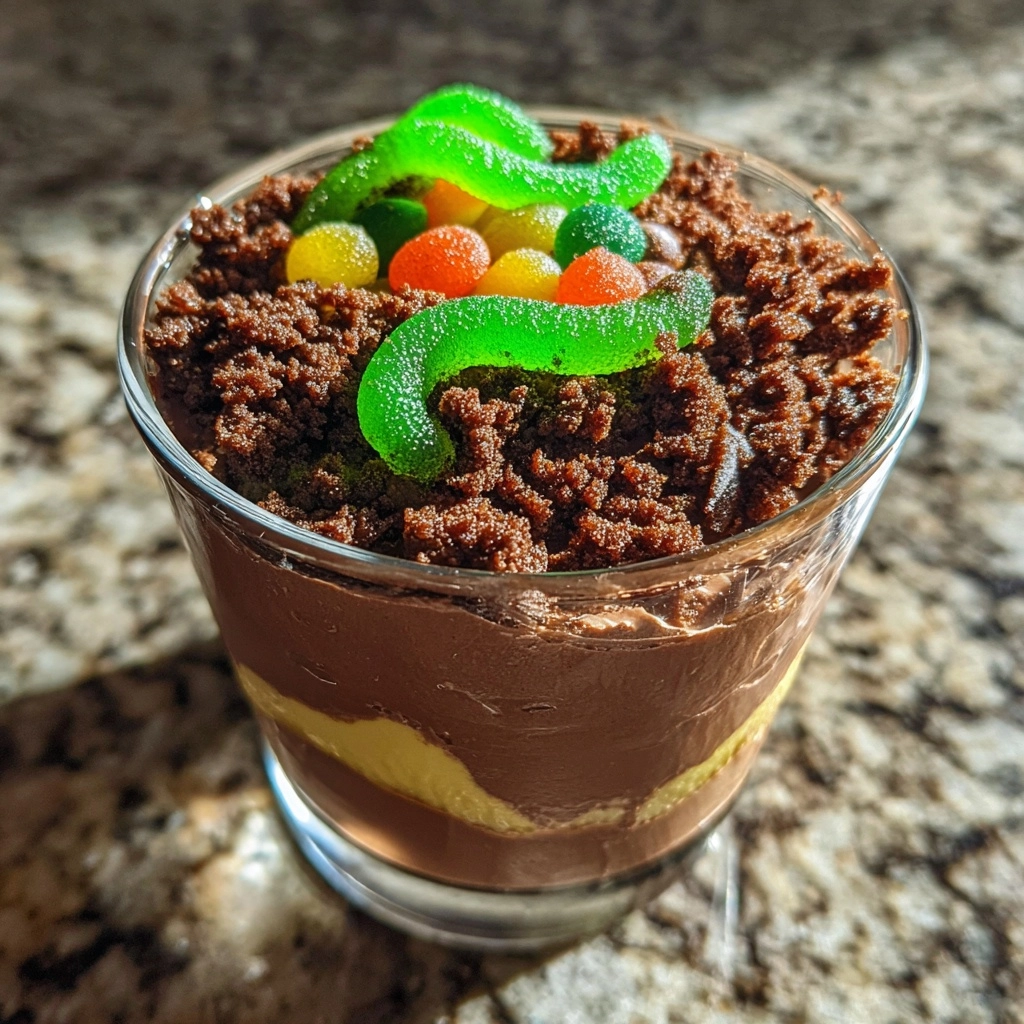
Grab your cups or bowls and start layering! Begin with a generous scoop of chocolate pudding at the bottom. Next, add a layer of the cream cheese mixture, followed by a sprinkle of crushed cookies. Repeat these layers until your cups are filled, finishing with a layer of crushed cookies on top. The layers create a beautiful visual, making your dirt cups as appealing as they are delicious!
Step 5: Add the Finishing Touches
Now for the fun part—decorating! Top each cup with gummy worms, letting them drape over the sides for a spooky effect. You can get creative here; maybe add some Halloween sprinkles or candy eyeballs for extra flair! These little touches make your Irresistible Halloween Dirt Cups Recipe even more festive and fun for the kids. They’ll love the creepy-crawly look!
Step 6: Chill and Serve
Finally, it’s time to chill your dirt cups in the refrigerator for at least one hour. This step is essential as it allows the flavors to meld together and the pudding to set. Plus, it makes the dessert refreshing! Once chilled, serve them up and watch your family’s faces light up with delight. Enjoy this spooky treat at your Halloween gathering!
Tips for Success
- Make sure your cream cheese is softened for easy mixing.
- Use a whisk for the pudding to avoid lumps and achieve a smooth texture.
- Chill the dirt cups for at least an hour to enhance the flavors.
- Get the kids involved in layering and decorating for extra fun!
- Experiment with different toppings like spooky sprinkles or candy corn.
Equipment Needed
- Mixing bowls: Any size will do, but a medium bowl is perfect for the pudding.
- Whisk: A whisk is ideal for mixing the pudding, but a fork works too!
- Electric mixer: This makes beating the cream cheese a breeze, but a hand mixer is fine.
- Spatula: Use this for folding in the whipped topping gently.
- Cups or bowls: Any fun containers will make your dirt cups shine!
Variations
- For a richer flavor, try using dark chocolate pudding mix instead of regular chocolate.
- Swap out the cream cheese for Greek yogurt for a lighter, tangy twist.
- Use gluten-free chocolate sandwich cookies to make this dessert gluten-free.
- Add a layer of crushed fruit, like strawberries or raspberries, for a fruity surprise.
- For a nutty flavor, sprinkle some crushed nuts between the layers.
Serving Suggestions
- Pair your dirt cups with spooky Halloween-themed cookies for a delightful dessert table.
- Serve alongside a refreshing apple cider or pumpkin spice latte to complement the flavors.
- For a festive touch, use clear cups to showcase the colorful layers of your dirt cups.
- Consider adding a Halloween-themed tablecloth or decorations to enhance the spooky vibe!
FAQs about Irresistible Halloween Dirt Cups Recipe
Can I make these Irresistible Halloween Dirt Cups in advance?
Absolutely! These dirt cups can be made a day in advance. Just layer them in cups, cover with plastic wrap, and store them in the refrigerator. This makes them a perfect treat for busy days!
What can I use instead of chocolate sandwich cookies?
If you want to switch things up, you can use crushed graham crackers or even vanilla sandwich cookies. They’ll still give you that fun “dirt” look while adding a different flavor!
How can I make this recipe healthier?
To lighten things up, consider using low-fat cream cheese and sugar-free pudding mix. You can also add fresh fruit layers for a nutritious twist. Your family will love it just as much!
Can I use homemade whipped cream instead of whipped topping?
Definitely! Homemade whipped cream adds a lovely touch. Just whip heavy cream with a bit of sugar until soft peaks form, and fold it into the cream cheese mixture for a delicious upgrade.
What other toppings can I use for decoration?
Get creative! You can use Halloween-themed sprinkles, candy eyeballs, or even chocolate spiders. The more festive, the better! Your kids will love the spooky surprises!
Final Thoughts
Making these Irresistible Halloween Dirt Cups is more than just whipping up a dessert; it’s about creating joyful moments with your family. The laughter, the excitement of layering, and the delight on their faces when they see those gummy worms peeking out are priceless. This recipe is a reminder that even the simplest treats can bring us together. So, whether you’re hosting a Halloween party or just looking for a fun activity with the kids, these dirt cups are sure to be a hit. Embrace the spooky season and enjoy every delicious bite!

Irresistible Halloween Dirt Cups Recipe You Must Try!
- Total Time: 1 hour 20 minutes
- Yield: 6 servings 1x
- Diet: Vegetarian
Description
A fun and spooky dessert perfect for Halloween, featuring layers of chocolate pudding, crushed cookies, and gummy worms.
Ingredients
- 1 package (3.9 oz) chocolate instant pudding mix
- 2 cups milk
- 1 package (8 oz) cream cheese, softened
- 1 cup powdered sugar
- 1 container (12 oz) whipped topping
- 1 package (15 oz) chocolate sandwich cookies, crushed
- Gummy worms for decoration
Instructions
- In a bowl, whisk together the chocolate pudding mix and milk until smooth.
- In another bowl, beat the softened cream cheese and powdered sugar until creamy.
- Fold in the whipped topping into the cream cheese mixture.
- Layer the chocolate pudding, cream cheese mixture, and crushed cookies in cups.
- Top with gummy worms for decoration.
- Chill in the refrigerator for at least 1 hour before serving.
Notes
- For a more intense chocolate flavor, use dark chocolate pudding mix.
- Feel free to add other Halloween-themed candies for decoration.
- These can be made a day in advance for convenience.
- Prep Time: 20 minutes
- Cook Time: 0 minutes
- Category: Dessert
- Method: No-bake
- Cuisine: American
Nutrition
- Serving Size: 1 cup
- Calories: 350
- Sugar: 25g
- Sodium: 200mg
- Fat: 15g
- Saturated Fat: 8g
- Unsaturated Fat: 5g
- Trans Fat: 0g
- Carbohydrates: 50g
- Fiber: 2g
- Protein: 5g
- Cholesterol: 30mg