Introduction to Spooky Ghost Brownies
As the leaves turn and the air gets crisp, I can’t help but get excited about Halloween. It’s that magical time of year when we can indulge in all things spooky and sweet. That’s where my Spooky Ghost Brownies come in! These delightful treats are not only delicious but also a fun way to get the kids involved in the kitchen. Whether you’re a busy mom juggling work and family or a professional looking to impress at a Halloween gathering, this recipe is a quick solution that will bring smiles all around. Let’s dive into this festive baking adventure!
Why You’ll Love This Spooky Ghost Brownies
These Spooky Ghost Brownies are a dream come true for busy lives! They come together in just about 50 minutes, making them perfect for last-minute Halloween parties or school events. The rich, fudgy texture will have everyone coming back for seconds. Plus, the ghostly decorations are a hit with kids and adults alike, adding a fun twist to your Halloween festivities. Who knew baking could be this easy and enjoyable?
Ingredients for Spooky Ghost Brownies
Gathering the right ingredients is half the fun of baking! For these Spooky Ghost Brownies, you’ll need a mix of pantry staples and a few special touches to create that ghostly charm.
- Unsalted butter: This is the base of our brownies, giving them that rich, fudgy texture. You can substitute with margarine if needed.
- Granulated sugar: Sweetness is key! It helps create that delightful crust on top. Brown sugar can be used for a deeper flavor.
- Large eggs: Eggs bind everything together and add moisture. If you’re looking for an egg-free option, try using applesauce or flaxseed meal.
- Vanilla extract: A splash of vanilla elevates the flavor, making the brownies taste even more delicious. Pure vanilla is best, but imitation works too.
- All-purpose flour: This gives structure to the brownies. For a gluten-free version, you can use a gluten-free flour blend.
- Cocoa powder: The star of the show! It provides that rich chocolate flavor. Dark cocoa powder can intensify the chocolatey goodness.
- Salt: Just a pinch enhances all the flavors. Don’t skip it!
- Baking powder: This helps the brownies rise slightly, giving them a nice texture. Baking soda can be used as a substitute in a pinch.
- White chocolate: For coating the brownies and creating the ghostly appearance. You can use candy melts if you prefer.
- Chocolate chips: These are perfect for the eyes of your ghostly creations. Mini chocolate chips work great for a cute touch!
For exact measurements, check the bottom of the article where you can find everything listed for easy printing. Happy baking!
How to Make Spooky Ghost Brownies
Now that we have our ingredients ready, let’s get to the fun part—making these Spooky Ghost Brownies! Follow these simple steps, and you’ll have a batch of deliciously spooky treats in no time.
Step 1: Preheat and Prepare
First things first, preheat your oven to 350°F (175°C). This ensures your brownies bake evenly. While the oven warms up, grab a 9×13 inch baking pan and grease it well. You can use butter or cooking spray. This step is crucial to prevent sticking, so don’t skip it!
Step 2: Mix the Wet Ingredients
In a large bowl, melt the unsalted butter. I usually do this in the microwave for about 30 seconds. Once melted, mix in the granulated sugar until it’s well combined. Then, add the eggs one at a time, mixing thoroughly after each addition. Finally, stir in the vanilla extract. The aroma will make your kitchen feel like a cozy bakery!
Step 3: Combine the Dry Ingredients
In another bowl, whisk together the all-purpose flour, cocoa powder, salt, and baking powder. This step is important to ensure even distribution of the dry ingredients. You want every bite of your Spooky Ghost Brownies to be rich and chocolatey!
Step 4: Combine Wet and Dry Mixtures
Now, it’s time to bring the two mixtures together. Gradually add the dry ingredients to the wet ingredients. Mix until just combined. Be careful not to overmix; a few lumps are perfectly fine. This will keep your brownies fudgy and delicious!
Step 5: Bake the Brownies
Pour the brownie batter into your prepared baking pan, spreading it evenly. Pop it into the preheated oven and bake for 25-30 minutes. To check for doneness, insert a toothpick in the center. If it comes out clean, your brownies are ready!
Step 6: Cool and Shape
Once baked, remove the brownies from the oven and let them cool completely in the pan. This is key! If you cut them too soon, they might crumble. Once cool, use a ghost-shaped cookie cutter to cut out your spooky shapes. If you don’t have one, a knife works just as well!
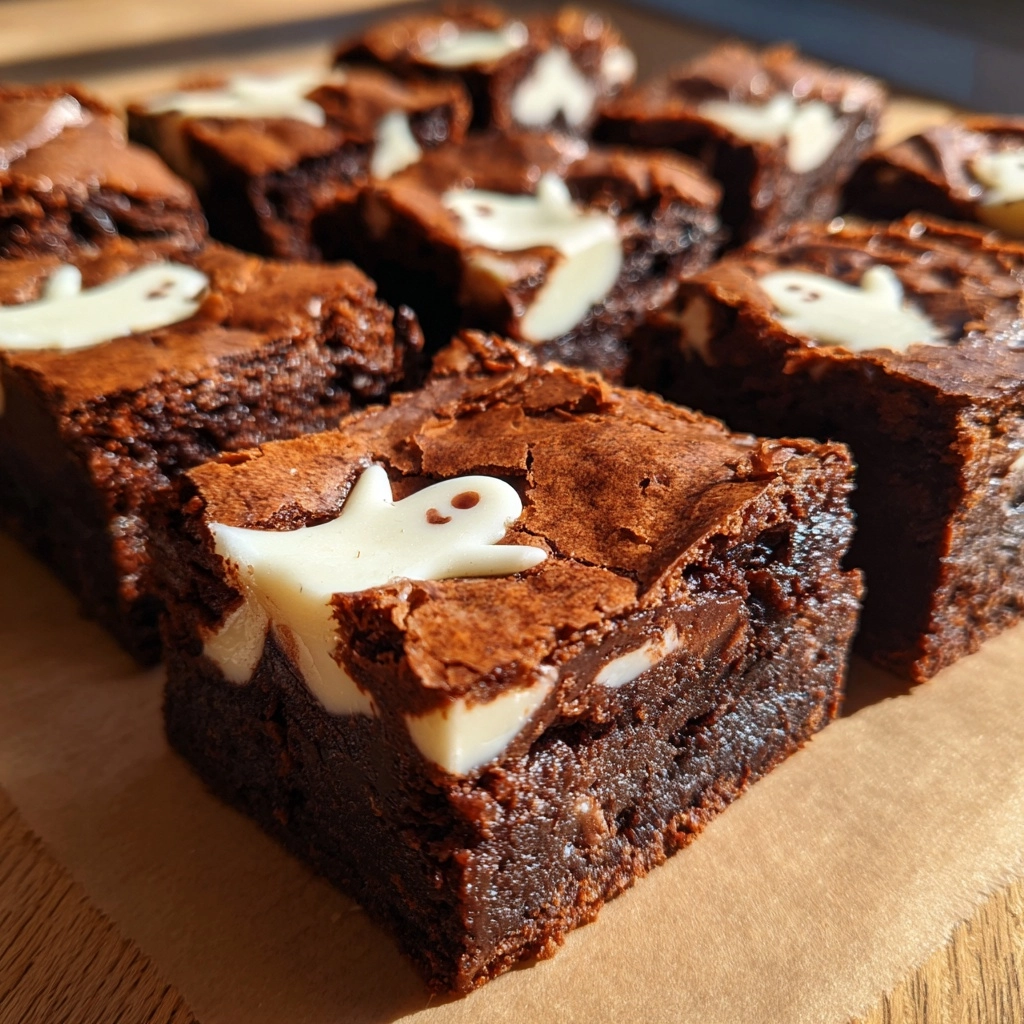
Step 7: Decorate the Brownies
Now for the fun part—decorating! Melt the white chocolate in a microwave-safe bowl, stirring every 30 seconds until smooth. Dip each brownie ghost into the melted chocolate, coating it well. Use chocolate chips to create eyes on each ghost. Get creative! You can even add little smiles if you want to make them extra cute.
Tips for Success
- Make sure your butter is fully melted for a smooth batter.
- Use room temperature eggs for better mixing.
- Don’t overmix the batter; it keeps the brownies fudgy.
- Let the brownies cool completely before cutting for clean edges.
- Experiment with different chocolate types for unique flavors.
Equipment Needed
- 9×13 inch baking pan: A standard size for brownies. You can use an 8×8 inch pan for thicker brownies.
- Mixing bowls: A large bowl for wet ingredients and a medium bowl for dry. Any size will do!
- Whisk: Perfect for mixing dry ingredients. A fork works in a pinch.
- Spatula: Great for spreading the batter evenly. A wooden spoon can also do the trick.
- Cookie cutter: For ghost shapes. A knife can be used for cutting if you don’t have one.
Variations of Spooky Ghost Brownies
- Nutty Ghost Brownies: Add chopped walnuts or pecans to the batter for a delightful crunch.
- Minty Ghost Brownies: Incorporate a few drops of peppermint extract into the batter for a refreshing twist.
- Gluten-Free Ghost Brownies: Substitute all-purpose flour with a gluten-free flour blend for a safe option.
- Vegan Ghost Brownies: Replace eggs with flaxseed meal and use dairy-free chocolate for a plant-based treat.
- Spicy Ghost Brownies: Add a pinch of cayenne pepper or cinnamon to the batter for a surprising kick!
Serving Suggestions for Spooky Ghost Brownies
- Pair with a scoop of vanilla ice cream for a delightful contrast.
- Serve alongside a warm cup of hot cocoa or apple cider for a cozy treat.
- Present on a spooky-themed platter with Halloween decorations for added flair.
- Dust with powdered sugar for a ghostly effect before serving.
- Offer with a side of fresh fruit for a balanced dessert option.
FAQs about Spooky Ghost Brownies
As you embark on your spooky baking adventure, you might have a few questions about these delightful treats. Here are some common queries I’ve encountered, along with helpful answers to guide you through making the best Spooky Ghost Brownies!
Can I make these brownies ahead of time?
Absolutely! You can bake the brownies a day in advance. Just store them in an airtight container at room temperature. Decorate them the day you plan to serve for the freshest look!
What can I use instead of white chocolate for coating?
If white chocolate isn’t your thing, you can use candy melts or even dark chocolate. Just melt it down the same way, and you’ll still achieve that ghostly appearance!
How do I store leftover brownies?
Store any leftover Spooky Ghost Brownies in an airtight container. They’ll stay fresh for up to three days. If you want to keep them longer, consider freezing them!
Can I customize the decorations?
Of course! Get creative with your decorations. Use colored icing for different ghost expressions or add sprinkles for a festive touch. The sky’s the limit!
What if my brownies turn out too cakey?
If your brownies are too cakey, it might be due to overmixing or baking them too long. Next time, mix just until combined and keep an eye on the baking time. You want that fudgy texture!
Final Thoughts
Making Spooky Ghost Brownies is more than just baking; it’s about creating memories with loved ones. The joy of seeing those little ghostly treats come to life brings a smile to my face every Halloween. Whether you’re sharing them at a party or enjoying them with your family, these brownies are sure to spark laughter and delight. Plus, the simplicity of the recipe means you can whip them up even on the busiest days. So, roll up your sleeves, gather your ingredients, and let the spooky fun begin! Happy baking, and may your Halloween be filled with sweetness!

Spooky Ghost Brownies That Will Delight Your Halloween!
- Total Time: 50 minutes
- Yield: 24 brownies 1x
- Diet: Vegetarian
Description
Deliciously spooky brownies decorated to look like ghosts, perfect for Halloween festivities.
Ingredients
- 1 cup unsalted butter
- 2 cups granulated sugar
- 4 large eggs
- 1 teaspoon vanilla extract
- 1 cup all-purpose flour
- 1 cup cocoa powder
- 1/2 teaspoon salt
- 1/2 teaspoon baking powder
- White chocolate for melting
- Chocolate chips for eyes
Instructions
- Preheat the oven to 350°F (175°C) and grease a 9×13 inch baking pan.
- In a large bowl, melt the butter and mix in the sugar until well combined.
- Add the eggs one at a time, mixing well after each addition, then stir in the vanilla extract.
- In another bowl, whisk together the flour, cocoa powder, salt, and baking powder.
- Gradually add the dry ingredients to the wet ingredients, mixing until just combined.
- Pour the brownie batter into the prepared baking pan and spread evenly.
- Bake for 25-30 minutes or until a toothpick inserted in the center comes out clean.
- Let the brownies cool completely before cutting them into ghost shapes.
- Melt the white chocolate and dip the brownies to coat them.
- Use chocolate chips to create eyes on each ghost brownie.
Notes
- For a more intense chocolate flavor, use dark cocoa powder.
- Make sure the brownies are completely cool before dipping in chocolate to avoid melting.
- Store leftovers in an airtight container for up to 3 days.
- Prep Time: 20 minutes
- Cook Time: 30 minutes
- Category: Dessert
- Method: Baking
- Cuisine: American
Nutrition
- Serving Size: 1 brownie
- Calories: 200
- Sugar: 18g
- Sodium: 150mg
- Fat: 10g
- Saturated Fat: 6g
- Unsaturated Fat: 4g
- Trans Fat: 0g
- Carbohydrates: 25g
- Fiber: 2g
- Protein: 3g
- Cholesterol: 50mg