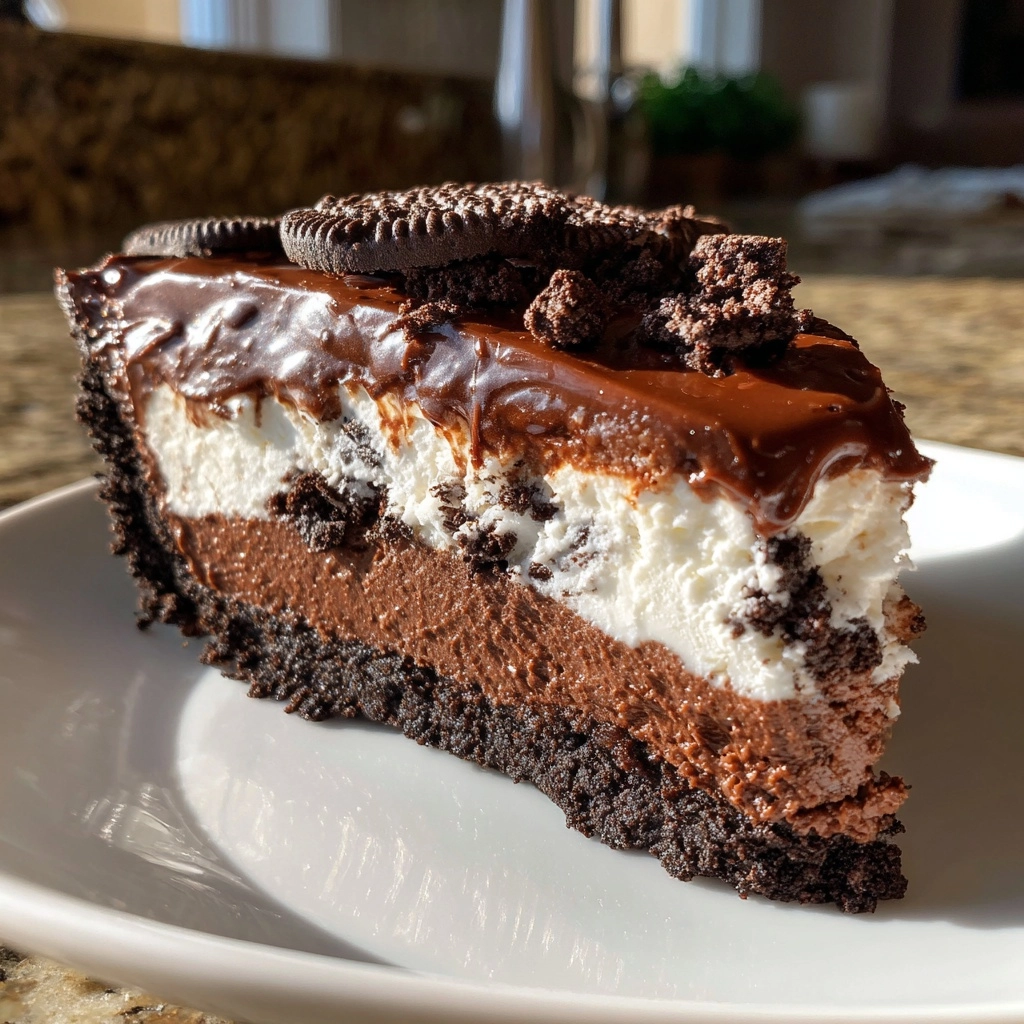
Introduction to Oreo Mud Pie – No-Bake Oreo Dessert – My Homemade Recipe
Hey there, fellow dessert lovers! If you’re anything like me, you know that life can get pretty hectic. That’s why I’m excited to share my Oreo Mud Pie – No-Bake Oreo Dessert recipe with you. This delightful treat is not only easy to whip up, but it also requires zero baking! Perfect for busy days or when you want to impress your loved ones without spending hours in the kitchen. Trust me, this creamy, chocolatey delight will have everyone asking for seconds. Let’s dive into this delicious adventure together!
Why You’ll Love This Oreo Mud Pie – No-Bake Oreo Dessert
This Oreo Mud Pie – No-Bake Oreo Dessert is a game-changer for busy moms and professionals alike. It’s incredibly easy to make, taking just 20 minutes of prep time. Plus, the layers of creamy filling and crunchy Oreos create a taste sensation that’s hard to resist. Whether you’re hosting a gathering or just treating yourself, this dessert is sure to bring smiles and satisfaction to everyone at the table!
Ingredients for Oreo Mud Pie – No-Bake Oreo Dessert
Gathering the right ingredients is the first step to creating this delightful Oreo Mud Pie – No-Bake Oreo Dessert. Here’s what you’ll need:
- Oreo cookies: The star of the show! These chocolatey cookies provide the perfect base and flavor.
- Unsalted butter: This helps bind the crushed Oreos together for a sturdy crust. Unsalted is best to control the saltiness.
- Cream cheese: Softened cream cheese adds a rich, creamy texture to the filling. It’s the secret to that luscious layer!
- Powdered sugar: This sweetens the cream cheese mixture and gives it a smooth consistency. It dissolves easily, making it perfect for desserts.
- Whipped topping: Light and fluffy, this adds volume and a delightful creaminess to the filling. You can use store-bought or homemade.
- Chocolate pudding mix: This brings a rich chocolate flavor to the pie. It’s quick and easy, making it a great choice for busy days.
- Milk: Essential for preparing the pudding mix. Whole milk gives the best creaminess, but you can use any type you prefer.
- Additional crushed Oreos: For topping! They add a nice crunch and make the pie look extra tempting.
For those who want to switch things up, consider using double stuffed Oreos for an even richer flavor. You can also make this dessert a day in advance, which is a lifesaver for busy schedules. If you have leftovers, they can be stored in the refrigerator for up to three days. Exact measurements for each ingredient can be found at the bottom of the article, ready for printing!
How to Make Oreo Mud Pie – No-Bake Oreo Dessert
Now that we have our ingredients ready, let’s dive into the fun part—making this Oreo Mud Pie – No-Bake Oreo Dessert! Follow these simple steps, and you’ll have a delicious treat in no time.
Step 1: Prepare the Oreo Crust
Start by combining the crushed Oreo cookies with the melted butter in a mixing bowl. Use a fork to mix them until the crumbs are evenly coated. The mixture should resemble wet sand. Next, press this mixture firmly into the bottom of a 9-inch pie pan. Make sure to create an even layer, as this will be the base of your pie. A sturdy crust is key to holding all those delicious layers!
Step 2: Make the Cream Cheese Filling
In a separate bowl, beat the softened cream cheese and powdered sugar together until smooth and creamy. I like to use an electric mixer for this, but a whisk works too if you’re feeling strong! Once it’s well combined, gently fold in the whipped topping. This adds a lightness to the filling that balances the richness of the cream cheese. You want it to be fluffy and airy, so be gentle!
Step 3: Layer the Cream Cheese Mixture
Now it’s time to spread that luscious cream cheese mixture over the Oreo crust. Use a spatula to evenly distribute it, making sure to reach the edges. This layer is where the magic happens, so take your time to make it look pretty. A smooth surface will make the next layer even more appealing!
Step 4: Prepare the Chocolate Pudding Layer
In another bowl, whisk together the chocolate pudding mix and milk. Keep whisking until the mixture thickens up nicely. This usually takes just a couple of minutes. The chocolate pudding adds a rich, decadent layer that complements the cream cheese perfectly. Once thickened, you’re ready to pour!
Step 5: Assemble the Pie
Carefully pour the chocolate pudding over the cream cheese layer. Use a spatula to spread it evenly, ensuring every bite has that delicious chocolate flavor. To finish it off, top with additional whipped topping and sprinkle crushed Oreos on top. This not only adds a nice crunch but also makes your pie look irresistible!
Step 6: Chill and Serve
Finally, it’s time to let your masterpiece chill in the refrigerator. Cover it with plastic wrap and let it set for at least 4 hours. This step is crucial, as it allows the layers to meld together beautifully. Once set, slice it up and serve chilled. Get ready for the compliments to roll in!
Tips for Success
- Use a food processor to crush Oreos quickly and evenly.
- Let the cream cheese sit at room temperature for easier mixing.
- For a firmer pie, chill it overnight; the flavors deepen beautifully.
- Experiment with different toppings like chocolate shavings or nuts.
- Keep a spatula handy for smooth layering and spreading.
Equipment Needed
- 9-inch pie pan: A standard pie dish works well, but a springform pan is great for easy removal.
- Mixing bowls: Use a variety of sizes for mixing and layering.
- Electric mixer or whisk: An electric mixer speeds up the process, but a whisk is perfect for a workout!
- Spatula: Essential for spreading and smoothing layers.
- Measuring cups: Handy for precise ingredient measurements.
Variations of Oreo Mud Pie – No-Bake Oreo Dessert
- Peanut Butter Oreo Mud Pie: Add a layer of creamy peanut butter to the cream cheese filling for a nutty twist.
- Mint Chocolate Oreo Mud Pie: Use mint-flavored Oreos and add a few drops of peppermint extract to the cream cheese mixture for a refreshing flavor.
- Gluten-Free Option: Substitute regular Oreos with gluten-free Oreos to make this dessert suitable for gluten-sensitive friends.
- Fruit Layer: Add a layer of fresh raspberries or strawberries between the cream cheese and chocolate pudding layers for a fruity surprise.
- Vegan Version: Use vegan cream cheese, coconut whipped cream, and dairy-free chocolate pudding mix for a plant-based treat.
Serving Suggestions for Oreo Mud Pie – No-Bake Oreo Dessert
- Pair with a scoop of vanilla ice cream for an extra creamy experience.
- Serve alongside fresh berries for a pop of color and freshness.
- Drizzle with chocolate or caramel sauce for added indulgence.
- Garnish with mint leaves for a refreshing touch.
- Present in individual cups for a fun, personal serving style.
FAQs about Oreo Mud Pie – No-Bake Oreo Dessert
Can I make this Oreo Mud Pie – No-Bake Oreo Dessert ahead of time?
Absolutely! In fact, making it a day in advance allows the flavors to meld beautifully. Just cover it well and store it in the refrigerator until you’re ready to serve.
How long does the Oreo Mud Pie last in the fridge?
This delicious dessert can be stored in the refrigerator for up to three days. Just make sure to keep it covered to maintain its freshness!
Can I use different flavors of pudding for this recipe?
Yes! While chocolate pudding is a classic choice, you can experiment with vanilla or even butterscotch pudding for a unique twist on this Oreo Mud Pie – No-Bake Oreo Dessert.
Is there a way to make this dessert healthier?
Sure! You can use reduced-fat cream cheese and sugar-free pudding mix to lighten it up. Just remember, the taste might vary slightly, but it’ll still be delicious!
What can I use instead of whipped topping?
If you prefer a homemade touch, you can whip up some heavy cream with a bit of sugar and vanilla extract. It’s a great alternative that adds a lovely freshness to your Oreo Mud Pie!
Final Thoughts on Oreo Mud Pie – No-Bake Oreo Dessert
Creating this Oreo Mud Pie – No-Bake Oreo Dessert has been a delightful journey filled with sweet memories. It’s more than just a dessert; it’s a way to bring family and friends together, sharing laughter and joy over each creamy slice. The ease of preparation means you can focus on what truly matters—making connections and enjoying life’s little moments. Whether it’s a special occasion or a simple weeknight treat, this pie is sure to impress. So, roll up your sleeves, gather your loved ones, and indulge in this delicious creation. You won’t regret it!

Oreo Mud Pie: Discover My Easy No-Bake Oreo Dessert!
- Total Time: 4 hours 20 minutes
- Yield: 8 servings 1x
- Diet: Vegetarian
Description
A delicious and easy no-bake Oreo dessert that combines layers of creamy filling and crushed Oreos for a delightful treat.
Ingredients
- 24 Oreo cookies, crushed
- 1/2 cup unsalted butter, melted
- 1 package (8 oz) cream cheese, softened
- 1 cup powdered sugar
- 1 cup whipped topping
- 1 cup chocolate pudding mix
- 2 cups milk
- Additional crushed Oreos for topping
Instructions
- In a bowl, combine crushed Oreo cookies and melted butter. Mix well.
- Press the mixture into the bottom of a 9-inch pie pan to form the crust.
- In another bowl, beat the cream cheese and powdered sugar until smooth.
- Fold in the whipped topping until well combined.
- Spread the cream cheese mixture over the Oreo crust.
- In a separate bowl, whisk together the chocolate pudding mix and milk until thickened.
- Pour the chocolate pudding over the cream cheese layer.
- Top with additional whipped topping and crushed Oreos.
- Refrigerate for at least 4 hours or until set.
- Slice and serve chilled.
Notes
- For a richer flavor, use double stuffed Oreos.
- Can be made a day in advance for convenience.
- Store leftovers in the refrigerator for up to 3 days.
- Prep Time: 20 minutes
- Cook Time: 0 minutes
- Category: Dessert
- Method: No-Bake
- Cuisine: American
Nutrition
- Serving Size: 1 slice
- Calories: 350
- Sugar: 25g
- Sodium: 200mg
- Fat: 20g
- Saturated Fat: 10g
- Unsaturated Fat: 5g
- Trans Fat: 0g
- Carbohydrates: 40g
- Fiber: 2g
- Protein: 4g
- Cholesterol: 30mg
