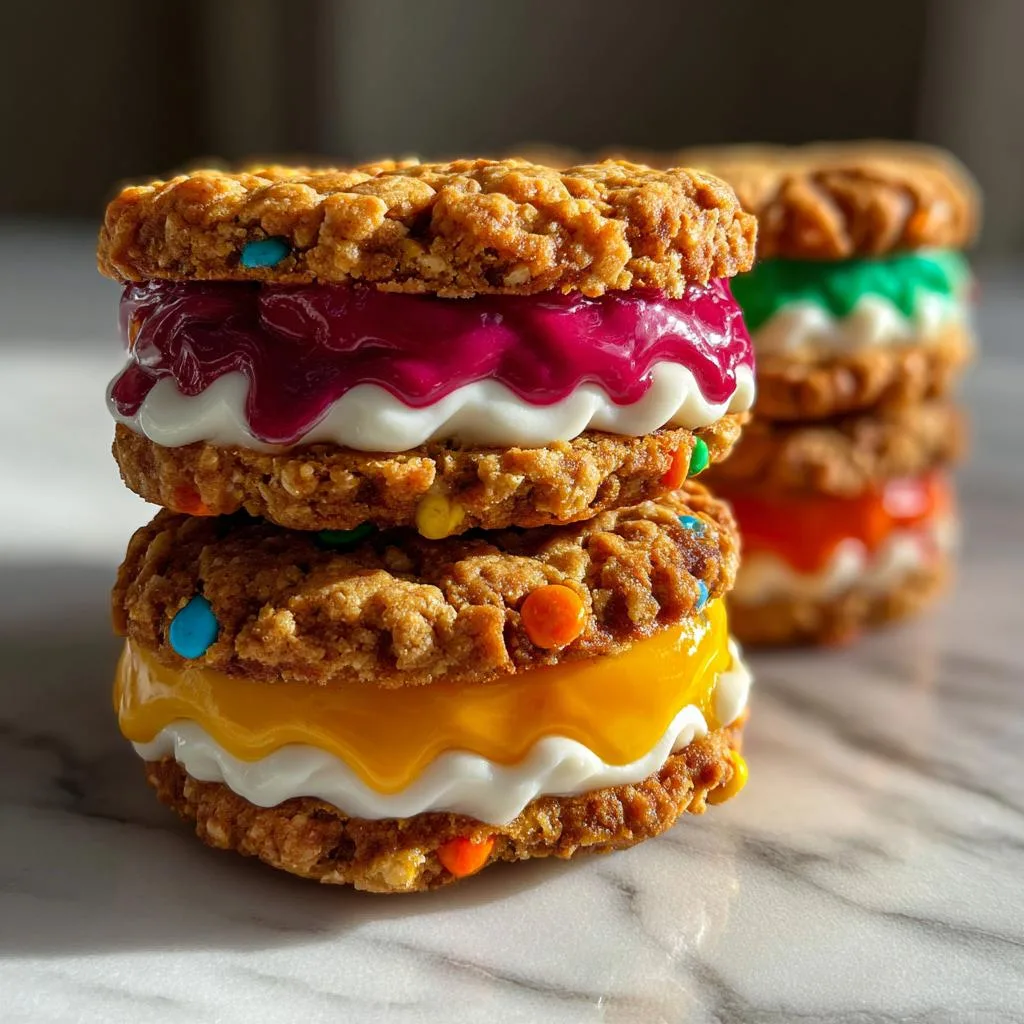
Introduction to Cute Monster Cookie Sandwiches
As the leaves turn and the air gets crisp, I find myself craving fun, festive treats that bring a smile to my family’s faces. That’s where these Cute Monster Cookie Sandwiches come in! They’re not just adorable; they’re a quick solution for busy days when you want to whip up something special without turning on the oven. With a creamy filling and playful decorations, these no-bake fall desserts are perfect for gatherings or just a cozy night in. Trust me, your loved ones will be delighted by these little monsters!
Why You’ll Love This Cute Monster Cookie Sandwiches
These Cute Monster Cookie Sandwiches are a dream come true for busy moms and professionals alike. They come together in just 30 minutes, making them a perfect last-minute treat. Plus, they’re no-bake, so you can skip the oven and the mess! The combination of creamy filling and chewy oats creates a delightful taste that will have everyone asking for seconds. Trust me, these little monsters are sure to impress!
Ingredients for Cute Monster Cookie Sandwiches
Gathering the right ingredients is the first step to creating these delightful Cute Monster Cookie Sandwiches. Here’s what you’ll need:
- Peanut Butter: This creamy base adds richness and flavor. You can swap it for almond butter if you need a nut-free option.
- Honey: A natural sweetener that binds everything together while adding a touch of sweetness.
- Rolled Oats: These provide a chewy texture and are a great source of fiber. They help keep the cookies hearty.
- Mini Chocolate Chips: These little morsels bring a burst of chocolatey goodness to each bite.
- Candy Eyes: The fun part! These make your cookies look like adorable monsters, perfect for a festive touch.
- Colorful Sprinkles: Add a pop of color and whimsy to your monster faces. They’re a must for any fun dessert!
- Cream Cheese: This creamy filling is what makes the sandwiches irresistible. It adds a tangy flavor that balances the sweetness.
- Powdered Sugar: This sweetens the cream cheese filling and gives it a smooth texture.
For exact measurements, check the bottom of the article where you can find everything listed for easy printing. Now, let’s get ready to create some monster magic!
How to Make Cute Monster Cookie Sandwiches
Now that we have our ingredients ready, let’s dive into the fun part: making these Cute Monster Cookie Sandwiches! Follow these simple steps, and you’ll have a batch of adorable treats in no time.
Step 1: Mix the Base
Start by grabbing a large bowl. Add the peanut butter and honey, then mix them together until smooth. This creamy base is crucial for the cookies. It holds everything together and gives them that delicious flavor. Trust me, a well-mixed base makes all the difference!
Step 2: Add Oats and Chocolate Chips
Next, it’s time to incorporate the rolled oats and mini chocolate chips. Gently fold them into the peanut butter mixture. Make sure everything is evenly distributed. You want every bite to be packed with chewy oats and little bursts of chocolatey goodness. It’s like a party in your mouth!
Step 3: Shape the Cookies
Now comes the fun part—shaping the cookies! Take small amounts of the mixture and roll them into balls. Then, flatten them slightly to form cookie shapes. Place them on a baking sheet lined with parchment paper. Don’t worry about making them perfect; these monsters are meant to be a little quirky!
Step 4: Prepare the Cream Cheese Filling
In another bowl, beat the cream cheese and powdered sugar together until creamy. This filling should be smooth and luscious. It’s the secret weapon that makes these sandwiches irresistible. The tangy cream cheese balances the sweetness perfectly, creating a delightful contrast.
Step 5: Assemble the Sandwiches
Now it’s time to bring it all together! Take half of your cookie shapes and spread a generous layer of the cream cheese mixture on top. Then, place the remaining cookies on top to create sandwiches. Press them down gently to ensure they stick together. You’re almost there!
Step 6: Decorate Your Monsters
Let’s get creative! Use candy eyes and colorful sprinkles to decorate your sandwiches. Place the candy eyes on top to give your cookies their monster faces. Sprinkle some colorful sprinkles around for extra flair. This is where the fun really shines, so let your imagination run wild!
Step 7: Chill and Serve
Finally, pop the assembled sandwiches in the refrigerator for at least 30 minutes. Chilling them helps the filling set and makes the cookies easier to handle. Plus, it enhances the flavors. Once they’re chilled, they’re ready to be devoured. Enjoy your adorable Cute Monster Cookie Sandwiches!
Tips for Success
- Use natural peanut butter for a creamier texture.
- Chill the cookies longer for a firmer filling.
- Mix in some chopped nuts for added crunch.
- Experiment with different sprinkles for unique monster designs.
- Make a double batch for parties; they disappear fast!
Equipment Needed
- Large mixing bowl: A sturdy bowl for combining ingredients.
- Spatula: Perfect for mixing and spreading the cream cheese filling.
- Baking sheet: Use a parchment-lined sheet for easy cookie shaping.
- Measuring cups: Essential for accurate ingredient portions.
- Refrigerator: To chill your monster sandwiches before serving.
Variations of Cute Monster Cookie Sandwiches
- Nut-Free Version: Swap peanut butter for sunflower seed butter to make these sandwiches safe for nut allergies.
- Vegan Delight: Use maple syrup instead of honey and a dairy-free cream cheese alternative for a vegan-friendly treat.
- Chocolate Lovers: Add cocoa powder to the cookie mixture for a chocolatey twist that will satisfy any sweet tooth.
- Fruit-Filled Monsters: Mix in dried fruits like cranberries or raisins for a chewy texture and a burst of flavor.
- Spiced Up: Add a pinch of cinnamon or pumpkin spice to the cookie mixture for a warm, fall-inspired flavor.
Serving Suggestions for Cute Monster Cookie Sandwiches
- Pair with a glass of cold milk for a classic treat.
- Serve alongside fresh fruit for a balanced snack.
- Present on a colorful platter for a festive touch.
- Include a scoop of vanilla ice cream for an indulgent dessert.
- Perfect for Halloween parties or school events!
FAQs about Cute Monster Cookie Sandwiches
Can I make these Cute Monster Cookie Sandwiches ahead of time?
Absolutely! These no-bake fall desserts can be made a day in advance. Just store them in an airtight container in the refrigerator. They’ll be just as delicious when you’re ready to serve them!
What can I use instead of peanut butter?
If you need a nut-free option, almond butter or sunflower seed butter works great! Both will give you a similar creamy texture without the nuts.
How long do these sandwiches last in the fridge?
These adorable sandwiches can last up to a week in the refrigerator. Just make sure they’re stored in an airtight container to keep them fresh!
Can I freeze Cute Monster Cookie Sandwiches?
Yes, you can freeze them! Just wrap each sandwich individually in plastic wrap and place them in a freezer-safe container. They’ll be good for up to three months. Just thaw them in the fridge before serving.
What’s the best way to decorate my monster sandwiches?
Get creative! Use candy eyes, colorful sprinkles, or even edible glitter for a fun twist. Let your kids help with the decorating for an extra dose of fun!
Final Thoughts
Creating these Cute Monster Cookie Sandwiches is more than just making a dessert; it’s about bringing joy and laughter to your kitchen. The smiles on my family’s faces as they devour these adorable treats are priceless. They’re perfect for any occasion, from cozy family nights to festive gatherings. Plus, the no-bake aspect means less time in the kitchen and more time enjoying the moment. So, gather your loved ones, unleash your creativity, and make some monster magic together. Trust me, these little delights will become a cherished tradition in your home!
Print
Cute Monster Cookie Sandwiches: Easy No-Bake Fall Treats!
- Total Time: 30 minutes
- Yield: 12 sandwiches 1x
- Diet: Vegetarian
Description
Cute Monster Cookie Sandwiches are fun, no-bake treats perfect for fall. These delightful cookies are filled with a creamy center and decorated to look like adorable monsters.
Ingredients
- 1 cup peanut butter
- 1/2 cup honey
- 2 cups rolled oats
- 1/2 cup mini chocolate chips
- 1/2 cup candy eyes
- 1/4 cup colorful sprinkles
- 1/2 cup cream cheese
- 1/4 cup powdered sugar
Instructions
- In a large bowl, mix peanut butter and honey until smooth.
- Add rolled oats and mini chocolate chips, stirring until well combined.
- Form the mixture into small cookie shapes and place them on a baking sheet.
- In another bowl, beat cream cheese and powdered sugar until creamy.
- Spread a layer of the cream cheese mixture on half of the cookies.
- Top with the remaining cookies to create sandwiches.
- Decorate the sandwiches with candy eyes and sprinkles to create monster faces.
- Chill in the refrigerator for at least 30 minutes before serving.
Notes
- Feel free to substitute almond butter for a nut-free version.
- Store leftovers in an airtight container in the refrigerator.
- These can be made ahead of time for parties or gatherings.
- Prep Time: 20 minutes
- Cook Time: 0 minutes
- Category: Dessert
- Method: No-Bake
- Cuisine: American
Nutrition
- Serving Size: 1 sandwich
- Calories: 180
- Sugar: 10g
- Sodium: 50mg
- Fat: 8g
- Saturated Fat: 2g
- Unsaturated Fat: 6g
- Trans Fat: 0g
- Carbohydrates: 24g
- Fiber: 3g
- Protein: 4g
- Cholesterol: 5mg