
Introduction to Cheesecake Stuffed Baked Apples
As a busy mom, I know how precious time can be, especially when it comes to preparing desserts. That’s why I absolutely adore these Cheesecake Stuffed Baked Apples! They’re not just a treat; they’re a delightful fusion of creamy cheesecake and sweet, tender apples that will impress your loved ones without taking hours in the kitchen. Imagine the joy on your family’s faces as they dig into these warm, gooey delights. This recipe is perfect for a quick weeknight dessert or a special occasion, making it a must-try for anyone looking to add a little sweetness to their day!
Why You’ll Love This Cheesecake Stuffed Baked Apples
These Cheesecake Stuffed Baked Apples are a game-changer for busy days! They come together in just 45 minutes, making them a quick and satisfying dessert option. The combination of creamy cheesecake and warm, baked apples creates a taste sensation that’s hard to resist. Plus, they’re versatile enough to please even the pickiest eaters. Trust me, once you try them, they’ll become a staple in your dessert rotation!
Ingredients for Cheesecake Stuffed Baked Apples
Gathering the right ingredients is the first step to creating these delightful Cheesecake Stuffed Baked Apples. Here’s what you’ll need:
- Medium-sized apples: Choose firm apples like Granny Smith or Honeycrisp for the best texture and flavor.
- Cream cheese: This is the star of the show! It gives the filling that rich, creamy texture we all love.
- Granulated sugar: A touch of sweetness to balance the tartness of the apples. You can adjust this based on your taste.
- Vanilla extract: Adds a warm, comforting flavor that enhances the cheesecake filling.
- Cinnamon: This spice brings warmth and a hint of nostalgia, making every bite feel like a cozy hug.
- Crushed graham crackers: These add a delightful crunch and mimic the crust of a traditional cheesecake.
- Chopped nuts (optional): Walnuts or pecans can add a lovely texture and nutty flavor, but feel free to skip them if you prefer.
- Caramel sauce: Drizzling this on top before serving elevates the dessert to a whole new level of indulgence!
For exact measurements, check the bottom of the article where you can find everything listed for easy printing. Happy cooking!
How to Make Cheesecake Stuffed Baked Apples
Now that you have your ingredients ready, let’s dive into the fun part—making these Cheesecake Stuffed Baked Apples! Follow these simple steps, and you’ll have a delicious dessert that will wow your family and friends.
Step 1: Preheat the Oven
First things first, preheat your oven to 350°F (175°C). Preheating is crucial because it ensures even cooking. You want those apples to bake perfectly, softening just right while the cheesecake filling gets all warm and gooey.
Step 2: Prepare the Apples
Next, grab your apples and core them. Use a sharp knife or an apple corer to remove the center, creating a hollow space. Be careful not to cut through the bottom! You want to create a little bowl for that luscious cheesecake filling.
Step 3: Make the Cheesecake Filling
In a mixing bowl, combine the softened cream cheese, granulated sugar, vanilla extract, and cinnamon. Mix until smooth and creamy. The texture should be velvety, almost like a cloud! This filling is what makes these baked apples taste like a slice of cheesecake.
Step 4: Add Crunch with Graham Crackers and Nuts
Now, it’s time to fold in the crushed graham crackers and any chopped nuts you’re using. Gently mix them into the cheesecake filling. This adds a delightful crunch and mimics the crust of a traditional cheesecake. It’s like a little surprise in every bite!
Step 5: Stuff the Apples
Carefully stuff each hollowed apple with the cheesecake mixture. Don’t overfill them; leave a little space at the top. The filling will expand as it bakes, and you don’t want it spilling over. Think of it as tucking your apples in for a cozy bake!
Step 6: Bake the Apples
Place the stuffed apples in a baking dish and cover them with foil. This helps them steam and become tender. Bake for 25-30 minutes, or until the apples are soft. You can check for tenderness by gently poking them with a fork. They should be soft but still hold their shape.
Step 7: Drizzle with Caramel
Once your apples are out of the oven, it’s time for the finishing touch! Drizzle warm caramel sauce over the top of each apple. This adds a rich sweetness that complements the creamy filling perfectly. It’s the cherry on top of this delightful dessert!
Tips for Success
- Choose apples that are firm and not overly ripe for the best texture.
- Let the cream cheese soften at room temperature for easier mixing.
- Don’t skip the foil cover while baking; it keeps the apples moist.
- Experiment with different nuts or spices to customize the flavor.
- Serve immediately for the best taste, but they can be stored in the fridge for a day.
Equipment Needed
- Baking dish: A glass or ceramic dish works well, but any oven-safe dish will do.
- Apple corer: If you don’t have one, a sharp knife can do the trick.
- Mixing bowl: Any large bowl will suffice for mixing the cheesecake filling.
- Foil: Use aluminum foil to cover the dish while baking.
- Measuring cups and spoons: Essential for accurate ingredient measurements.
Variations
- Chocolate Lovers: Add cocoa powder to the cheesecake filling for a rich chocolate flavor.
- Fruit Fusion: Mix in some chopped berries or diced peaches into the filling for a fruity twist.
- Nut-Free Option: Simply omit the nuts or substitute with seeds like sunflower or pumpkin seeds.
- Spiced Up: Experiment with spices like nutmeg or ginger for a warm, spiced flavor profile.
- Vegan Version: Use vegan cream cheese and maple syrup instead of sugar for a plant-based treat.
Serving Suggestions
- Pair with a scoop of vanilla ice cream for a delightful contrast in temperature.
- Serve alongside a warm cup of spiced chai or coffee to enhance the flavors.
- Garnish with fresh mint leaves for a pop of color and freshness.
- Present on a beautiful platter, drizzled with extra caramel for an elegant touch.
FAQs about Cheesecake Stuffed Baked Apples
Can I use different types of apples for this recipe?
Absolutely! While I love using Granny Smith or Honeycrisp, you can experiment with any firm apple variety. Just make sure they hold their shape while baking.
How do I store leftover Cheesecake Stuffed Baked Apples?
Store any leftovers in an airtight container in the fridge for up to a day. Just reheat them in the microwave for a quick treat!
Can I make the filling ahead of time?
Yes! You can prepare the cheesecake filling a day in advance. Just keep it covered in the fridge until you’re ready to stuff the apples.
What can I substitute for cream cheese?
If you’re looking for a lighter option, low-fat cream cheese works well. For a dairy-free alternative, try using vegan cream cheese instead!
Can I freeze Cheesecake Stuffed Baked Apples?
While I recommend enjoying them fresh, you can freeze the stuffed apples before baking. Just thaw and bake when you’re ready for a delicious dessert!
Final Thoughts
Making Cheesecake Stuffed Baked Apples is more than just a cooking experience; it’s a chance to create sweet memories with your loved ones. The aroma that fills your kitchen as they bake is simply irresistible, wrapping you in a warm embrace. Each bite is a delightful blend of creamy cheesecake and tender apple, making it a dessert that feels both indulgent and comforting. Whether it’s a busy weeknight or a special gathering, these baked apples are sure to bring smiles and satisfaction. So, roll up your sleeves and enjoy the joy of baking this delightful treat!
Print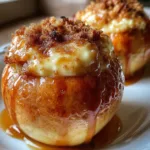
Cheesecake Stuffed Baked Apples: A Delicious Fusion Recipe!
- Total Time: 45 minutes
- Yield: 4 servings 1x
- Diet: Vegetarian
Description
Cheesecake Stuffed Baked Apples are a delightful dessert that combines the flavors of creamy cheesecake with the natural sweetness of baked apples, creating a perfect fusion of taste and texture.
Ingredients
- 4 medium-sized apples
- 8 oz cream cheese, softened
- 1/2 cup granulated sugar
- 1 tsp vanilla extract
- 1/2 tsp cinnamon
- 1/4 cup crushed graham crackers
- 1/4 cup chopped nuts (optional)
- 1/4 cup caramel sauce (for drizzling)
Instructions
- Preheat the oven to 350°F (175°C).
- Core the apples and create a hollow space in the center.
- In a mixing bowl, combine cream cheese, sugar, vanilla extract, and cinnamon until smooth.
- Fold in crushed graham crackers and chopped nuts.
- Stuff the mixture into the hollowed apples.
- Place the stuffed apples in a baking dish and cover with foil.
- Bake for 25-30 minutes or until the apples are tender.
- Remove from the oven and drizzle with caramel sauce before serving.
Notes
- For a healthier option, use low-fat cream cheese.
- Adjust the sweetness by adding more or less sugar based on your preference.
- Serve warm for the best flavor experience.
- Prep Time: 15 minutes
- Cook Time: 30 minutes
- Category: Dessert
- Method: Baking
- Cuisine: American
Nutrition
- Serving Size: 1 stuffed apple
- Calories: 250
- Sugar: 20g
- Sodium: 150mg
- Fat: 10g
- Saturated Fat: 5g
- Unsaturated Fat: 3g
- Trans Fat: 0g
- Carbohydrates: 35g
- Fiber: 3g
- Protein: 4g
- Cholesterol: 30mg