
Introduction to Red Velvet OREO Brownies
As a busy mom, I know how precious time can be, especially when it comes to whipping up something delicious. That’s why I absolutely adore these Red Velvet OREO Brownies! They’re not just a treat; they’re a delightful way to bring a smile to your loved ones’ faces. Imagine the rich, velvety flavor of red velvet cake combined with the satisfying crunch of OREO cookies. It’s a quick solution for a hectic day or a sweet surprise for a gathering. Trust me, these brownies will become your go-to dessert for any occasion!
Why You’ll Love This Red Velvet OREO Brownies
These Red Velvet OREO Brownies are a dream come true for busy moms and professionals alike. They’re incredibly easy to make, taking just 15 minutes of prep time. The taste? Oh, it’s a heavenly blend of rich chocolatey goodness and creamy cream cheese swirls. Plus, they’re perfect for any occasion, whether it’s a family gathering or a cozy night in. You’ll love how quickly they disappear!
Ingredients for Red Velvet OREO Brownies
Gathering the right ingredients is the first step to creating these scrumptious Red Velvet OREO Brownies. Here’s what you’ll need:
- Red velvet cake mix: This is the star of the show, providing that signature flavor and color.
- Vegetable oil: It keeps the brownies moist and adds richness to the texture.
- Large eggs: Eggs help bind everything together, giving the brownies a lovely structure.
- Water: Just a bit of water helps to bring the batter together, making it smooth and easy to mix.
- OREO cookies: Chopped OREOs add a delightful crunch and a burst of chocolatey goodness.
- Cream cheese: This creamy ingredient creates a luscious swirl that complements the brownies perfectly.
- Powdered sugar: A touch of sweetness to balance the tanginess of the cream cheese.
- Vanilla extract: This adds a warm, aromatic flavor that enhances the overall taste.
For those looking to elevate the flavor, consider adding chocolate chips to the batter for an extra chocolatey kick. You can find all the exact measurements at the bottom of the article, ready for printing!
How to Make Red Velvet OREO Brownies
Step 1: Preheat and Prepare
First things first, preheat your oven to 350°F (175°C). While it warms up, grab a 9×13 inch baking pan and grease it well. This step is crucial to ensure your brownies come out easily without sticking. Trust me, no one wants a brownie disaster!
Step 2: Mix the Batter
In a large bowl, combine the red velvet cake mix, vegetable oil, eggs, and water. Stir everything together until it’s well blended. The batter should be smooth and slightly thick. This is where the magic begins, so don’t rush it—mix with love!
Step 3: Add OREO Cookies
Now, it’s time to fold in those chopped OREO cookies. Gently mix them into the batter, ensuring they’re evenly distributed. Each bite will be a delightful surprise of crunch and creaminess. It’s like a party in your mouth!
Step 4: Pour and Spread
Pour the luscious batter into your prepared baking pan. Use a spatula to spread it evenly across the bottom. This ensures every brownie gets that perfect texture. You want them to bake evenly, so take your time with this step!
Step 5: Prepare the Cream Cheese Mixture
In a separate bowl, mix the softened cream cheese, powdered sugar, and vanilla extract until smooth. This creamy mixture will add a delightful swirl to your brownies. Make sure there are no lumps; we want it silky and dreamy!
Step 6: Swirl the Cream Cheese
Drop spoonfuls of the cream cheese mixture over the brownie batter. Then, take a knife and gently swirl it through the batter to create a marbled effect. This step not only looks beautiful but adds a rich flavor to each bite!
Step 7: Bake
Place your pan in the preheated oven and bake for 25-30 minutes. Keep an eye on them! To check for doneness, insert a toothpick in the center. If it comes out clean, your brownies are ready to shine!
Step 8: Cool and Serve
Once baked, remove the brownies from the oven and let them cool in the pan. After about 10-15 minutes, cut them into squares. Serve them warm or at room temperature. Either way, they’re sure to be a hit!
Tips for Success
- Make sure your cream cheese is softened for easy mixing.
- Don’t overmix the batter; a few lumps are okay!
- Use a spatula to spread the batter evenly in the pan.
- Let the brownies cool completely before cutting for clean edges.
- For extra flavor, try adding a pinch of salt to the cream cheese mixture.
Equipment Needed
- 9×13 inch baking pan: A standard size for brownies; you can use a glass or metal pan.
- Mixing bowls: A large bowl for the batter and a smaller one for the cream cheese mixture.
- Spatula: Perfect for spreading the batter evenly; a wooden spoon works too.
- Knife: Essential for swirling the cream cheese and cutting the brownies.
- Measuring cups: Handy for accurate ingredient measurements; you can use a kitchen scale if preferred.
Variations
- Nutty Delight: Add chopped walnuts or pecans for a crunchy texture that complements the brownies beautifully.
- Gluten-Free Option: Substitute the red velvet cake mix with a gluten-free blend to make these brownies suitable for gluten-sensitive friends.
- Minty Fresh: Incorporate mint extract into the cream cheese mixture for a refreshing twist that pairs well with the chocolate.
- Cheesecake Swirl: Use a cheesecake batter instead of cream cheese for a richer, creamier experience.
- Vegan Version: Replace eggs with flaxseed meal and use a plant-based cake mix to create a vegan-friendly treat.
Serving Suggestions
- Pair these Red Velvet OREO Brownies with a scoop of vanilla ice cream for a delightful contrast.
- Serve with a dollop of whipped cream and fresh berries for a pop of color.
- Drizzle with chocolate or cream cheese frosting for an extra indulgent touch.
- Enjoy with a cup of coffee or a glass of cold milk to balance the sweetness.
FAQs about Red Velvet OREO Brownies
Can I use a different cake mix for these brownies?
Absolutely! While red velvet cake mix is the star here, you can experiment with chocolate or vanilla cake mixes for a different flavor profile. Just remember, the OREO cookies will still add that delightful crunch!
How do I store leftover brownies?
Store your Red Velvet OREO Brownies in an airtight container at room temperature for up to three days. If you want to keep them longer, they can be frozen for up to two months. Just make sure to wrap them well!
Can I make these brownies ahead of time?
Yes! These brownies are perfect for making ahead. Bake them a day or two in advance, and they’ll still taste fresh. Just let them cool completely before storing them.
What can I serve with these brownies?
These brownies pair wonderfully with a scoop of vanilla ice cream or a dollop of whipped cream. You can also serve them with fresh berries for a refreshing contrast to the rich flavors.
Are these brownies suitable for a gluten-free diet?
To make these Red Velvet OREO Brownies gluten-free, simply substitute the red velvet cake mix with a gluten-free blend. This way, everyone can enjoy this delicious treat!
Final Thoughts
Making these Red Velvet OREO Brownies is more than just baking; it’s about creating sweet memories with your loved ones. The joy of pulling a warm batch from the oven, the aroma wafting through your home, and the smiles on your family’s faces as they take that first bite—priceless! Whether it’s a special occasion or just a Tuesday, these brownies bring a touch of magic to any day. So, roll up your sleeves, gather your ingredients, and let the fun begin. Trust me, you’ll be glad you did, and your taste buds will thank you!
Print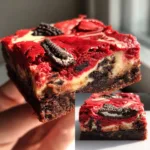
Red Velvet OREO BROWNIES: Indulge in this Delight!
- Total Time: 45 minutes
- Yield: 12 servings 1x
- Diet: Vegetarian
Description
Deliciously rich and decadent Red Velvet OREO Brownies that combine the classic flavors of red velvet cake with the crunch of OREO cookies.
Ingredients
- 1 box red velvet cake mix
- 1/2 cup vegetable oil
- 2 large eggs
- 1/2 cup water
- 1 cup OREO cookies, chopped
- 1/2 cup cream cheese, softened
- 1/4 cup powdered sugar
- 1 teaspoon vanilla extract
Instructions
- Preheat the oven to 350°F (175°C) and grease a 9×13 inch baking pan.
- In a large bowl, combine the red velvet cake mix, vegetable oil, eggs, and water. Mix until well combined.
- Fold in the chopped OREO cookies into the batter.
- Pour the batter into the prepared baking pan and spread evenly.
- In a separate bowl, mix the cream cheese, powdered sugar, and vanilla extract until smooth.
- Drop spoonfuls of the cream cheese mixture over the brownie batter and swirl with a knife to create a marbled effect.
- Bake in the preheated oven for 25-30 minutes or until a toothpick inserted in the center comes out clean.
- Allow to cool before cutting into squares and serving.
Notes
- For a richer flavor, add chocolate chips to the brownie batter.
- Store leftovers in an airtight container at room temperature for up to 3 days.
- These brownies can be frozen for up to 2 months.
- Prep Time: 15 minutes
- Cook Time: 30 minutes
- Category: Dessert
- Method: Baking
- Cuisine: American
Nutrition
- Serving Size: 1 brownie
- Calories: 250
- Sugar: 20g
- Sodium: 150mg
- Fat: 12g
- Saturated Fat: 4g
- Unsaturated Fat: 8g
- Trans Fat: 0g
- Carbohydrates: 35g
- Fiber: 1g
- Protein: 3g
- Cholesterol: 30mg