
Introduction to Best Homemade Red Velvet Brownies
Welcome to the world of indulgence with my Best Homemade Red Velvet Brownies! If you’re like me, juggling a busy life, you know how precious time can be. These brownies are not just a treat; they’re a quick solution for those days when you want to impress your loved ones without spending hours in the kitchen. With their rich red hue and delightful cocoa flavor, they’re sure to bring smiles to faces. So, let’s dive into this delicious adventure together and create something truly special!
Why You’ll Love This Best Homemade Red Velvet Brownies
These Best Homemade Red Velvet Brownies are a game-changer for busy moms and professionals alike. They come together in just 45 minutes, making them perfect for last-minute gatherings or a sweet treat after a long day. The rich, fudgy texture paired with a hint of cocoa will have everyone asking for seconds. Plus, they’re versatile enough to dress up for special occasions or enjoy as a simple dessert at home!
Ingredients for Best Homemade Red Velvet Brownies
Gathering the right ingredients is the first step to creating these delightful brownies. Here’s what you’ll need:
- Unsalted butter: This adds richness and moisture, making your brownies fudgy.
- Granulated sugar: Sweetness is key! It helps create that perfect chewy texture.
- Large eggs: They bind everything together and contribute to the brownies’ structure.
- Vanilla extract: A splash of vanilla enhances the overall flavor, making it more aromatic.
- All-purpose flour: This is the base of your brownies, providing the necessary structure.
- Unsweetened cocoa powder: It gives that classic chocolate flavor without added sweetness.
- Baking powder: A little lift helps achieve that perfect brownie texture.
- Salt: Just a pinch balances the sweetness and enhances the flavors.
- Red food coloring: This is what makes these brownies stand out with their vibrant hue!
- White chocolate chips (optional): For a sweet twist, these add a creamy contrast to the cocoa.
For those looking to make substitutions, you can use coconut oil instead of butter for a dairy-free option. If you’re out of granulated sugar, brown sugar can work too, giving a deeper flavor. Remember, the exact quantities are at the bottom of the article and available for printing, so you can easily whip these up!
How to Make Best Homemade Red Velvet Brownies
Now that we have our ingredients ready, let’s dive into the fun part—making these Best Homemade Red Velvet Brownies! Follow these simple steps, and you’ll be on your way to a delicious treat that will impress everyone.
Step 1: Preheat and Prepare
First things first, preheat your oven to 350°F (175°C). This ensures your brownies bake evenly. While the oven warms up, grease a 9×13 inch baking pan. A well-prepared pan helps prevent sticking, making it easier to cut those perfect squares later!
Step 2: Mix Wet Ingredients
In a large bowl, melt the unsalted butter. Once melted, mix in the granulated sugar until it’s well combined. This step is crucial for achieving that chewy texture we all love. Next, add the eggs one at a time, mixing well after each addition. Don’t forget to stir in the vanilla extract; it adds a lovely aroma and flavor!
Step 3: Combine Dry Ingredients
In another bowl, whisk together the all-purpose flour, unsweetened cocoa powder, baking powder, and salt. This step is important because it ensures that the dry ingredients are evenly distributed. No one wants a mouthful of baking powder, right?
Step 4: Combine Wet and Dry Mixtures
Now, gradually add the dry ingredients to the wet mixture. Mix until just combined. Be careful not to overmix; this can lead to tough brownies. We want them soft and fudgy, not chewy like a rubber band!
Step 5: Add Color and Flavor
Time to bring in the fun! Stir in the red food coloring until the batter is a vibrant red. If you’re feeling adventurous, toss in some white chocolate chips for an extra layer of flavor. They’ll melt slightly and create delightful pockets of sweetness!
Step 6: Bake
Pour the batter into your prepared baking pan and spread it evenly. Bake for 25-30 minutes. To check for doneness, insert a toothpick into the center. If it comes out clean or with a few moist crumbs, your brownies are ready. If it’s wet, give them a few more minutes.
Step 7: Cool and Serve
Once baked, remove the brownies from the oven and let them cool in the pan. This cooling time is essential for achieving the best texture. After about 15-20 minutes, cut them into squares and serve. Trust me, the wait will be worth it!
Tips for Success
- Always measure your ingredients accurately for consistent results.
- Use room temperature eggs for better mixing and texture.
- Don’t skip the cooling step; it helps the brownies set properly.
- For extra fudginess, underbake slightly and let them finish cooking in the pan.
- Experiment with mix-ins like nuts or different chocolate chips for variety!
Equipment Needed
- 9×13 inch baking pan: A standard size for brownies; you can use a glass or metal pan.
- Mixing bowls: A large bowl for wet ingredients and a medium bowl for dry ingredients.
- Whisk: Perfect for combining dry ingredients; a fork can work in a pinch.
- Spatula: Great for mixing and spreading the batter evenly in the pan.
- Measuring cups and spoons: Essential for accurate ingredient measurements.
Variations
- Gluten-Free: Substitute all-purpose flour with a gluten-free flour blend for a delicious gluten-free option.
- Nutty Delight: Add chopped walnuts or pecans for a crunchy texture that complements the fudginess.
- Mint Chocolate: Incorporate mint extract and dark chocolate chips for a refreshing twist on the classic flavor.
- Red Velvet Cheesecake Brownies: Swirl in a cream cheese mixture for a rich, cheesecake-like layer that pairs beautifully with the red velvet.
- Vegan Option: Replace eggs with flaxseed meal and use coconut oil instead of butter for a plant-based treat.
Serving Suggestions
- Pair with a scoop of vanilla ice cream for a delightful contrast in temperature and texture.
- Serve with a dollop of whipped cream and fresh berries for a pop of color.
- Drizzle with cream cheese frosting for an extra indulgent treat.
- Enjoy with a cup of coffee or a glass of milk to balance the sweetness.
- Present on a decorative platter for a stunning dessert display at gatherings.
FAQs about Best Homemade Red Velvet Brownies
Can I make these brownies ahead of time?
Absolutely! These Best Homemade Red Velvet Brownies can be made a day in advance. Just store them in an airtight container at room temperature. They’ll stay fresh and delicious, ready to impress your guests!
What can I substitute for red food coloring?
If you prefer a natural option, you can use beet juice or powdered beetroot for a similar vibrant color. Just keep in mind that the flavor might slightly change, but it will still be delicious!
How do I know when the brownies are done baking?
To check for doneness, insert a toothpick into the center. If it comes out clean or with a few moist crumbs, they’re ready. If it’s wet, give them a few more minutes in the oven.
Can I freeze the brownies?
Yes! These brownies freeze beautifully. Just wrap them tightly in plastic wrap and place them in an airtight container. They can be frozen for up to three months. Thaw them at room temperature before serving.
What’s the best way to store leftover brownies?
Store any leftover brownies in an airtight container at room temperature for up to a week. If you want to keep them fresh longer, refrigerate them, but let them come to room temperature before enjoying!
Final Thoughts
Making the Best Homemade Red Velvet Brownies is more than just baking; it’s about creating moments of joy. The vibrant color and rich flavor bring a sense of celebration to any occasion, whether it’s a family gathering or a quiet evening at home. I love how these brownies can turn an ordinary day into something special with just a few simple ingredients. Plus, the smiles on my loved ones’ faces when they take that first bite? Absolutely priceless! So, roll up your sleeves and dive into this delightful recipe; you won’t regret it!
Print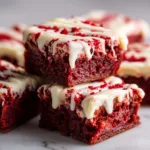
Best Homemade Red Velvet Brownies for Irresistible Delight!
- Total Time: 45 minutes
- Yield: 24 brownies 1x
- Diet: Vegetarian
Description
These Best Homemade Red Velvet Brownies are a delicious twist on the classic brownie, featuring a rich red color and a hint of cocoa flavor, perfect for any occasion.
Ingredients
- 1 cup unsalted butter
- 2 cups granulated sugar
- 4 large eggs
- 2 teaspoons vanilla extract
- 2 cups all-purpose flour
- 1/2 cup unsweetened cocoa powder
- 1 teaspoon baking powder
- 1 teaspoon salt
- 1 tablespoon red food coloring
- 1 cup white chocolate chips (optional)
Instructions
- Preheat your oven to 350°F (175°C) and grease a 9×13 inch baking pan.
- In a large bowl, melt the butter and mix in the sugar until well combined.
- Add the eggs one at a time, mixing well after each addition, then stir in the vanilla extract.
- In another bowl, whisk together the flour, cocoa powder, baking powder, and salt.
- Gradually add the dry ingredients to the wet ingredients, mixing until just combined.
- Stir in the red food coloring and white chocolate chips if using.
- Pour the batter into the prepared baking pan and spread evenly.
- Bake for 25-30 minutes or until a toothpick inserted in the center comes out clean.
- Allow to cool before cutting into squares and serving.
Notes
- For a richer flavor, consider adding a pinch of espresso powder to the batter.
- These brownies can be stored in an airtight container for up to a week.
- Serve with cream cheese frosting for an extra indulgent treat.
- Prep Time: 15 minutes
- Cook Time: 30 minutes
- Category: Dessert
- Method: Baking
- Cuisine: American
Nutrition
- Serving Size: 1 brownie
- Calories: 250
- Sugar: 20g
- Sodium: 150mg
- Fat: 12g
- Saturated Fat: 7g
- Unsaturated Fat: 3g
- Trans Fat: 0g
- Carbohydrates: 35g
- Fiber: 1g
- Protein: 3g
- Cholesterol: 50mg