
Introduction to Black Velvet Halloween Cake
As the leaves turn and the air gets crisp, I find myself dreaming of cozy kitchens and delightful treats. This Black Velvet Halloween Cake is the perfect way to embrace the spooky season while satisfying your sweet tooth. It’s not just a cake; it’s a celebration of flavors and fun! Whether you’re a busy mom juggling work and family or a professional looking to impress at a Halloween gathering, this recipe is your go-to. With its rich taste and festive appearance, it’s sure to be a hit with everyone at your table!
Why You’ll Love This Black Velvet Halloween Cake
This Black Velvet Halloween Cake is a delightful blend of rich flavors and spooky charm, making it a must-try for your Halloween festivities. It’s incredibly easy to whip up, even on the busiest days, and the taste? Absolutely divine! The moist, chocolatey layers paired with a striking black hue will impress your family and friends. Plus, it’s a fun way to get everyone involved in the kitchen, creating sweet memories together!
Ingredients for Black Velvet Halloween Cake
Gathering the right ingredients is the first step to creating your Black Velvet Halloween Cake. Here’s what you’ll need:
- All-purpose flour: This is the backbone of your cake, providing structure and texture.
- Granulated sugar: Sweetness is key! It helps balance the rich cocoa flavor.
- Unsweetened cocoa powder: This gives the cake its deep chocolate flavor and dark color.
- Baking soda: A leavening agent that helps the cake rise, making it light and fluffy.
- Baking powder: Works alongside baking soda for that perfect lift.
- Salt: Just a pinch enhances all the flavors, making them pop!
- Vegetable oil: Keeps the cake moist and tender, ensuring every bite is delicious.
- Buttermilk: Adds a tangy flavor and helps create a soft crumb.
- Large eggs: They bind the ingredients together and add richness.
- Vanilla extract: A splash of vanilla brings warmth and depth to the flavor.
- Boiling water: This helps to bloom the cocoa, intensifying the chocolate flavor.
- Black food coloring: Optional, but it enhances the spooky look of your cake!
For exact measurements, check the bottom of the article where you can find everything listed for easy printing. Happy baking!
How to Make Black Velvet Halloween Cake
Step 1: Preheat and Prepare
First things first, preheat your oven to 350°F (175°C). This ensures your cake bakes evenly. While the oven warms up, grab two 9-inch round cake pans and grease them well. I like to use a bit of vegetable oil or non-stick spray. This step is crucial; it prevents your cake from sticking. Trust me, there’s nothing worse than a cake that won’t come out of the pan!
Step 2: Mix Dry Ingredients
In a large mixing bowl, combine the all-purpose flour, granulated sugar, unsweetened cocoa powder, baking soda, baking powder, and salt. Whisk them together until they’re well blended. This step is important because it ensures that the leavening agents are evenly distributed. A good mix here means a fluffy cake later! Plus, the rich cocoa aroma will start to fill your kitchen, making it feel like Halloween already!
Step 3: Combine Wet Ingredients
Now, it’s time to add the wet ingredients. Pour in the vegetable oil, buttermilk, eggs, and vanilla extract into the dry mixture. Mix everything together until it’s smooth and well combined. I usually use a hand mixer for this, but a whisk works just fine too! The batter should be thick and glossy, and you’ll notice the chocolatey goodness coming together beautifully.
Step 4: Add Boiling Water and Color
Here comes the fun part! Slowly add the boiling water to the batter, mixing as you go. This step helps to bloom the cocoa, enhancing the chocolate flavor. Don’t forget to add the black food coloring if you want that spooky look! The batter will become thinner, but that’s exactly what you want. It’s going to bake up perfectly moist and delicious!
Step 5: Bake the Cakes
Now, divide the batter evenly between the two prepared cake pans. Give them a gentle tap on the counter to release any air bubbles. Pop them into your preheated oven and bake for 30-35 minutes. You’ll know they’re done when a toothpick inserted in the center comes out clean. The smell wafting through your kitchen will be irresistible, and your family will be eagerly waiting for a slice!
Step 6: Cool and Frost
Once baked, let the cakes cool in the pans for about 10 minutes. This makes it easier to remove them without breaking. After that, transfer the cakes to a wire rack to cool completely. It’s essential to let them cool fully before frosting; otherwise, the frosting might melt. Once cooled, you can frost with your favorite frosting and get creative with Halloween decorations!
Tips for Success
- Use room temperature ingredients for a smoother batter.
- Don’t skip the cooling step; it prevents melting frosting.
- For a richer flavor, opt for dark cocoa powder.
- Experiment with different frostings like cream cheese or chocolate ganache.
- Get creative with decorations—think spooky sprinkles or edible glitter!
Equipment Needed
- Two 9-inch round cake pans (or one 9×13-inch pan for a single layer)
- Mixing bowls (a large one for dry ingredients and a medium one for wet)
- Whisk or hand mixer (a sturdy spoon works too!)
- Measuring cups and spoons for accuracy
- Wire rack for cooling the cakes
Variations
- For a gluten-free option, substitute all-purpose flour with a 1:1 gluten-free baking blend.
- Add a hint of spice by incorporating a teaspoon of cinnamon or nutmeg into the dry ingredients.
- For a richer chocolate flavor, use dark cocoa powder instead of regular cocoa powder.
- Make it a layered cake by adding a layer of raspberry or cherry jam between the cake layers for a fruity twist.
- For a vegan version, replace eggs with flax eggs and use plant-based milk instead of buttermilk.
Serving Suggestions
- Pair your Black Velvet Halloween Cake with a scoop of vanilla ice cream for a delightful contrast.
- Serve with a side of fresh berries to add a pop of color and freshness.
- For drinks, consider a spooky punch or hot apple cider to complement the flavors.
- Decorate the cake with Halloween-themed toppers for a festive presentation.
FAQs about Black Velvet Halloween Cake
Can I make this cake ahead of time?
Absolutely! You can bake the Black Velvet Halloween Cake a day or two in advance. Just make sure to wrap the cooled cakes tightly in plastic wrap and store them in the fridge. This helps keep them moist and fresh!
What frosting works best with this cake?
While cream cheese frosting is a classic choice, I love using chocolate ganache for a rich, decadent touch. You could also try a simple buttercream with a hint of vanilla or even a whipped cream frosting for a lighter option!
Can I use a different type of food coloring?
Yes! While black food coloring gives that spooky vibe, you can experiment with other colors. Just keep in mind that the cake’s flavor might change slightly depending on the color you choose. A deep purple or dark green could be fun for Halloween!
Is this cake suitable for special diets?
Definitely! You can easily adapt the Black Velvet Halloween Cake for gluten-free or vegan diets. Just swap out the all-purpose flour for a gluten-free blend and replace the eggs with flax eggs for a vegan version. Everyone can enjoy this spooky treat!
How should I store leftovers?
Store any leftover cake in an airtight container at room temperature for up to three days. If you want to keep it longer, refrigerate it for up to a week. Just remember to let it come to room temperature before serving for the best flavor!
Final Thoughts
Creating this Black Velvet Halloween Cake is more than just baking; it’s about making memories with loved ones. The rich flavors and festive appearance bring joy to any gathering, making it a centerpiece of celebration. I love how this cake invites everyone into the kitchen, sparking laughter and creativity. Whether you’re serving it at a Halloween party or enjoying a quiet family dinner, each slice is a reminder of the sweet moments we share. So, roll up your sleeves, embrace the spirit of the season, and let this cake be a delicious part of your Halloween traditions!
Print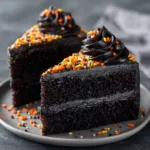
Black Velvet Halloween Cake: Discover a Spooky Delight!
- Total Time: 1 hour 5 minutes
- Yield: 12 servings 1x
- Diet: Vegetarian
Description
A deliciously spooky Black Velvet Halloween Cake that combines rich flavors with a festive appearance, perfect for Halloween celebrations.
Ingredients
- 2 cups all-purpose flour
- 1 ½ cups granulated sugar
- 1 cup unsweetened cocoa powder
- 1 ½ teaspoons baking soda
- 1 teaspoon baking powder
- 1 teaspoon salt
- 1 cup vegetable oil
- 1 cup buttermilk
- 2 large eggs
- 1 teaspoon vanilla extract
- 1 cup boiling water
- Black food coloring (as needed)
Instructions
- Preheat your oven to 350°F (175°C) and grease two 9-inch round cake pans.
- In a large bowl, mix together the flour, sugar, cocoa powder, baking soda, baking powder, and salt.
- Add the vegetable oil, buttermilk, eggs, and vanilla extract to the dry ingredients and mix until well combined.
- Slowly add the boiling water and black food coloring, mixing until the batter is smooth.
- Divide the batter evenly between the prepared cake pans.
- Bake for 30-35 minutes or until a toothpick inserted in the center comes out clean.
- Allow the cakes to cool in the pans for 10 minutes before transferring to a wire rack to cool completely.
- Frost with your favorite frosting and decorate for Halloween.
Notes
- For a richer flavor, consider using dark cocoa powder.
- Ensure the cakes are completely cool before frosting to prevent melting.
- Decorate with Halloween-themed sprinkles or edible decorations for a festive touch.
- Prep Time: 20 minutes
- Cook Time: 35 minutes
- Category: Dessert
- Method: Baking
- Cuisine: American
Nutrition
- Serving Size: 1 slice
- Calories: 350
- Sugar: 25g
- Sodium: 300mg
- Fat: 15g
- Saturated Fat: 2g
- Unsaturated Fat: 10g
- Trans Fat: 0g
- Carbohydrates: 50g
- Fiber: 2g
- Protein: 4g
- Cholesterol: 30mg