
Introduction to Crispy Dill Pickle Parmesan Chicken
Hey there, fellow food lovers! If you’re anything like me, you know that life can get pretty hectic. Between juggling work, family, and everything in between, finding time to whip up a delicious meal can feel like a daunting task. That’s where my Crispy Dill Pickle Parmesan Chicken comes in! This dish is not only a quick solution for a busy day, but it also packs a punch of flavor that will wow your taste buds. Trust me, your loved ones will be asking for seconds, and you’ll feel like a culinary rockstar!
Why You’ll Love This Crispy Dill Pickle Parmesan Chicken
This Crispy Dill Pickle Parmesan Chicken is a game-changer for busy moms and professionals alike. It’s incredibly easy to make, taking just 40 minutes from start to finish. The combination of tangy dill pickles and savory Parmesan creates a flavor explosion that’s hard to resist. Plus, it’s baked, not fried, making it a healthier option without sacrificing that satisfying crunch. You’ll love how quickly it becomes a family favorite!
Ingredients for Crispy Dill Pickle Parmesan Chicken
Let’s dive into the star-studded lineup of ingredients that make this Crispy Dill Pickle Parmesan Chicken a hit! Each component plays a vital role in creating that mouthwatering flavor and texture.
- Boneless, skinless chicken breasts: The perfect canvas for our flavors, these are lean and cook up juicy.
- Dill pickle juice: This tangy liquid not only infuses the chicken with flavor but also helps tenderize it. You can use store-bought or homemade pickle juice!
- Breadcrumbs: They provide that delightful crunch. I prefer using panko for extra crispiness, but regular breadcrumbs work just fine.
- Grated Parmesan cheese: This adds a savory, nutty flavor that complements the dill perfectly. Freshly grated is best, but pre-grated will do in a pinch.
- Garlic powder: A must-have for that aromatic kick. It enhances the overall flavor without overpowering the dish.
- Onion powder: This adds depth and sweetness, balancing the tanginess of the pickles.
- Black pepper: A dash of this spice brings warmth and a hint of heat to the mix.
- Salt: Essential for enhancing all the flavors. Just the right amount makes a world of difference.
- Large eggs: These act as the glue, helping the breadcrumb mixture stick to the chicken for that crispy coating.
For those looking to switch things up, consider adding some cayenne pepper for heat or using gluten-free breadcrumbs to keep it gluten-free. You can find the exact quantities for each ingredient at the bottom of the article, ready for printing!
How to Make Crispy Dill Pickle Parmesan Chicken
Now that we have our ingredients ready, let’s get cooking! Making this Crispy Dill Pickle Parmesan Chicken is a breeze, and I promise you’ll feel like a pro in the kitchen. Follow these simple steps, and you’ll have a delicious meal on the table in no time!
Step 1: Marinate the Chicken
First things first, let’s marinate the chicken in dill pickle juice. This step is crucial for infusing the chicken with that tangy flavor and ensuring it stays tender. I usually let it soak for at least an hour, but if you have time, overnight is even better. The longer it marinates, the more flavor it absorbs, making each bite a delightful experience!
Step 2: Preheat the Oven
While the chicken is soaking up all that pickle goodness, preheat your oven to 400°F (200°C). This step is essential for achieving that perfect crispy texture. Don’t forget to line your baking sheet with parchment paper. It makes cleanup a breeze and helps prevent sticking!
Step 3: Prepare the Coating
In a mixing bowl, combine the breadcrumbs, grated Parmesan cheese, garlic powder, onion powder, black pepper, and salt. Stir everything together until well mixed. This breadcrumb mixture is what gives our chicken that irresistible crunch. If you’re feeling adventurous, you can even add some dried herbs for an extra flavor boost!
Step 4: Beat the Eggs
In another bowl, crack the large eggs and beat them until they’re well combined. The eggs play a vital role in the coating process. They act as the glue that helps the breadcrumb mixture stick to the chicken, ensuring every piece is perfectly coated and crispy when baked.
Step 5: Coat the Chicken
Now it’s time to coat the chicken! Remove each piece from the pickle juice and dip it into the beaten eggs, making sure it’s fully covered. Then, transfer the chicken to the breadcrumb mixture, pressing gently to ensure it sticks. Place the coated chicken on the prepared baking sheet, leaving space between each piece for even cooking. If you want an extra crunch, feel free to double coat them!
Step 6: Bake the Chicken
Finally, pop the baking sheet into the preheated oven and bake for 25-30 minutes. Keep an eye on the chicken as it cooks. You’ll know it’s done when the coating is golden brown and crispy, and the internal temperature reaches 165°F (75°C). Let it rest for a few minutes before serving, and enjoy the deliciousness!
Tips for Success
- For maximum flavor, marinate the chicken overnight in dill pickle juice.
- Use panko breadcrumbs for an extra crispy texture.
- Don’t rush the baking; let the chicken cook until golden brown.
- Experiment with spices like paprika or cayenne for a kick.
- Let the chicken rest for a few minutes before serving to keep it juicy.
Equipment Needed
- Baking sheet: A standard baking sheet works well, but a wire rack can help with airflow for extra crispiness.
- Parchment paper: This makes cleanup easy; aluminum foil is a good alternative.
- Mixing bowls: Use any size you have on hand for mixing ingredients.
- Whisk or fork: Perfect for beating eggs; a fork will do just fine!
- Tongs: Handy for flipping the chicken without making a mess.
Variations
- Spicy Kick: Add cayenne pepper or crushed red pepper flakes to the breadcrumb mixture for a spicy twist.
- Herb Infusion: Mix in dried herbs like oregano, thyme, or Italian seasoning to the breadcrumb mixture for added flavor.
- Cheesy Delight: Experiment with different cheeses, such as cheddar or mozzarella, for a cheesy coating.
- Gluten-Free Option: Use gluten-free breadcrumbs to make this dish suitable for those with gluten sensitivities.
- Vegetarian Version: Substitute chicken with thick slices of eggplant or zucchini for a delicious vegetarian alternative.
Serving Suggestions
- Fresh Salad: Pair with a crisp garden salad for a refreshing contrast.
- Roasted Vegetables: Serve alongside roasted seasonal veggies for a colorful plate.
- Ranch Dressing: Offer ranch or dill dip for a tasty accompaniment.
- Cold Beverage: Enjoy with a chilled glass of iced tea or lemonade.
FAQs about Crispy Dill Pickle Parmesan Chicken
Can I use chicken thighs instead of breasts?
Absolutely! Chicken thighs will work just as well. They tend to be juicier and can add even more flavor to your Crispy Dill Pickle Parmesan Chicken. Just adjust the cooking time slightly, as thighs may take a bit longer to cook through.
How do I store leftovers?
To keep your Crispy Dill Pickle Parmesan Chicken fresh, store leftovers in an airtight container in the fridge. They should last for about 3-4 days. Reheat in the oven for that crispy texture, or use the microwave if you’re in a hurry!
Can I freeze this dish?
Yes, you can freeze the coated chicken before baking! Just place the coated pieces on a baking sheet, freeze until solid, then transfer to a freezer bag. When you’re ready to cook, bake from frozen, adding a few extra minutes to the cooking time.
What can I serve with this chicken?
This Crispy Dill Pickle Parmesan Chicken pairs wonderfully with a fresh salad, roasted vegetables, or even mashed potatoes. You can also serve it with a side of ranch dressing for dipping, which complements the flavors beautifully!
Is this recipe gluten-free?
Yes, it can be! Just use gluten-free breadcrumbs to make your Crispy Dill Pickle Parmesan Chicken suitable for those with gluten sensitivities. It’s just as delicious and satisfying!
Final Thoughts
Cooking should be a joyful experience, and my Crispy Dill Pickle Parmesan Chicken brings just that! It’s a dish that not only satisfies your cravings but also creates lasting memories around the dinner table. The delightful crunch and tangy flavor make it a hit with both kids and adults alike. Plus, it’s quick enough to fit into your busy schedule, leaving you more time to enjoy with your loved ones. So, roll up your sleeves, embrace the kitchen adventure, and let this recipe become a staple in your home. Happy cooking!
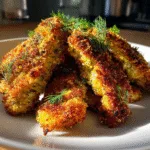
Crispy Dill Pickle Parmesan Chicken will Wow Your Tastebuds!
- Total Time: 40 minutes
- Yield: 4 servings 1x
- Diet: Gluten Free
Description
Crispy Dill Pickle Parmesan Chicken is a delicious and flavorful dish that combines the tanginess of dill pickles with the savory taste of Parmesan cheese, creating a crunchy and satisfying meal.
Ingredients
- 4 boneless, skinless chicken breasts
- 1 cup dill pickle juice
- 1 cup breadcrumbs
- 1/2 cup grated Parmesan cheese
- 1 teaspoon garlic powder
- 1 teaspoon onion powder
- 1/2 teaspoon black pepper
- 1/2 teaspoon salt
- 2 large eggs
Instructions
- Marinate the chicken breasts in dill pickle juice for at least 1 hour, or overnight for best results.
- Preheat the oven to 400°F (200°C) and line a baking sheet with parchment paper.
- In a bowl, mix together the breadcrumbs, Parmesan cheese, garlic powder, onion powder, black pepper, and salt.
- In another bowl, beat the eggs.
- Remove the chicken from the pickle juice and dip each piece into the beaten eggs, then coat with the breadcrumb mixture.
- Place the coated chicken on the prepared baking sheet.
- Bake for 25-30 minutes, or until the chicken is cooked through and the coating is golden brown and crispy.
- Serve hot and enjoy!
Notes
- For extra crunch, you can double coat the chicken by repeating the egg and breadcrumb steps.
- Serve with a side of ranch dressing for dipping.
- This dish pairs well with a fresh salad or roasted vegetables.
- Prep Time: 10 minutes
- Cook Time: 30 minutes
- Category: Main Course
- Method: Baking
- Cuisine: American
Nutrition
- Serving Size: 1 chicken breast
- Calories: 350
- Sugar: 1g
- Sodium: 800mg
- Fat: 15g
- Saturated Fat: 4g
- Unsaturated Fat: 8g
- Trans Fat: 0g
- Carbohydrates: 20g
- Fiber: 1g
- Protein: 30g
- Cholesterol: 120mg