
Introduction to Easy Halloween Oreo Cake Bars
As the leaves turn and the air gets crisp, I find myself craving festive treats that bring a smile to my family’s faces. That’s where these Easy Halloween Oreo Cake Bars come in! They’re not just a dessert; they’re a delightful way to celebrate the season without spending hours in the kitchen. Perfect for busy moms like us, these bars combine the rich flavors of chocolate and cream, making them a hit at any Halloween gathering. Trust me, your loved ones will be asking for seconds, and you’ll love how simple they are to whip up!
Why You’ll Love This Easy Halloween Oreo Cake Bars
These Easy Halloween Oreo Cake Bars are a game-changer for busy days. They come together in just 45 minutes, making them a quick solution for last-minute gatherings. The combination of chocolate cake and creamy frosting is simply irresistible, satisfying even the pickiest eaters. Plus, they’re a fun way to get the kids involved in the kitchen. With minimal effort, you’ll create a festive treat that everyone will adore!
Easy Halloween Oreo Cake Bars: A Sweet Treat to Savor!
- Total Time: 45 minutes
- Yield: 12–16 bars 1x
- Diet: Vegetarian
Description
Easy Halloween Oreo Cake Bars are a delightful and festive dessert perfect for Halloween celebrations, combining the rich flavors of chocolate and cream.
Ingredients
- 1 package of Oreo cookies (about 36 cookies)
- 1/2 cup unsalted butter, melted
- 1 box of chocolate cake mix
- 3 large eggs
- 1 cup of milk
- 1 cup of Halloween-themed sprinkles
- 1 cup of cream cheese frosting
Instructions
- Preheat your oven to 350°F (175°C) and grease a 9×13 inch baking pan.
- Crush the Oreo cookies into fine crumbs and mix with melted butter until well combined.
- Press the Oreo mixture into the bottom of the prepared baking pan to form a crust.
- In a large bowl, combine the chocolate cake mix, eggs, and milk, and mix until smooth.
- Pour the cake batter over the Oreo crust in the baking pan.
- Bake in the preheated oven for 25-30 minutes or until a toothpick inserted in the center comes out clean.
- Allow the cake to cool completely before frosting with cream cheese frosting.
- Top with Halloween-themed sprinkles for decoration.
- Cut into bars and serve.
Notes
- For a richer flavor, consider adding chocolate chips to the batter.
- Store leftovers in an airtight container at room temperature for up to 3 days.
- These bars can be made a day in advance for easier party planning.
- Prep Time: 15 minutes
- Cook Time: 30 minutes
- Category: Dessert
- Method: Baking
- Cuisine: American
Nutrition
- Serving Size: 1 bar
- Calories: 250
- Sugar: 20g
- Sodium: 200mg
- Fat: 12g
- Saturated Fat: 7g
- Unsaturated Fat: 3g
- Trans Fat: 0g
- Carbohydrates: 32g
- Fiber: 1g
- Protein: 3g
- Cholesterol: 40mg
Ingredients for Easy Halloween Oreo Cake Bars
Gathering the right ingredients is the first step to creating these delightful Easy Halloween Oreo Cake Bars. Here’s what you’ll need:
- Oreo cookies: The star of the show! These chocolatey cookies provide a delicious crust and a rich flavor that pairs perfectly with the cake.
- Unsalted butter: Melted butter helps bind the Oreo crumbs together, creating a sturdy base for your bars. Unsalted is best to control the saltiness.
- Chocolate cake mix: This is the foundation of your bars. It adds moisture and a deep chocolate flavor. You can use any brand you prefer!
- Large eggs: Eggs help the cake rise and provide structure. They also add richness to the batter.
- Milk: Milk adds moisture and helps create a smooth batter. You can substitute with almond milk or any non-dairy option if needed.
- Halloween-themed sprinkles: These are for decoration! They add a festive touch and make your bars visually appealing. Feel free to get creative with colors and shapes.
- Cream cheese frosting: This luscious frosting is the perfect finishing touch. It adds a creamy sweetness that balances the chocolate flavor beautifully.
For exact quantities, check the bottom of the article where you can find everything listed for easy printing. Happy baking!
How to Make Easy Halloween Oreo Cake Bars
Step 1: Preheat and Prepare
Let’s kick things off by preheating your oven to 350°F (175°C). This step is crucial for ensuring your Easy Halloween Oreo Cake Bars bake evenly. While the oven warms up, grab a 9×13 inch baking pan and grease it well. I like to use cooking spray or a little melted butter to make sure nothing sticks. Trust me, you want these bars to come out perfectly! Once your pan is ready and the oven is hot, you’re all set to move on to the next step.
Step 2: Create the Oreo Crust
Now, it’s time to make that delicious Oreo crust! Start by crushing the Oreo cookies into fine crumbs. You can use a food processor or simply place them in a zip-top bag and crush them with a rolling pin. Once you have those crumbs, mix them with the melted butter until everything is well combined. The mixture should resemble wet sand. Press this mixture firmly into the bottom of your greased baking pan. This crust is the foundation of your bars, so make sure it’s nice and compact!
Step 3: Mix the Cake Batter
In a large mixing bowl, it’s time to whip up the cake batter! Combine the chocolate cake mix, large eggs, and milk. Use a whisk or an electric mixer to blend everything until it’s smooth and creamy. The batter should be thick but pourable. If you want to add a little extra chocolatey goodness, consider tossing in some chocolate chips at this stage. Once your batter is ready, it’s time to pour it over that lovely Oreo crust you just made!
Step 4: Bake the Bars
Pour the cake batter evenly over the Oreo crust in the baking pan. Make sure to spread it out gently so it covers the crust completely. Now, pop the pan into your preheated oven and bake for 25-30 minutes. Keep an eye on it! You’ll know it’s done when a toothpick inserted in the center comes out clean. The aroma of chocolate will fill your kitchen, making it hard to resist sneaking a taste!
Step 5: Cool and Frost
Once your Easy Halloween Oreo Cake Bars are baked to perfection, it’s time to let them cool. Allow the bars to cool completely in the pan on a wire rack. This step is important because it helps the frosting set better. After they’ve cooled, spread a generous layer of cream cheese frosting over the top. The creamy sweetness of the frosting pairs beautifully with the chocolate cake. Don’t be shy—make it as thick as you like!
Step 6: Decorate and Serve
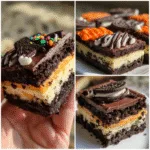
Now for the fun part—decorating! Sprinkle a generous amount of Halloween-themed sprinkles over the frosted bars. This adds a festive touch that’s perfect for the season. Once decorated, cut the bars into squares or rectangles, depending on your preference. Serve them on a platter, and watch as your family and friends dive in! These Easy Halloween Oreo Cake Bars are sure to be a hit at any gathering!
Tips for Success
- Use room temperature eggs and milk for a smoother batter.
- Don’t overmix the cake batter; mix just until combined for a lighter texture.
- Let the bars cool completely before frosting to prevent melting.
- For a fun twist, try adding crushed candy corn or mini marshmallows to the frosting.
- Store leftovers in an airtight container to keep them fresh and delicious.
Equipment Needed
- 9×13 inch baking pan: A standard size for these bars. If you don’t have one, a similar-sized dish will work.
- Mixing bowls: Use any size you have on hand. A large bowl is best for mixing the batter.
- Whisk or electric mixer: A whisk is great for mixing by hand, but an electric mixer saves time.
- Measuring cups and spoons: Essential for accurate ingredient measurements.
- Spatula: Perfect for spreading frosting and scraping down the sides of the bowl.
Variations
- Gluten-Free Option: Use a gluten-free chocolate cake mix to make these bars suitable for those with gluten sensitivities.
- Nutty Twist: Add chopped nuts, like walnuts or pecans, to the cake batter for an extra crunch and flavor.
- Minty Fresh: Incorporate mint extract into the frosting for a refreshing mint chocolate flavor that’s perfect for Halloween.
- Vegan Version: Substitute eggs with flax eggs and use a plant-based milk and vegan butter for a delicious vegan treat.
- Cheesecake Layer: Add a layer of cheesecake filling made with cream cheese, sugar, and vanilla between the Oreo crust and cake batter for a decadent twist.
Serving Suggestions
- Pair these Easy Halloween Oreo Cake Bars with a scoop of vanilla ice cream for a delightful contrast.
- Serve with a warm cup of apple cider or hot chocolate to enhance the cozy fall vibes.
- For a festive touch, arrange the bars on a Halloween-themed platter with spooky decorations.
- Consider adding a side of fresh fruit, like sliced apples or berries, for a refreshing balance.
FAQs about Easy Halloween Oreo Cake Bars
Can I make these Easy Halloween Oreo Cake Bars ahead of time?
Absolutely! These bars can be made a day in advance. Just store them in an airtight container at room temperature. This makes them perfect for busy moms planning ahead for Halloween parties!
What can I use instead of cream cheese frosting?
If cream cheese frosting isn’t your thing, you can use chocolate frosting or even whipped cream. Both options will still taste amazing with the chocolate cake and Oreo crust!
How should I store the leftover bars?
Store any leftovers in an airtight container at room temperature for up to three days. If you want to keep them longer, consider refrigerating them, but let them come to room temperature before serving for the best flavor.
Can I freeze these bars?
Yes, you can freeze these Easy Halloween Oreo Cake Bars! Just wrap them tightly in plastic wrap and then in aluminum foil. They’ll stay fresh for up to three months. Thaw them in the fridge before serving.
What if I don’t have a 9×13 inch pan?
No worries! You can use any similar-sized baking dish. Just keep an eye on the baking time, as it may vary slightly depending on the pan you use.
Final Thoughts
Creating these Easy Halloween Oreo Cake Bars is more than just baking; it’s about making memories with your loved ones. The joy of watching your family’s faces light up as they take that first bite is priceless. These bars are not only delicious but also a fun way to celebrate the season together. Whether you’re hosting a Halloween party or just looking for a sweet treat to enjoy at home, these bars are sure to bring smiles all around. So, roll up your sleeves, gather your ingredients, and let the baking magic begin!