Introduction to Easy Mini Halloween Pizzas
As the leaves turn and the air gets crisp, Halloween creeps around the corner, bringing with it a whirlwind of excitement. I know how busy life can get, especially for us moms juggling work, kids, and everything in between. That’s why I’m thrilled to share my recipe for Easy Mini Halloween Pizzas! These delightful little treats are not only fun to make but also a quick solution for a festive gathering. Imagine the smiles on your loved ones’ faces as they dig into these spooky, cheesy bites. Let’s make this Halloween a little more delicious!
Why You’ll Love This Easy Mini Halloween Pizzas
These Easy Mini Halloween Pizzas are a lifesaver for busy nights! They come together in just 27 minutes, making them perfect for last-minute gatherings or a fun family dinner. The best part? You can customize them to suit everyone’s tastes, from picky eaters to adventurous foodies. Plus, they’re a hit with kids and adults alike, ensuring your Halloween celebration is both tasty and memorable!
Ingredients for Easy Mini Halloween Pizzas
Gathering the right ingredients is half the fun! Here’s what you’ll need to whip up these Easy Mini Halloween Pizzas:
- Mini pizza crusts: These are the perfect base for your spooky creations. You can find them in the store or make your own if you’re feeling adventurous!
- Pizza sauce: A classic tomato sauce adds that essential flavor. Feel free to use store-bought or homemade for a personal touch.
- Shredded mozzarella cheese: This melty goodness is a must! It creates that gooey, cheesy layer that everyone loves.
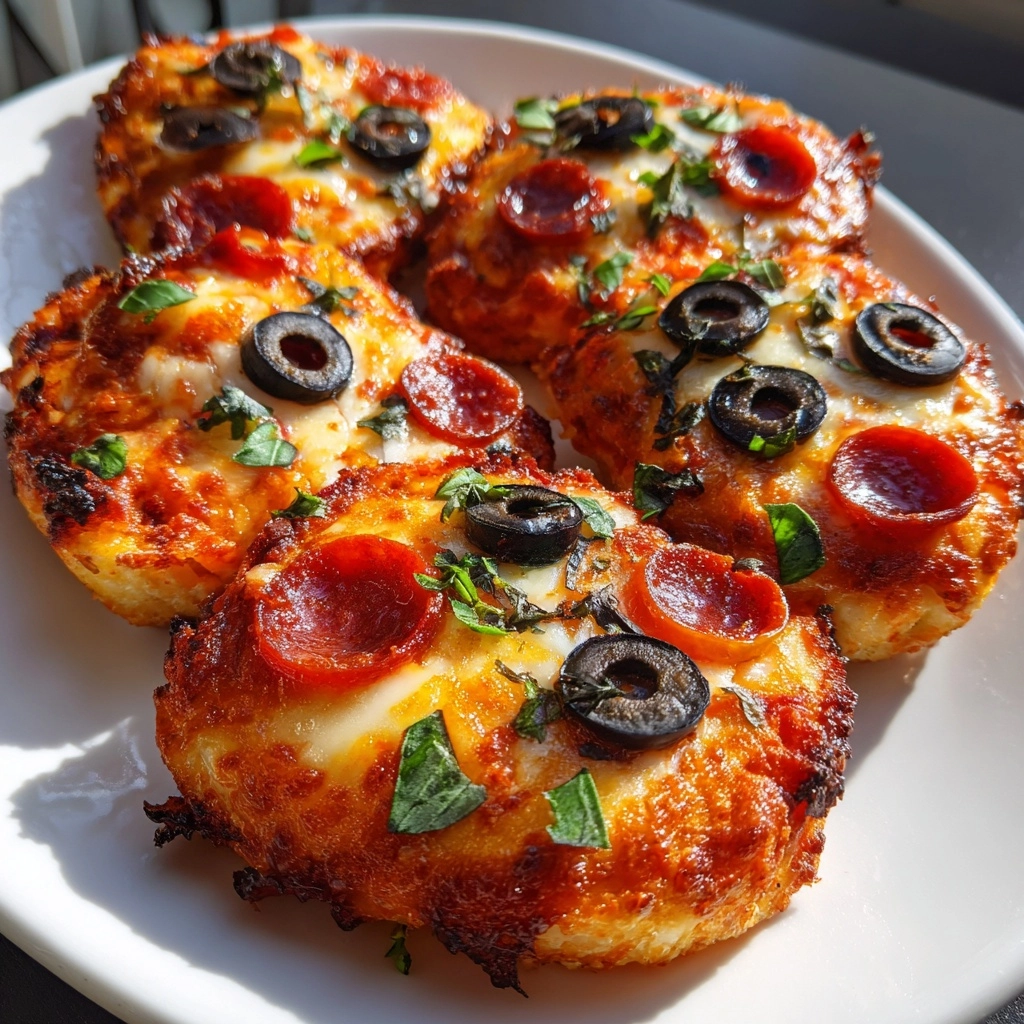
- Sliced black olives: These little guys are perfect for creating spooky eyes and mouths. They add a fun twist and a salty flavor.
- Pepperoni slices: A favorite topping that adds a savory kick. You can swap it out for turkey pepperoni or even leave it off for a vegetarian option.
- Diced bell peppers: These colorful veggies not only add crunch but also a pop of color to your pizzas. Use any color you like!
- Grated Parmesan cheese: A sprinkle of this on top enhances the flavor and gives a nice finishing touch.
Feel free to get creative with your toppings! You can add things like mushrooms, spinach, or even pineapple if that’s your jam. For exact quantities, check the bottom of the article where you can find everything available for printing.
How to Make Easy Mini Halloween Pizzas
Now that we have our ingredients ready, let’s dive into the fun part—making these Easy Mini Halloween Pizzas! Follow these simple steps, and you’ll have a spooktacular treat in no time.
Step 1: Preheat the Oven
First things first, preheat your oven to 400°F (200°C). Preheating is crucial because it ensures that your pizzas bake evenly. A hot oven helps the cheese melt beautifully and gives the crust that perfect golden-brown finish. Trust me, you don’t want to skip this step!
Step 2: Prepare the Pizza Crusts
Next, grab your mini pizza crusts and place them on a baking sheet. Make sure to space them out a bit so they have room to expand while baking. If you’re using a non-stick baking sheet, you can skip the greasing. If not, a light spray of cooking oil will do the trick!
Step 3: Add Pizza Sauce
Now it’s time to spread the pizza sauce! Use a spoon to dollop a generous amount of sauce on each crust. Then, gently spread it out to cover the surface evenly. This layer is where all the flavor begins, so don’t be shy with the sauce!
Step 4: Sprinkle Cheese
Next up, sprinkle a hearty layer of shredded mozzarella cheese over the sauce. Cheese is the star of the show here, creating that gooey, melty goodness we all crave. Make sure to cover the sauce well, but leave a little edge for the crust to shine through.
Step 5: Create Spooky Faces
Here comes the fun part! Use the sliced black olives to create spooky eyes and mouths on your pizzas. You can place two olives for eyes and cut one in half for a creepy grin. Let your creativity run wild—each pizza can have its own unique personality!
Step 6: Add Additional Toppings
Now, let’s add some extra flair! Scatter pepperoni slices and diced bell peppers on top. You can arrange them in fun patterns or just toss them on for a more casual look. The bell peppers add a nice crunch and color, making your pizzas even more festive!
Step 7: Finish with Parmesan
To elevate the flavor, sprinkle some grated Parmesan cheese on top. This adds a delightful salty kick and a touch of sophistication to your mini pizzas. Plus, it gives them a beautiful finish that will make your guests say, “Wow!”
Step 8: Bake the Pizzas
It’s time to bake! Place the baking sheet in your preheated oven and let the pizzas bake for 10-12 minutes. Keep an eye on them; you want the cheese to be bubbly and golden. If you’re unsure, a quick peek will help you gauge their doneness.
Step 9: Cool and Serve
Once they’re out of the oven, let the pizzas cool for a few minutes. This step is important because it allows the cheese to set a bit, making them easier to handle. After that, serve them up and watch the smiles appear as everyone digs in!
Tips for Success
- Prep your ingredients ahead of time to save on cooking stress.
- Experiment with toppings—let your kids choose their favorites!
- Use a pizza stone for an extra crispy crust if you have one.
- Don’t overcrowd the baking sheet; give each pizza room to breathe.
- For a fun twist, try using different sauces like pesto or barbecue.
Equipment Needed
- Baking sheet: A standard one works great, but a pizza stone can give you a crispier crust.
- Spoon: For spreading the sauce evenly on the crusts.
- Knife: To slice olives and other toppings.
- Oven mitts: Safety first when handling hot trays!
Variations
- For a healthier twist, use whole wheat mini pizza crusts for added fiber.
- Try a gluten-free crust if you have dietary restrictions; many options are available in stores.
- Switch up the cheese! Use cheddar, gouda, or a dairy-free alternative for a different flavor profile.
- Add some heat with jalapeños or spicy sausage for those who love a kick.
- For a veggie-packed version, load up on spinach, mushrooms, or zucchini slices.
Serving Suggestions
- Pair your Easy Mini Halloween Pizzas with a fresh garden salad for a balanced meal.
- Serve with spooky-themed drinks like a witch’s brew punch or orange soda.
- For a festive touch, arrange the pizzas on a Halloween-themed platter.
- Include a side of marinara sauce for dipping to enhance the flavor.
FAQs about Easy Mini Halloween Pizzas
Can I make these Easy Mini Halloween Pizzas ahead of time?
Absolutely! You can prepare the pizzas in advance and store them in the fridge. Just bake them right before serving for that fresh-out-of-the-oven taste.
What are some fun toppings for Easy Mini Halloween Pizzas?
Get creative! You can use toppings like sliced bell peppers, mushrooms, or even pineapple. Let your kids choose their favorites for a personalized touch!
How can I make these pizzas healthier?
Consider using whole wheat mini pizza crusts or adding more veggies. You can also opt for low-fat cheese to cut down on calories while still enjoying the flavor.
Can I freeze the Easy Mini Halloween Pizzas?
Yes, you can freeze them! Just assemble the pizzas, wrap them tightly, and store them in the freezer. Bake them straight from frozen, adding a few extra minutes to the cooking time.
What’s the best way to store leftovers?
Store any leftover pizzas in an airtight container in the fridge. They’ll stay fresh for a couple of days, and you can reheat them in the oven for a quick snack!
Final Thoughts
Making Easy Mini Halloween Pizzas is more than just cooking; it’s about creating joyful moments with family and friends. The laughter, the creativity, and the deliciousness all come together to make this recipe a highlight of your Halloween festivities. Whether you’re hosting a party or enjoying a cozy night in, these mini pizzas are sure to bring smiles to everyone’s faces. Plus, the ease of preparation means you can focus on what truly matters—making memories. So, roll up your sleeves, gather your loved ones, and let the spooky fun begin!
Print
Easy Mini Halloween Pizzas: Spooktacular Treats You Must Try!
- Total Time: 27 minutes
- Yield: 12 mini pizzas 1x
- Diet: Vegetarian
Description
These Easy Mini Halloween Pizzas are a fun and spooky treat perfect for Halloween parties or family gatherings.
Ingredients
- 1 package of mini pizza crusts
- 1 cup pizza sauce
- 1 cup shredded mozzarella cheese
- 1/2 cup sliced black olives
- 1/2 cup pepperoni slices
- 1/2 cup bell peppers, diced
- 1/4 cup grated Parmesan cheese
Instructions
- Preheat the oven to 400°F (200°C).
- Place the mini pizza crusts on a baking sheet.
- Spread a layer of pizza sauce on each crust.
- Sprinkle shredded mozzarella cheese over the sauce.
- Use black olives to create spooky eyes and mouths on the pizzas.
- Add pepperoni slices and diced bell peppers for additional decoration.
- Sprinkle grated Parmesan cheese on top for extra flavor.
- Bake in the preheated oven for 10-12 minutes or until the cheese is bubbly and golden.
- Remove from the oven and let cool slightly before serving.
Notes
- Feel free to customize toppings based on your preferences.
- These pizzas can be made ahead of time and baked just before serving.
- Use cookie cutters to create fun shapes with the toppings.
- Prep Time: 15 minutes
- Cook Time: 12 minutes
- Category: Appetizer
- Method: Baking
- Cuisine: Italian
Nutrition
- Serving Size: 1 mini pizza
- Calories: 150
- Sugar: 2g
- Sodium: 300mg
- Fat: 7g
- Saturated Fat: 3g
- Unsaturated Fat: 4g
- Trans Fat: 0g
- Carbohydrates: 15g
- Fiber: 1g
- Protein: 6g
- Cholesterol: 15mg