Introduction to Halloween Eyeball Cakepops
As the leaves turn and the air gets crisp, I can’t help but get excited about Halloween! This year, I’m thrilled to share my Halloween Eyeball Cakepops with you. These spooky treats are not only fun to make, but they also bring a delightful twist to your Halloween gatherings. Whether you’re a busy mom juggling work and family or a professional looking to impress your friends, these cakepops are a quick solution that will wow everyone. Trust me, they’re as delicious as they are creepy, making them the perfect addition to your festive celebrations!
Why You’ll Love This Halloween Eyeball Cakepops
These Halloween Eyeball Cakepops are a breeze to whip up, making them perfect for busy days. With just a few simple steps, you can create a spooky treat that’s sure to impress. Plus, they’re incredibly versatile! You can customize the flavors and colors to suit your taste. And let’s be honest, who doesn’t love a dessert that’s both adorable and a little creepy? Your guests will be raving about them!
Ingredients for Halloween Eyeball Cakepops
Gathering the right ingredients is half the fun! Here’s what you’ll need to create these spooky delights:
- Chocolate cake mix: This is the base of your cakepops. You can use any brand you like, or even make your own from scratch if you’re feeling adventurous!
- Eggs: These help bind the cake together, giving it a moist texture. If you’re looking for a vegan option, you can substitute with applesauce or flaxseed meal.
- Vegetable oil: This adds moisture and richness to the cake. You can swap it for melted coconut oil for a different flavor.
- Water: Just plain old water to help mix the cake batter. You can also use milk for a creamier texture.
- Frosting: Any flavor you love! This is what makes the cakepops extra delicious and helps hold everything together. Cream cheese or buttercream works wonderfully.
- White chocolate melts: These are used to coat the cakeballs, giving them that spooky eyeball look. You can also use dark chocolate if you prefer.
- Red candy melts: Perfect for creating a gory drizzle effect around the eyeballs. You can use any color you like for a fun twist!
- Chocolate chips: These serve as the pupils of the eyeballs. Mini chocolate chips work great, but you can also use M&Ms for a pop of color.
- Lollipop sticks: Essential for turning your cakeballs into cakepops. If you don’t have these, you can use pretzel sticks for a fun alternative.
For exact measurements, check the bottom of the article where you can find everything listed for easy printing!
How to Make Halloween Eyeball Cakepops
Now that you have your ingredients ready, let’s dive into the fun part—making these Halloween Eyeball Cakepops! Follow these simple steps, and you’ll have a spooky treat that’s sure to impress.
Step 1: Prepare the Cake Mix
Start by preheating your oven according to the instructions on the cake mix box. This is crucial for getting that perfect rise. In a large bowl, combine the chocolate cake mix, eggs, vegetable oil, and water. Mix until everything is well blended. It should be smooth and creamy, like a cozy chocolate hug!
Step 2: Bake and Cool the Cake
Pour the batter into a greased cake pan and bake it in the preheated oven. Keep an eye on it, as baking times can vary. Once it’s done, let the cake cool completely. This is the perfect time to clean up your kitchen or enjoy a cup of coffee!
Step 3: Crumble and Mix with Frosting
Once the cake is cool, crumble it into a large bowl. I like to use my hands for this—it’s oddly satisfying! Then, add in your favorite frosting. Mix until it’s well combined. The mixture should be moist but not too sticky, like a soft dough.
Step 4: Form Cake Balls
Now comes the fun part! Take small portions of the mixture and roll them into balls, about the size of a golf ball. Place them on a baking sheet lined with parchment paper. This is where your creativity can shine—make them as round as you can!
Step 5: Chill the Cake Balls
Pop the baking sheet into the refrigerator for about 30 minutes. Chilling helps the cake balls hold their shape when you dip them in chocolate. Plus, it gives you a little break before the next steps!
Step 6: Melt the White Chocolate
While the cake balls chill, melt the white chocolate melts in a microwave-safe bowl. Heat in short bursts, stirring in between, until smooth. Be careful not to overheat it; you want it silky, not clumpy!
Step 7: Insert Lollipop Sticks
Take the cake balls out of the fridge. Dip the end of each lollipop stick into the melted white chocolate, then insert it into a cake ball. This helps the stick stay put. It’s like giving your cakepop a little chocolate hug!
Step 8: Coat with White Chocolate
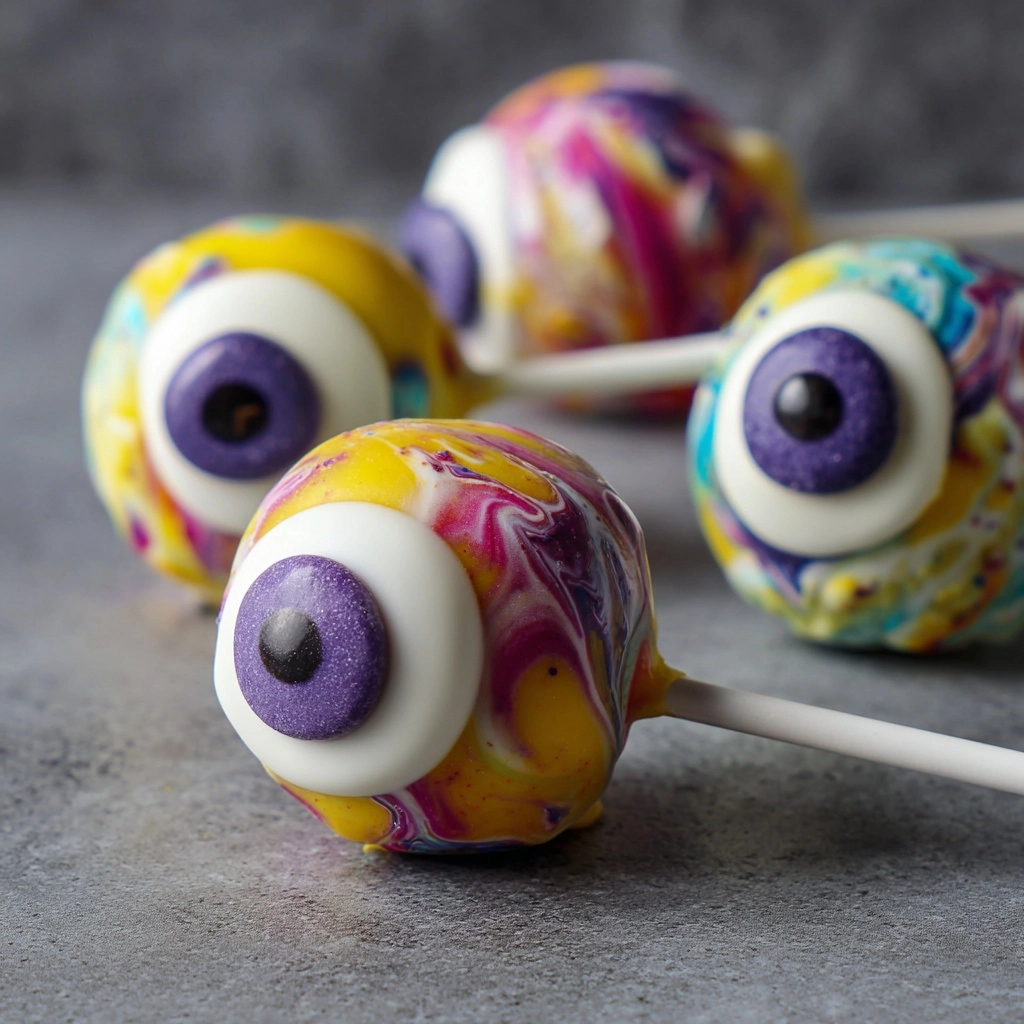
Now, it’s time to coat the cake balls! Dip each one into the melted white chocolate, making sure it’s fully covered. Let the excess chocolate drip off. This is where they start to look like spooky eyeballs!
Step 9: Add Eyeball Pupils
Before the chocolate sets, place a chocolate chip on each cake pop to create the eyeball pupil. You can use mini chocolate chips for a more realistic look. It’s like giving each eyeball its own personality!
Step 10: Drizzle with Red Candy Melts
Next, melt the red candy melts in a separate bowl. Use a fork or a piping bag to drizzle the red candy over the white chocolate. This creates a gory effect that’s perfect for Halloween. It’s all about the spooky details!
Step 11: Let Set Before Serving
Finally, let the cake pops set completely. You can place them in the fridge to speed up the process. Once they’re firm, they’re ready to be served! Just look at those creepy, delicious eyeballs!
Tips for Success
- Make sure your cake is completely cool before crumbling; this prevents a gooey mess.
- Use a cookie scoop for even-sized cake balls; it makes rolling easier!
- Don’t skip the chilling step; it helps the cake balls hold their shape.
- Experiment with different flavors of cake and frosting for a unique twist.
- Have fun with the decoration—let your creativity run wild!
Equipment Needed
- Mixing bowls: Essential for combining ingredients. Any size will do!
- Whisk or electric mixer: For mixing the cake batter smoothly. A whisk works just fine!
- Baking sheet: Needed for chilling the cake balls. A regular tray will work too.
- Parchment paper: Helps prevent sticking. You can use wax paper in a pinch.
- Microwave-safe bowl: For melting chocolate. Any heatproof bowl will suffice!
Variations
- Flavor Swaps: Try using vanilla or red velvet cake mix for a different taste. The colors can add to the spooky theme!
- Frosting Options: Experiment with cream cheese frosting for a tangy twist or peanut butter frosting for a nutty flavor.
- Dietary Adaptations: Use gluten-free cake mix and frosting to make these cakepops suitable for gluten-sensitive guests.
- Vegan Version: Substitute eggs with flaxseed meal and use plant-based frosting and chocolate melts.
- Colorful Candy Melts: Instead of red, use green or purple candy melts for a fun, festive look!
Serving Suggestions
- Pair these Halloween Eyeball Cakepops with spooky-themed drinks like a witch’s brew punch or pumpkin spice lattes.
- Serve them on a decorative platter with fake spider webs for a creepy presentation.
- Include a variety of other Halloween treats, like ghost-shaped cookies or monster cupcakes, for a festive dessert table.
- For a fun twist, place them in a pumpkin or cauldron for a unique serving display!
FAQs about Halloween Eyeball Cakepops
Can I make these Halloween Eyeball Cakepops in advance?
Absolutely! You can prepare the cakepops a day in advance. Just store them in the refrigerator to keep them fresh. This makes them a perfect treat for busy moms like us!
What if I don’t have lollipop sticks?
No worries! You can use pretzel sticks or even sturdy straws as a fun alternative. They’ll still look great and add a unique twist to your spooky treats!
Can I use different flavors for the cake and frosting?
Yes, feel free to get creative! You can use any flavor of cake mix and frosting you love. Chocolate, vanilla, or even red velvet can add a delightful surprise!
How do I store leftover cakepops?
Store any leftover Halloween Eyeball Cakepops in an airtight container in the refrigerator. They’ll stay fresh for up to a week, but I doubt they’ll last that long!
Can kids help make these cakepops?
Definitely! Making Halloween Eyeball Cakepops is a fun activity for kids. They can help with rolling the cake balls and decorating. Just be ready for some giggles and a little mess!
Final Thoughts
Creating these Halloween Eyeball Cakepops is more than just baking; it’s about making memories with your loved ones. The joy of rolling the cake balls and decorating them together can spark laughter and creativity in your kitchen. Plus, the delight on your guests’ faces when they see these spooky treats is priceless! Whether you’re hosting a Halloween party or just looking for a fun activity with the kids, these cakepops are sure to bring smiles all around. So, grab your ingredients and let the Halloween fun begin—your kitchen is about to become a spooky masterpiece!
Print
Halloween Eyeball Cakepops: A Spooky Treat Recipe!
- Total Time: 1 hour
- Yield: 24 cake pops 1x
- Diet: Vegetarian
Description
These Halloween Eyeball Cakepops are a fun and spooky treat perfect for Halloween parties or gatherings. They are easy to make and sure to impress your guests!
Ingredients
- 1 box of chocolate cake mix
- 3 eggs
- 1/2 cup of vegetable oil
- 1 cup of water
- 1 can of frosting (any flavor)
- White chocolate melts
- Red candy melts
- Chocolate chips (for eyeball pupils)
- Lollipop sticks
Instructions
- Preheat your oven and prepare the cake mix according to the package instructions.
- Bake the cake and let it cool completely.
- Crumble the cooled cake into a large bowl and mix in the frosting until well combined.
- Form the mixture into small balls and place them on a baking sheet.
- Chill the cake balls in the refrigerator for about 30 minutes.
- Melt the white chocolate melts in a microwave-safe bowl.
- Dip the end of each lollipop stick into the melted chocolate and insert it into a cake ball.
- Coat each cake ball in the melted white chocolate and let the excess drip off.
- Before the chocolate sets, place a chocolate chip on each cake pop to create the eyeball pupil.
- Use the red candy melts to drizzle ‘blood’ around the eyeball for a spooky effect.
- Let the cake pops set completely before serving.
Notes
- Feel free to use any flavor of cake and frosting you prefer.
- Store the cake pops in the refrigerator to keep them fresh.
- These can be made a day in advance for convenience.
- Prep Time: 30 minutes
- Cook Time: 30 minutes
- Category: Dessert
- Method: Baking and Decorating
- Cuisine: American
Nutrition
- Serving Size: 1 cake pop
- Calories: 150
- Sugar: 12g
- Sodium: 50mg
- Fat: 7g
- Saturated Fat: 3g
- Unsaturated Fat: 4g
- Trans Fat: 0g
- Carbohydrates: 20g
- Fiber: 1g
- Protein: 2g
- Cholesterol: 30mg