
Introduction to How to Make Rice Krispie Valentine Hearts
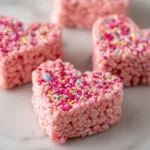
Valentine’s Day is just around the corner, and if you’re like me, you want to celebrate love without spending hours in the kitchen. That’s where learning how to make Rice Krispie Valentine Hearts comes in! This delightful treat is not only quick and easy but also a fun way to show your affection. Whether you’re a busy mom juggling work and family or a professional looking to impress your loved ones, these heart-shaped goodies are the perfect solution. With just a few simple ingredients, you can create a sweet surprise that will warm hearts and bring smiles!
Why You’ll Love This How to Make Rice Krispie Valentine Hearts
These Rice Krispie Valentine Hearts are a dream come true for busy cooks! They come together in just 15 minutes, making them a perfect last-minute treat. The combination of gooey marshmallows and crispy cereal creates a delightful texture that everyone loves. Plus, you can customize them with food coloring or toppings, making each batch uniquely yours. It’s a simple, sweet way to spread love this Valentine’s Day!
Ingredients for How to Make Rice Krispie Valentine Hearts
Gathering the right ingredients is the first step to creating these delightful Rice Krispie Valentine Hearts. Here’s what you’ll need:
- Butter: This adds richness and helps bind the ingredients together. I prefer unsalted butter for better control over the sweetness.
- Marshmallows: The star of the show! They provide that gooey, sweet texture we all love. Mini marshmallows work great, but regular ones can be cut up too.
- Rice Krispies cereal: This gives the hearts their signature crunch. You can also use other puffed cereals if you’re feeling adventurous!
- Red food coloring (optional): A few drops can transform your treats into festive Valentine’s delights. Feel free to skip this if you prefer a classic look.
- Heart-shaped cookie cutter: Essential for shaping your treats into adorable hearts. If you don’t have one, you can use a knife to cut them into squares or other shapes.
For exact measurements, check the bottom of the article where you can find everything listed for easy printing. Happy cooking!
How to Make Rice Krispie Valentine Hearts
Step 1: Melt the Butter
Start by grabbing a large saucepan and placing it on the stove over low heat. Add the butter and let it melt slowly. Stir occasionally to ensure it doesn’t burn. The goal is to have it just melted, creating a lovely base for our sweet treat.
Step 2: Add the Marshmallows
Once the butter is melted, it’s time to add the marshmallows. Pour them into the saucepan and stir continuously. You want to keep stirring until they are completely melted and form a smooth, gooey mixture. This is where the magic begins!
Step 3: Add Food Coloring
If you’re feeling festive, now’s the time to add a few drops of red food coloring. Mix it in well until the marshmallow mixture turns a beautiful shade of pink or red. This little touch makes your Rice Krispie Valentine Hearts even more special!
Step 4: Combine with Rice Krispies
Remove the saucepan from heat and carefully add the Rice Krispies cereal. Stir gently but thoroughly, ensuring every piece is coated in that delicious marshmallow mixture. This step is crucial for that perfect crunch!
Step 5: Press into Baking Pan
Next, grab a greased baking pan. Pour the mixture into the pan and press it down firmly with a spatula or your hands. Make sure it’s evenly spread out. This will help shape the hearts later on. Don’t worry; it’s okay if it’s a little sticky!
Step 6: Cut Out Hearts
Allow the mixture to cool slightly, just enough so it’s safe to handle. Then, take your heart-shaped cookie cutter and press it into the mixture to create adorable heart shapes. If you don’t have a cookie cutter, a knife works just as well for cutting squares or other shapes.
Step 7: Cool Completely
Finally, let the hearts cool completely before serving. This step is important! It allows them to firm up, making them easier to handle and eat. Once they’re cool, you can enjoy your delightful Rice Krispie Valentine Hearts!
Tips for Success
- Use fresh marshmallows for the best texture and flavor.
- Grease your hands or spatula when pressing the mixture into the pan to avoid stickiness.
- For a fun twist, add sprinkles or mini chocolate chips to the mixture before pressing it into the pan.
- Store any leftovers in an airtight container to keep them fresh and chewy.
- Feel free to experiment with different food coloring shades for a unique look!
Equipment Needed
- Large saucepan: Essential for melting butter and marshmallows. A non-stick pot works well too.
- Spatula: Perfect for stirring and pressing the mixture. A wooden spoon can be a great alternative.
- Baking pan: A 9×13 inch pan is ideal, but any similar-sized dish will do.
- Heart-shaped cookie cutter: Necessary for shaping. A knife can also be used for cutting.
Variations
- Chocolate Drizzle: Melt some chocolate and drizzle it over the cooled hearts for an extra touch of sweetness.
- Nutty Addition: Stir in some chopped nuts like almonds or walnuts for a crunchy twist.
- Gluten-Free Option: Use gluten-free puffed rice cereal to make these treats suitable for gluten-sensitive friends.
- Vegan Version: Substitute butter with coconut oil and use vegan marshmallows for a plant-based treat.
- Flavor Infusion: Add a teaspoon of vanilla or almond extract to the melted marshmallows for a delightful flavor boost.
Serving Suggestions
- Pair these Rice Krispie Valentine Hearts with a glass of cold milk for a classic treat.
- Serve them alongside fresh strawberries or raspberries for a fruity contrast.
- For a festive touch, arrange the hearts on a decorative platter with rose petals.
- Wrap them in clear cellophane and tie with a ribbon for a sweet gift.
FAQs about How to Make Rice Krispie Valentine Hearts
Can I make these Rice Krispie Valentine Hearts ahead of time?
Absolutely! These treats can be made a day or two in advance. Just store them in an airtight container to keep them fresh. This way, you can enjoy more time with your loved ones on Valentine’s Day!
What can I use instead of a heart-shaped cookie cutter?
If you don’t have a heart-shaped cookie cutter, no worries! You can use a knife to cut the mixture into squares or any shape you like. Just be creative!
How do I store leftover Rice Krispie Valentine Hearts?
To keep them fresh, store your hearts in an airtight container at room temperature. They should stay delicious for about a week, but I doubt they’ll last that long!
Can I use different cereals for this recipe?
Yes! While Rice Krispies are traditional, you can experiment with other puffed cereals. Just make sure they have a similar texture for the best results.
Is it possible to make these treats gluten-free?
Definitely! Just swap out the Rice Krispies for a gluten-free puffed rice cereal. This way, everyone can enjoy these sweet Valentine’s treats!
Final Thoughts
Making Rice Krispie Valentine Hearts is more than just a recipe; it’s a delightful experience that brings joy to both the cook and the recipients. The simplicity of this treat allows you to focus on what truly matters—spreading love and creating memories. Whether you’re whipping them up for your kids, a partner, or friends, these heart-shaped goodies are sure to bring smiles. Plus, the quick prep time means you can enjoy the process without the stress. So, gather your ingredients, let your creativity flow, and celebrate love with these sweet, crunchy hearts!
How to Make Rice Krispie Valentine Hearts Effortlessly!
- Total Time: 15 minutes
- Yield: 12 hearts 1x
- Diet: Vegetarian
Description
A simple and fun recipe to create Rice Krispie Valentine Hearts, perfect for celebrating love on Valentine’s Day.
Ingredients
- 3 tablespoons butter
- 1 package (10 oz) marshmallows
- 6 cups Rice Krispies cereal
- Red food coloring (optional)
- Heart-shaped cookie cutter
Instructions
- In a large saucepan, melt the butter over low heat.
- Add the marshmallows and stir until completely melted.
- If desired, add a few drops of red food coloring and mix well.
- Remove from heat and add the Rice Krispies cereal, stirring until well coated.
- Press the mixture into a greased baking pan.
- Allow to cool slightly, then use a heart-shaped cookie cutter to cut out heart shapes.
- Let the hearts cool completely before serving.
Notes
- For added decoration, consider drizzling melted chocolate over the hearts.
- Store in an airtight container to keep them fresh.
- These can be made ahead of time for convenience.
- Prep Time: 10 minutes
- Cook Time: 5 minutes
- Category: Dessert
- Method: Stovetop
- Cuisine: American
Nutrition
- Serving Size: 1 heart
- Calories: 150
- Sugar: 10g
- Sodium: 50mg
- Fat: 5g
- Saturated Fat: 3g
- Unsaturated Fat: 2g
- Trans Fat: 0g
- Carbohydrates: 24g
- Fiber: 0g
- Protein: 1g
- Cholesterol: 15mg