
Introduction to Monster Mash Brownies
As the leaves turn and the air gets crisp, I can’t help but get excited about Halloween. It’s that magical time of year when I whip up my favorite treats, and these Monster Mash Brownies are at the top of my list! They’re not just delicious; they’re a fun way to bring the family together in the kitchen. If you’re a busy mom or professional like me, you’ll appreciate how quick and easy this recipe is. Plus, they’re sure to impress your loved ones with their spooky charm. Let’s dive into this delightful baking adventure!
Why You’ll Love This Monster Mash Brownies
These Monster Mash Brownies are a lifesaver for busy days! They come together in just about 50 minutes, making them perfect for last-minute gatherings or school events. The rich chocolate flavor is irresistible, and the colorful toppings add a festive touch that kids adore. Plus, they’re a great way to get the family involved in the kitchen, creating sweet memories while whipping up a spooky treat!
Ingredients for Monster Mash Brownies
Gathering the right ingredients is half the fun of baking these Monster Mash Brownies! Here’s what you’ll need:
- Unsalted butter: This adds richness and moisture to the brownies. You can substitute with coconut oil for a dairy-free option.
- Granulated sugar: Sweetness is key! It helps create that chewy texture we all love.
- Large eggs: They bind everything together and give the brownies their structure. If you need an egg substitute, try using applesauce or flaxseed meal.
- Vanilla extract: A splash of vanilla enhances the chocolate flavor, making it even more delightful.
- All-purpose flour: This is the backbone of the brownies, providing the necessary structure. For a gluten-free version, almond flour works well.
- Cocoa powder: The star of the show! It gives the brownies their rich chocolate flavor. Dark cocoa powder can intensify that chocolatey goodness.
- Salt: Just a pinch balances the sweetness and enhances the flavors.
- Baking powder: This helps the brownies rise slightly, giving them a nice texture.
- Chocolate chips: These little morsels melt into gooey pockets of chocolate bliss. Feel free to mix in white chocolate or peanut butter chips for a twist!
- Assorted Halloween candies: The fun part! Use your favorite spooky candies to decorate and create a festive look. Think gummy worms, candy eyes, or colorful sprinkles!
For exact measurements, check the bottom of the article where you can find everything listed for easy printing. Happy baking!
How to Make Monster Mash Brownies
Now that we have our ingredients ready, let’s get baking! Follow these simple steps to create your Monster Mash Brownies. Trust me, the process is as enjoyable as the final treat!
Step 1: Preheat and Prepare
First things first, preheat your oven to 350°F (175°C). This ensures your brownies bake evenly. While the oven warms up, grab a 9×13 inch baking pan and grease it well. You can use butter or cooking spray. This step is crucial to prevent those delicious brownies from sticking!
Step 2: Mix the Wet Ingredients
In a large bowl, melt the unsalted butter. I usually do this in the microwave for about 30 seconds. Once melted, mix in the granulated sugar until it’s well combined. Next, add the eggs one at a time, mixing thoroughly after each addition. Don’t forget to stir in the vanilla extract! This mixture should be smooth and creamy, like a warm hug.
Step 3: Combine the Dry Ingredients
In another bowl, whisk together the all-purpose flour, cocoa powder, salt, and baking powder. This step is important to ensure even distribution of the dry ingredients. You want to avoid any clumps of cocoa powder. The aroma of cocoa will already start to fill your kitchen, and it’s heavenly!
Step 4: Combine Wet and Dry Mixtures
Now, it’s time to bring the two mixtures together. Gradually add the dry ingredients to the wet ingredients. Mix gently until just combined. Be careful not to overmix; we want those brownies to be fudgy and rich, not tough!
Step 5: Add Chocolate Chips
Here comes the best part! Fold in the chocolate chips. I like to use semi-sweet chips for that perfect balance of sweetness. You can also mix in some white chocolate or peanut butter chips for an extra twist. Just imagine those gooey pockets of chocolate waiting to be discovered!
Step 6: Bake the Brownies
Pour the brownie batter into your prepared baking pan. Spread it evenly with a spatula. Now, pop it into the preheated oven and bake for 25-30 minutes. Keep an eye on them! You’ll know they’re done when a toothpick inserted in the center comes out clean. The smell will be irresistible!
Step 7: Cool and Decorate
Once baked, let the brownies cool completely in the pan. This is the hardest part, I know! But patience is key. Once cooled, it’s time to unleash your creativity. Decorate with assorted Halloween candies to create a spooky effect. Think gummy worms, candy eyes, or colorful sprinkles. Your Monster Mash Brownies are now ready to impress!
Tips for Success
- Always measure your ingredients accurately for the best results.
- Let the brownies cool completely before decorating to prevent melting the toppings.
- Use a toothpick to check for doneness; it should come out with a few moist crumbs.
- Experiment with different Halloween candies for unique designs.
- Store leftovers in an airtight container to keep them fresh and chewy.
Equipment Needed
- 9×13 inch baking pan: A standard size for brownies. You can use an 8×8 inch pan for thicker brownies.
- Mixing bowls: A large bowl for wet ingredients and a medium bowl for dry. Any size will do!
- Whisk: Perfect for mixing dry ingredients. A fork works in a pinch!
- Spatula: Great for spreading the batter evenly. A wooden spoon can also do the trick.
- Measuring cups and spoons: Essential for accuracy. You can use a kitchen scale if you prefer weight measurements.
Variations
- Gluten-Free: Substitute all-purpose flour with a gluten-free blend or almond flour for a delicious gluten-free version.
- Nutty Brownies: Add chopped nuts like walnuts or pecans for a delightful crunch and extra flavor.
- Mint Chocolate: Mix in mint chocolate chips or a few drops of peppermint extract for a refreshing twist.
- Vegan Option: Replace eggs with flaxseed meal and use coconut oil instead of butter for a vegan-friendly treat.
- Spicy Kick: Add a pinch of cayenne pepper or chili powder to the batter for a surprising spicy flavor that pairs well with chocolate.
Serving Suggestions
- Pair your Monster Mash Brownies with a scoop of vanilla ice cream for a delightful contrast.
- Serve with a glass of cold milk or a warm cup of hot chocolate for a cozy treat.
- For a spooky presentation, arrange brownies on a Halloween-themed platter with decorative napkins.
- Top with whipped cream and a sprinkle of cocoa for an elegant touch.
FAQs about Monster Mash Brownies
As you embark on your Monster Mash Brownies adventure, you might have a few questions. Here are some common queries I’ve encountered, along with helpful answers!
Can I make Monster Mash Brownies ahead of time?
Absolutely! You can bake the brownies a day in advance. Just store them in an airtight container at room temperature. Wait to add the Halloween candy toppings until you’re ready to serve for the best presentation.
What can I use instead of eggs in this recipe?
If you’re looking for an egg substitute, try using 1/4 cup of unsweetened applesauce or 1 tablespoon of flaxseed meal mixed with 2.5 tablespoons of water for each egg. Both options work well in keeping the brownies moist!
How do I store leftover brownies?
To keep your Monster Mash Brownies fresh, store them in an airtight container at room temperature for up to three days. If you want to keep them longer, you can freeze them for up to three months. Just thaw before serving!
Can I customize the toppings for my brownies?
Definitely! Feel free to get creative with your toppings. Use your favorite Halloween candies, sprinkles, or even crushed cookies. The more colorful, the better!
What’s the best way to cut brownies?
For clean cuts, use a sharp knife and wipe it clean between cuts. This helps prevent the brownies from sticking to the knife, giving you those perfect, neat squares!
Final Thoughts
Making Monster Mash Brownies is more than just baking; it’s about creating memories with your loved ones. The joy of mixing, decorating, and sharing these delightful treats brings a sense of togetherness that’s hard to beat. As the aroma fills your kitchen, you’ll find yourself smiling at the anticipation of those first bites. Whether you’re hosting a Halloween party or simply enjoying a cozy night in, these brownies are sure to add a sprinkle of magic to your day. So, roll up your sleeves, gather your family, and let the Halloween fun begin with these deliciously spooky brownies!
Monster Mash Brownies: Bake Halloween Delights Today!
- Total Time: 50 minutes
- Yield: 24 brownies 1x
- Diet: Vegetarian
Description
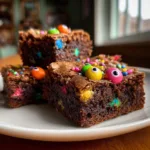
Monster Mash Brownies are a fun and festive treat perfect for Halloween, combining rich chocolate brownies with colorful toppings to create a spooky dessert.
Ingredients
- 1 cup unsalted butter
- 2 cups granulated sugar
- 4 large eggs
- 1 teaspoon vanilla extract
- 1 cup all-purpose flour
- 1 cup cocoa powder
- 1/2 teaspoon salt
- 1/2 teaspoon baking powder
- 1 cup chocolate chips
- Assorted Halloween candies for topping
Instructions
- Preheat your oven to 350°F (175°C) and grease a 9×13 inch baking pan.
- In a large bowl, melt the butter and mix in the sugar until well combined.
- Add the eggs one at a time, mixing well after each addition, then stir in the vanilla extract.
- In another bowl, whisk together the flour, cocoa powder, salt, and baking powder.
- Gradually add the dry ingredients to the wet ingredients, mixing until just combined.
- Fold in the chocolate chips.
- Pour the batter into the prepared baking pan and spread evenly.
- Bake for 25-30 minutes or until a toothpick inserted in the center comes out clean.
- Let the brownies cool completely before adding toppings.
- Decorate with assorted Halloween candies to create a spooky effect.
Notes
- For a more intense chocolate flavor, use dark cocoa powder.
- Feel free to customize the toppings with your favorite Halloween candies.
- Store leftovers in an airtight container for up to 3 days.
- Prep Time: 20 minutes
- Cook Time: 30 minutes
- Category: Dessert
- Method: Baking
- Cuisine: American
Nutrition
- Serving Size: 1 brownie
- Calories: 200
- Sugar: 18g
- Sodium: 150mg
- Fat: 10g
- Saturated Fat: 6g
- Unsaturated Fat: 4g
- Trans Fat: 0g
- Carbohydrates: 25g
- Fiber: 2g
- Protein: 3g
- Cholesterol: 40mg