
Introduction to Patriotic Mini Cheesecakes
As a busy mom, I know how important it is to have quick and delightful treats on hand, especially during celebrations. That’s why I absolutely adore these Patriotic Mini Cheesecakes. They’re not just delicious; they’re a feast for the eyes too! With their vibrant red, white, and blue colors, they’re perfect for any festive gathering. Whether it’s a backyard barbecue or a family picnic, these mini cheesecakes will impress your loved ones without taking up too much of your precious time. Let’s dive into this fun and easy recipe that’s sure to become a favorite!
Why You’ll Love This Patriotic Mini Cheesecakes
These Patriotic Mini Cheesecakes are a dream come true for busy moms like me! They’re incredibly easy to whip up, taking just a little over two hours from start to finish. Plus, the taste is simply divine—creamy, sweet, and oh-so-satisfying. You can make them ahead of time, which means less stress on the day of your celebration. Trust me, your family will be asking for seconds!
Ingredients for Patriotic Mini Cheesecakes
Gathering the right ingredients is the first step to creating these delightful Patriotic Mini Cheesecakes. Here’s what you’ll need:
- Cream Cheese: The star of the show! It gives the cheesecake its rich and creamy texture.
- Sugar: A touch of sweetness to balance the tanginess of the cream cheese.
- Vanilla Extract: This adds a warm, comforting flavor that enhances the overall taste.
- Whipped Cream: Light and fluffy, it makes the cheesecake airy and indulgent.
- Graham Cracker Crumbs: These create a crunchy crust that perfectly complements the creamy filling.
- Butter: Melted butter binds the crust together, adding richness.
- Red and Blue Food Coloring: Essential for that festive look! You can use gel or liquid, depending on what you have on hand.
- Fresh Strawberries and Blueberries: These not only add a pop of color but also a fresh, fruity flavor on top.
For those looking to switch things up, consider using gluten-free graham crackers for a gluten-free version or coconut cream instead of whipped cream for a dairy-free option. You can find all the exact measurements at the bottom of the article, ready for printing!
How to Make Patriotic Mini Cheesecakes
Now that we have our ingredients ready, let’s get started on making these delightful Patriotic Mini Cheesecakes. Follow these simple steps, and you’ll have a treat that’s sure to wow your family and friends!
Step 1: Preheat the Oven
First things first, preheat your oven to 325°F (160°C). Preheating is crucial because it ensures that your cheesecakes bake evenly. A hot oven helps set the filling quickly, giving you that perfect creamy texture.
Step 2: Prepare the Cream Cheese Mixture
In a mixing bowl, beat the softened cream cheese, sugar, and vanilla extract together until smooth. I like to use an electric mixer for this step. It makes the process quicker and ensures a creamy consistency. You want to avoid any lumps, so mix until it’s silky and well combined.
Step 3: Fold in the Whipped Cream
Next, gently fold in the whipped cream. This step is key to keeping your cheesecakes light and fluffy. Use a spatula and a gentle motion to combine the whipped cream with the cream cheese mixture. Be careful not to overmix; we want to keep that airy texture!
Step 4: Make the Crust
In another bowl, mix the graham cracker crumbs with the melted butter. This mixture should resemble wet sand. It’s the perfect base for our mini cheesecakes. Press this crumb mixture firmly into the bottom of your mini cheesecake cups. A flat-bottomed glass works wonders for this step!
Step 5: Assemble the Cheesecakes
Now it’s time to fill those cups! Spoon the cream cheese mixture over the crust, filling each cup about three-quarters full. This allows room for the cheesecakes to rise slightly while baking. Make sure to smooth the tops for a nice finish.
Step 6: Add Color and Swirl
Here comes the fun part! Divide half of the cream cheese mixture into another bowl and add red and blue food coloring. Swirl the colors into the cream cheese mixture using a toothpick or a skewer. This creates a festive marbled effect that’s perfect for your Patriotic Mini Cheesecakes.
Step 7: Bake and Cool
Place your mini cheesecakes in the preheated oven and bake for 15-20 minutes. You’ll know they’re done when the edges are set but the centers are still slightly jiggly. Once baked, let them cool at room temperature for about 30 minutes before transferring them to the fridge. Chilling them for at least 2 hours enhances the flavor and texture.
Step 8: Top with Fresh Fruit
Finally, just before serving, top each cheesecake with fresh strawberries and blueberries. Not only do they add a burst of color, but they also bring a refreshing taste that complements the creamy filling beautifully. You can arrange them in a star shape for an extra festive touch!
Tips for Success
- Make sure your cream cheese is at room temperature for easy mixing.
- Use a piping bag for a more elegant presentation when topping with fruit.
- Chill the cheesecakes overnight for the best flavor and texture.
- Experiment with different fruit toppings like raspberries or blackberries.
- Keep an eye on the baking time; every oven is different!
Equipment Needed
- Mixing Bowls: Use any size, but a large bowl is best for mixing.
- Electric Mixer: A hand mixer works well, but a stand mixer is even better.
- Mini Cheesecake Cups: Muffin tins or silicone molds are great alternatives.
- Spatula: A rubber spatula helps with folding and scraping.
- Toothpick or Skewer: Perfect for swirling colors in the batter.
Variations
- Chocolate Swirl: Add cocoa powder to half of the cream cheese mixture for a chocolatey twist.
- Fruit Puree: Blend fresh fruit like raspberries or mangoes and swirl it into the batter for a fruity flavor.
- Nutty Crust: Substitute graham cracker crumbs with crushed nuts or almond flour for a gluten-free option.
- Vegan Version: Use vegan cream cheese and coconut whipped cream for a dairy-free treat.
- Mini Cheesecake Bites: Pour the mixture into mini muffin tins for bite-sized versions that are perfect for parties.
Serving Suggestions
- Pair these Patriotic Mini Cheesecakes with a refreshing lemonade or iced tea for a delightful summer treat.
- Serve on a festive platter adorned with red, white, and blue decorations to enhance the celebration vibe.
- Consider adding a scoop of vanilla ice cream on the side for an extra indulgent touch.
- For a fun twist, serve with sparklers for a dazzling presentation at your next gathering!
FAQs about Patriotic Mini Cheesecakes
As you embark on your journey to create these delightful Patriotic Mini Cheesecakes, you might have a few questions. Here are some common queries I’ve encountered, along with helpful answers!
Can I make these cheesecakes ahead of time?
Absolutely! These mini cheesecakes can be made a day in advance. Just chill them in the fridge, and they’ll be ready to impress your guests when it’s time to celebrate.
What can I use instead of cream cheese?
If you’re looking for a lighter option, consider using Greek yogurt or a dairy-free cream cheese alternative. Both will give you a creamy texture while keeping the flavor intact.
How do I store leftovers?
Store any leftover Patriotic Mini Cheesecakes in an airtight container in the fridge. They’ll stay fresh for up to three days, but trust me, they won’t last that long!
Can I freeze these mini cheesecakes?
Yes, you can freeze them! Just make sure to wrap each cheesecake tightly in plastic wrap and then place them in a freezer-safe container. They’ll keep for about a month. Thaw them in the fridge before serving.
What other toppings can I use?
While strawberries and blueberries are classic, feel free to get creative! Try adding chocolate shavings, crushed nuts, or even a drizzle of caramel sauce for a unique twist.
Final Thoughts
Creating these Patriotic Mini Cheesecakes is more than just baking; it’s about bringing joy to your celebrations. The vibrant colors and creamy texture make them a hit at any gathering, and the smiles on your loved ones’ faces are priceless. I love how easy they are to prepare, allowing me to spend more time with family and friends. Whether it’s a holiday barbecue or a simple get-together, these mini cheesecakes will surely be the star of the show. So, roll up your sleeves and let the festivities begin with this delightful treat!
Print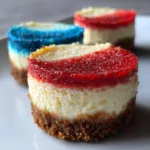
Patriotic Mini Cheesecakes: A Fun Treat for Celebrations!
- Total Time: 2 hours 40 minutes
- Yield: 12 mini cheesecakes 1x
- Diet: Vegetarian
Description
Delicious mini cheesecakes decorated in red, white, and blue, perfect for patriotic celebrations.
Ingredients
- 8 oz cream cheese, softened
- 1/2 cup sugar
- 1 tsp vanilla extract
- 1 cup whipped cream
- 1/2 cup graham cracker crumbs
- 1/4 cup butter, melted
- Red and blue food coloring
- Fresh strawberries and blueberries for topping
Instructions
- Preheat the oven to 325°F (160°C).
- In a mixing bowl, beat the cream cheese, sugar, and vanilla until smooth.
- Fold in the whipped cream until well combined.
- In another bowl, mix the graham cracker crumbs and melted butter.
- Press the crumb mixture into the bottom of mini cheesecake cups.
- Fill each cup with the cream cheese mixture.
- Add red and blue food coloring to half of the mixture and swirl gently.
- Bake for 15-20 minutes, then let cool.
- Top with fresh strawberries and blueberries before serving.
Notes
- Chill the cheesecakes for at least 2 hours before serving for best flavor.
- Use a piping bag for a more decorative topping.
- These can be made a day in advance.
- Prep Time: 20 minutes
- Cook Time: 20 minutes
- Category: Dessert
- Method: Baking
- Cuisine: American
Nutrition
- Serving Size: 1 mini cheesecake
- Calories: 150
- Sugar: 10g
- Sodium: 150mg
- Fat: 8g
- Saturated Fat: 5g
- Unsaturated Fat: 2g
- Trans Fat: 0g
- Carbohydrates: 15g
- Fiber: 1g
- Protein: 3g
- Cholesterol: 30mg