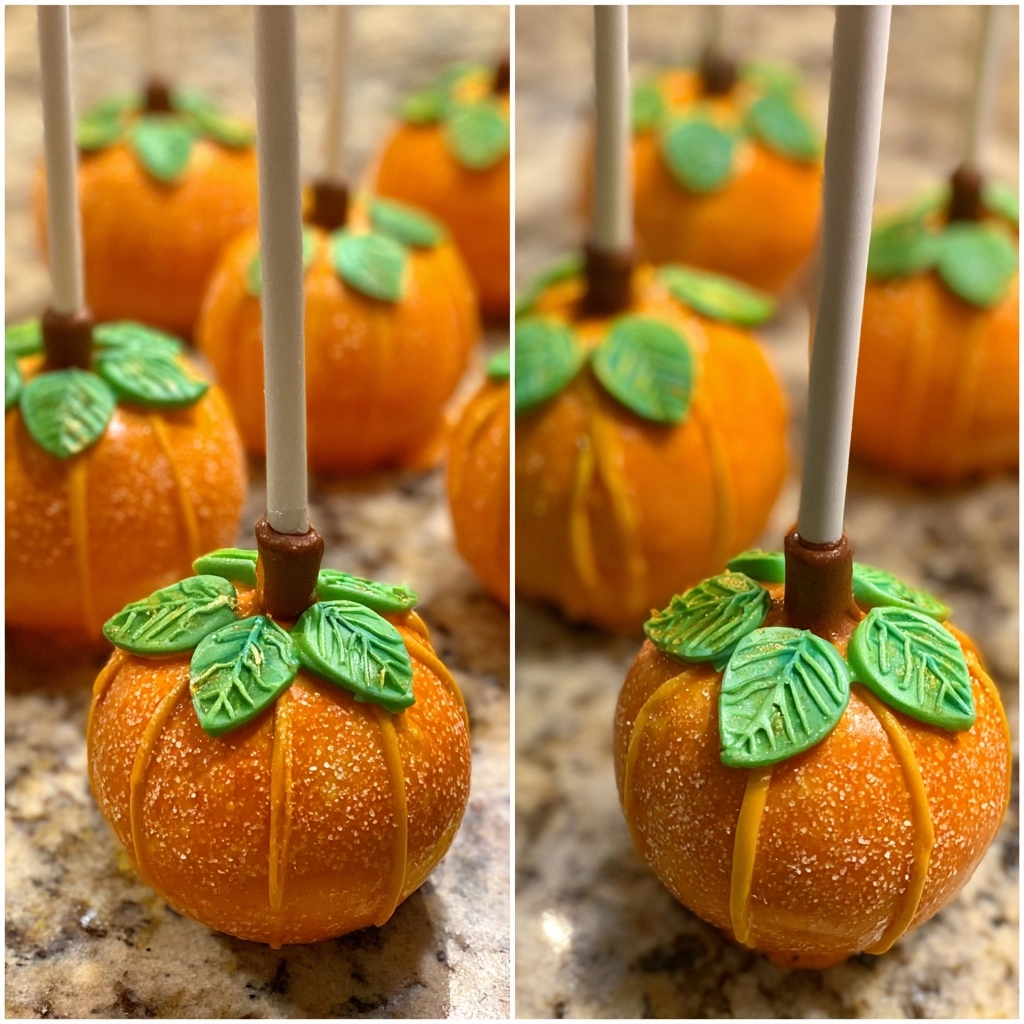
Introduction to Pumpkin Cake Pops
As the leaves turn and the air gets crisp, I find myself craving the warm, cozy flavors of fall. That’s where these delightful Pumpkin Cake Pops come in! They’re not just a treat; they’re a quick solution for busy days when you want to impress your loved ones without spending hours in the kitchen. With just a few simple ingredients, you can whip up these adorable bites of joy that are perfect for any gathering. Trust me, once you take a bite, you’ll be transported to a pumpkin patch on a sunny autumn day!
Why You’ll Love This Pumpkin Cake Pops
These Pumpkin Cake Pops are a game-changer for busy moms and professionals alike. They’re incredibly easy to make, taking just 30 minutes from start to finish. Plus, the combination of pumpkin and warm spices creates a flavor that’s simply irresistible. Whether you’re hosting a fall gathering or just need a sweet treat for the family, these cake pops are sure to bring smiles and warm hearts!
Ingredients for Pumpkin Cake Pops
Gathering the right ingredients is the first step to creating these delightful Pumpkin Cake Pops. Here’s what you’ll need:
- Pumpkin puree: This is the star of the show! It adds moisture and that lovely pumpkin flavor. You can use canned puree or make your own from fresh pumpkins.
- Cake mix: A convenient base that saves time. Choose your favorite flavor, but a vanilla or spice cake mix works wonders with pumpkin.
- Frosting: This binds everything together and adds sweetness. You can use store-bought or homemade frosting. Cream cheese frosting is a delicious alternative!
- White chocolate chips: These are for coating the cake pops. They melt beautifully and create a sweet, creamy shell. Dark chocolate can be a fun twist if you prefer.
- Sprinkles: These are optional but add a festive touch! Use seasonal colors or fun shapes to make your cake pops pop.
For exact measurements, check the bottom of the article where you can find everything listed for easy printing. Happy baking!
How to Make Pumpkin Cake Pops
Now that you have your ingredients ready, let’s dive into the fun part—making these delightful Pumpkin Cake Pops! Follow these simple steps, and you’ll have a batch of sweet treats that will impress everyone.
Step 1: Mix Pumpkin and Cake Mix
Start by grabbing a large mixing bowl. Add the pumpkin puree and cake mix together. Use a spatula or a wooden spoon to mix them until they’re well blended. You want a smooth, thick batter that’s full of that lovely pumpkin flavor. It’s like a warm hug in a bowl!
Step 2: Add Frosting
Next, it’s time to add the frosting. Scoop it into the bowl with your pumpkin mixture. Stir gently until everything is combined and smooth. This step is crucial because the frosting helps bind the mixture together, making it easier to form into balls later. Plus, it adds that extra sweetness we all love!
Step 3: Form Cake Balls
Now comes the fun part—shaping the mixture! Take a small amount of the batter and roll it into a ball about the size of a tablespoon. Place each ball on a baking sheet lined with parchment paper. Don’t worry if they’re not perfect; they’ll still taste amazing! Just make sure they’re all about the same size for even coating later.
Step 4: Chill the Cake Balls
Once you’ve formed all your cake balls, it’s time to chill them. Pop the baking sheet into the refrigerator for about 30 minutes. Chilling is essential because it makes the cake balls firmer, which will help when you dip them in chocolate. Trust me, this step is worth the wait!
Step 5: Melt White Chocolate
While your cake balls are chilling, let’s melt the white chocolate chips. Place them in a microwave-safe bowl and heat in 30-second intervals, stirring in between. Keep an eye on them to avoid burning. You want a smooth, creamy consistency that’s perfect for dipping. If you’re feeling adventurous, you can add a splash of coconut oil to make it even smoother!
Step 6: Dip Cake Balls
Now that your chocolate is melted and your cake balls are chilled, it’s time to dip! Take a cake ball and use a fork to dip it into the melted chocolate. Make sure it’s fully coated, then gently tap the fork on the edge of the bowl to remove excess chocolate. Place the dipped cake ball back on the baking sheet. Repeat this for all the cake balls, and don’t forget to have fun with it!
Step 7: Decorate
Before the chocolate hardens, it’s time to add some flair! Sprinkle your favorite decorations on top of each cake pop. Whether it’s colorful sprinkles or festive shapes, this is where you can get creative. It’s like giving each cake pop its own little personality!
Step 8: Let Set
Finally, let the cake pops set completely before serving. You can leave them on the counter or pop them back in the fridge for a quicker set. Once the chocolate is firm, they’re ready to be enjoyed! Trust me, the wait will be worth it when you see the smiles on everyone’s faces.
Tips for Success
- Chill the cake balls for at least 30 minutes to make dipping easier.
- Use a fork or a toothpick for dipping to avoid messy hands.
- Experiment with different types of sprinkles for a fun twist.
- Make sure the chocolate is smooth; add a bit of coconut oil if needed.
- Store leftover cake pops in an airtight container in the fridge.
Equipment Needed
- Mixing bowl: A large bowl for combining ingredients. A smaller bowl works too if you’re short on space.
- Spatula or wooden spoon: For mixing. A whisk can also do the job!
- Baking sheet: To place your cake balls. A plate can work in a pinch.
- Parchment paper: For easy cleanup. Wax paper is a good alternative.
- Microwave-safe bowl: For melting chocolate. A small saucepan can be used for stovetop melting.
Variations of Pumpkin Cake Pops
- Gluten-Free: Use a gluten-free cake mix to make these Pumpkin Cake Pops suitable for those with gluten sensitivities.
- Vegan: Substitute the frosting with a vegan option and use a plant-based cake mix to create a delicious vegan treat.
- Spiced Up: Add a pinch of nutmeg or ginger to the pumpkin mixture for an extra kick of fall flavor.
- Chocolate Lovers: Use chocolate cake mix instead of vanilla for a rich, chocolatey twist on the classic pumpkin flavor.
- Nutty Addition: Fold in some chopped nuts, like pecans or walnuts, into the cake mixture for added texture and flavor.
Serving Suggestions for Pumpkin Cake Pops
- Pair with a warm cup of spiced chai or apple cider for a cozy fall treat.
- Serve on a festive platter with autumn leaves or mini pumpkins for a charming presentation.
- Include a side of whipped cream for dipping to elevate the experience.
- Perfect for Halloween parties, school events, or as a sweet surprise in lunchboxes.
FAQs about Pumpkin Cake Pops
As you embark on your journey to create these delightful Pumpkin Cake Pops, you might have a few questions. Here are some common queries that can help you along the way:
Can I use fresh pumpkin instead of canned puree?
Absolutely! Fresh pumpkin can add a wonderful flavor. Just make sure to cook and puree it until smooth before using it in the recipe.
How do I store leftover cake pops?
Store your Pumpkin Cake Pops in an airtight container in the refrigerator. They’ll stay fresh for up to a week, but I doubt they’ll last that long!
Can I freeze Pumpkin Cake Pops?
Yes, you can freeze them! Just make sure they’re fully set and then place them in a freezer-safe container. They can last for up to three months.
What can I use instead of white chocolate for coating?
If white chocolate isn’t your thing, you can use dark chocolate or even candy melts in various colors for a fun twist. The options are endless!
Are these cake pops suitable for kids?
Definitely! These Pumpkin Cake Pops are a hit with kids. They’re fun to eat and can be a great way to introduce them to the flavors of fall.
Final Thoughts
Creating these Pumpkin Cake Pops is more than just baking; it’s about sharing joy and warmth with those you love. Each bite is a delightful reminder of cozy fall days, laughter, and togetherness. Whether you’re making them for a festive gathering or just to brighten up a busy week, these treats are sure to bring smiles. Plus, the process is simple enough to involve the kids, making it a fun family activity. So, roll up your sleeves, embrace the pumpkin spice magic, and enjoy the sweet moments that come with every delicious pop!
Print
Pumpkin Cake Pops: Delight in Every Bite Today!
- Total Time: 30 minutes
- Yield: 12 cake pops 1x
- Diet: Vegetarian
Description
Pumpkin Cake Pops are a delightful treat that combines the flavors of pumpkin and spices, perfect for fall celebrations.
Ingredients
- 1 cup pumpkin puree
- 1 cup cake mix
- 1/2 cup frosting
- 1 cup white chocolate chips
- Sprinkles for decoration
Instructions
- In a bowl, mix the pumpkin puree and cake mix until well combined.
- Add the frosting and mix until the mixture is smooth.
- Form the mixture into small balls and place them on a baking sheet.
- Chill the cake balls in the refrigerator for about 30 minutes.
- Melt the white chocolate chips in a microwave-safe bowl.
- Dip each cake ball into the melted chocolate and place them back on the baking sheet.
- Sprinkle with decorations before the chocolate hardens.
- Let the cake pops set completely before serving.
Notes
- Ensure the cake balls are chilled for easier dipping.
- Use different types of sprinkles for variety.
- Store in an airtight container in the refrigerator.
- Prep Time: 20 minutes
- Cook Time: 10 minutes
- Category: Dessert
- Method: Baking
- Cuisine: American
Nutrition
- Serving Size: 1 cake pop
- Calories: 150
- Sugar: 10g
- Sodium: 50mg
- Fat: 7g
- Saturated Fat: 4g
- Unsaturated Fat: 2g
- Trans Fat: 0g
- Carbohydrates: 20g
- Fiber: 1g
- Protein: 2g
- Cholesterol: 15mg
