Introduction to Sensory Experience: The Science of Texture in Modern Food Photography
Welcome, fellow food lovers! Today, we’re diving into the fascinating world of food photography, specifically focusing on the sensory experience: the science of texture in modern food photography. As a busy mom, I know how challenging it can be to capture the beauty of our culinary creations. But trust me, understanding texture can elevate your food photos from ordinary to extraordinary. Whether you’re snapping a quick shot for social media or aiming to impress your loved ones, mastering texture will make your dishes pop and tantalize the senses. Let’s embark on this delicious journey together!
Why You’ll Love This Sensory Experience: The Science of Texture in Modern Food Photography
Capturing the essence of food through photography can be a game-changer. It’s not just about the taste; it’s about the visual feast that draws people in. By focusing on texture, you’ll create images that evoke emotions and cravings. Plus, this process is quick and easy, making it perfect for busy moms like us. You’ll be amazed at how a little attention to detail can transform your food photography!
Ingredients for Sensory Experience: The Science of Texture in Modern Food Photography
To embark on this exciting journey of capturing texture in food photography, you’ll need a few essential ingredients. Here’s what you’ll gather:
- High-quality camera: A good camera is crucial for capturing the intricate details of texture. Whether it’s a DSLR or a smartphone, ensure it has a decent resolution.
- Variety of food items: Choose foods with diverse textures, like crispy vegetables, creamy sauces, or flaky pastries. This variety will make your photos more engaging.
- Natural lighting: Lighting can make or break your photos. Natural light enhances texture beautifully, so aim for a well-lit spot near a window.
- Textured backgrounds: Use surfaces like wood, stone, or fabric to add depth. These backgrounds can complement your food and highlight its texture.
- Props for styling: Consider using utensils, napkins, or decorative items to create a more inviting scene. Props can add personality and context to your shots.
For exact quantities and additional tips, check the bottom of the article where you can find everything available for printing. Happy shooting!
How to Make Sensory Experience: The Science of Texture in Modern Food Photography
Step 1: Choose Food Items with Interesting Textures
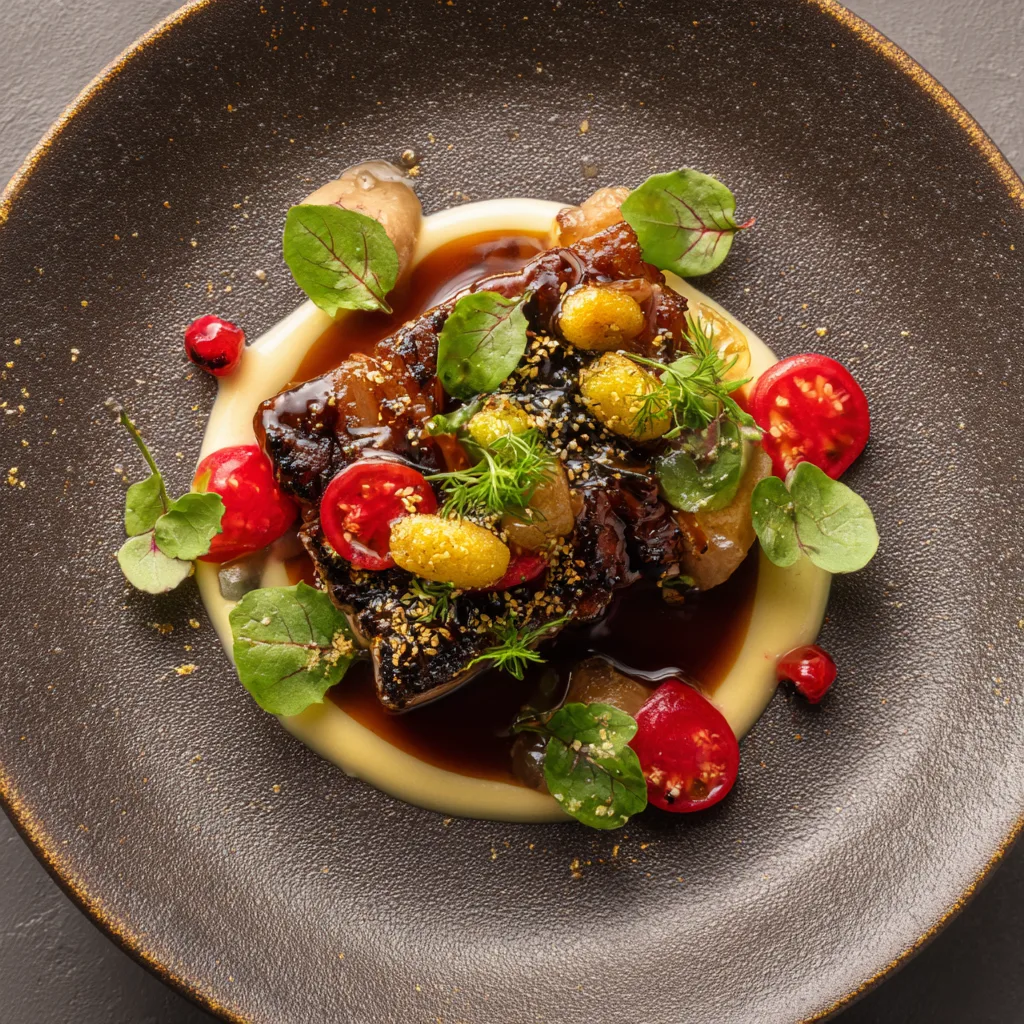
When it comes to food photography, texture is everything! Selecting food with unique textures can make your images pop. Think about crispy lettuce, velvety sauces, or flaky pastries. Each texture tells a story and invites viewers to imagine the taste. For instance, a shiny, juicy tomato contrasts beautifully with a rough, rustic bread. This variety not only enhances the visual appeal but also creates a sensory experience that draws people in. So, don’t shy away from experimenting with different foods that have captivating textures!
Step 2: Set Up Your Shooting Area with Natural Lighting
Natural lighting is your best friend in food photography. It brings out the true colors and textures of your dishes. Find a spot near a window where soft, diffused light pours in. Avoid harsh sunlight, as it can create unflattering shadows. Instead, aim for that golden hour glow, which adds warmth and depth to your photos. If the light is too bright, use sheer curtains to soften it. Remember, the right lighting can transform an ordinary shot into a stunning visual feast!
Step 3: Arrange the Food on Textured Backgrounds
The background of your food photo plays a crucial role in enhancing texture. Using textured surfaces like wood, stone, or fabric can add depth and interest. For example, a rustic wooden table can beautifully complement a vibrant salad. Experiment with different backgrounds to see how they interact with your food. A smooth, white plate can make colorful dishes stand out, while a patterned cloth can add a playful touch. The right background can elevate your food photography to new heights!
Step 4: Experiment with Different Angles
Angles can dramatically change the perception of texture in your photos. Don’t be afraid to get creative! Try shooting from above for a flat lay that showcases all the elements together. Alternatively, a side angle can highlight the layers of a cake or the creaminess of a dip. Move around your subject and find the angle that best captures its unique texture. Remember, the goal is to make your viewers feel like they can almost reach out and touch the food!
Step 5: Use Props to Complement the Food
Props can add personality and context to your food photography. Think about using utensils, napkins, or even fresh herbs to create a more inviting scene. A simple fork can lead the eye to the dish, while a colorful napkin can add a pop of color. Just be careful not to overcrowd the frame; the food should remain the star! Props should enhance the sensory experience without stealing the spotlight. A well-placed prop can make your composition feel complete and engaging.
Step 6: Take Multiple Shots and Review
Practice makes perfect, especially in food photography! Take multiple shots from different angles and settings. This way, you can capture the best representation of texture. After your shoot, review the images carefully. Look for the ones that truly showcase the food’s unique qualities. Sometimes, the best shot is the one you didn’t expect! Don’t hesitate to edit your favorites to enhance colors and textures further. Remember, the goal is to create a sensory experience that leaves viewers craving more!
Tips for Success
- Always clean your lens before shooting to avoid blurry images.
- Use a tripod for stability, especially in low light.
- Experiment with different textures and colors to find the perfect combination.
- Don’t rush; take your time to set up each shot thoughtfully.
- Review your photos regularly to track your progress and learn from each session.
Equipment Needed for Sensory Experience: The Science of Texture in Modern Food Photography
- Camera: A DSLR or a smartphone with a good camera will work.
- Tripod: Use a tripod for stability; a stack of books can be a quick alternative.
- Macro lens: For close-ups, consider a macro lens or use your phone’s zoom feature.
- Reflector: A white poster board can act as a reflector to bounce light.
- Editing software: Use free apps like Snapseed or paid options like Adobe Lightroom for touch-ups.
Variations on Sensory Experience: The Science of Texture in Modern Food Photography
- Seasonal Ingredients: Use seasonal fruits and vegetables to add vibrant colors and unique textures. Think about using ripe peaches in summer or hearty squash in fall.
- Dietary Adaptations: For gluten-free options, consider using gluten-free grains or flours in your food items. This can create interesting textures while catering to dietary needs.
- Textured Sauces: Experiment with different sauces, like chunky salsas or creamy dressings, to add layers of texture to your dishes.
- Herbs and Spices: Fresh herbs can add a pop of color and a different texture. Try using basil, cilantro, or microgreens for a fresh touch.
- Layering Techniques: Create layered dishes, like parfaits or lasagnas, to showcase various textures in one shot. This adds depth and visual interest.
Serving Suggestions for Sensory Experience: The Science of Texture in Modern Food Photography
- Pair your textured dishes with a light, refreshing salad to balance flavors.
- Serve with a glass of sparkling water or herbal tea for a delightful drink option.
- Consider using colorful plates or bowls to enhance visual appeal.
- Garnish with fresh herbs to add a pop of color and texture.
- Use wooden or slate boards for a rustic presentation that complements the food.
FAQs about Sensory Experience: The Science of Texture in Modern Food Photography
What is the importance of texture in food photography?
Texture plays a vital role in food photography as it enhances the visual appeal and creates a sensory experience for viewers. It invites them to imagine the taste and feel of the food, making the image more engaging and appetizing.
How can I improve the texture in my food photos?
To improve texture in your food photos, focus on using natural lighting, choose foods with interesting textures, and experiment with different backgrounds. Additionally, try using a macro lens for close-up shots to capture intricate details.
What types of backgrounds work best for showcasing texture?
Textured backgrounds like wood, stone, or fabric can enhance the visual appeal of your food. A rustic wooden table or a smooth marble surface can create a beautiful contrast, highlighting the food’s unique textures.
How do I choose the right angle for my food photography?
Choosing the right angle is crucial for capturing texture. Experiment with different perspectives, such as overhead shots for flat lays or side angles to showcase layers. The goal is to find the angle that best highlights the food’s unique qualities.
Can I use my smartphone for food photography?
Absolutely! Many smartphones have excellent cameras that can capture stunning food photos. Just remember to utilize natural lighting and focus on texture to create a captivating sensory experience.
Final Thoughts on Sensory Experience: The Science of Texture in Modern Food Photography
Embracing the sensory experience of texture in food photography can truly transform your culinary storytelling. Each click of the camera captures not just food, but the emotions and memories tied to it. As you experiment with different textures, lighting, and angles, you’ll discover a newfound joy in showcasing your dishes. This journey is about more than just pretty pictures; it’s about connecting with your audience and evoking their senses. So grab your camera, unleash your creativity, and let the textures of your food tell a delicious story that leaves everyone craving more!
Print
Sensory Experience: Discover Texture’s Impact in Food Photography
- Total Time: N/A
- Yield: N/A
- Diet: N/A
Description
An exploration of how texture influences the perception of food in photography, enhancing the sensory experience for viewers.
Ingredients
- High-quality camera
- Variety of food items
- Natural lighting
- Textured backgrounds
- Props for styling
Instructions
- Choose food items with interesting textures.
- Set up your shooting area with natural lighting.
- Arrange the food on textured backgrounds to enhance visual appeal.
- Experiment with different angles to capture the texture effectively.
- Use props to complement the food and add depth to the composition.
- Take multiple shots and review them to select the best representation of texture.
Notes
- Consider using a macro lens for close-up shots of texture.
- Pay attention to the color contrast between food and background.
- Experiment with different lighting conditions to see how they affect texture perception.
- Prep Time: N/A
- Cook Time: N/A
- Category: Photography
- Method: Digital Photography
- Cuisine: N/A
Nutrition
- Serving Size: N/A
- Calories: N/A
- Sugar: N/A
- Sodium: N/A
- Fat: N/A
- Saturated Fat: N/A
- Unsaturated Fat: N/A
- Trans Fat: N/A
- Carbohydrates: N/A
- Fiber: N/A
- Protein: N/A
- Cholesterol: N/A