Introduction to Witch’s Finger Sandwiches
As the leaves turn and the air gets crisp, I find myself dreaming up spooky treats for Halloween. One of my absolute favorites is Witch’s Finger Sandwiches. These delightful little sandwiches are not just a feast for the eyes; they’re a quick solution for busy days filled with festive fun. Perfect for parties or a cozy family gathering, they’re sure to impress your loved ones. Plus, they’re easy to whip up, making them a go-to recipe when time is tight. Let’s dive into this whimsical culinary adventure together!
Why You’ll Love This Witch’s Finger Sandwiches
Witch’s Finger Sandwiches are a delightful blend of fun and flavor. They come together in just 15 minutes, making them perfect for busy moms like me. The creamy, green filling is not only tasty but also visually striking, captivating both kids and adults alike. Plus, they’re vegetarian-friendly, so everyone can enjoy them. With minimal prep and maximum impact, these sandwiches are a Halloween hit you won’t want to miss!
Ingredients for Witch’s Finger Sandwiches
Gathering the right ingredients is half the fun! Here’s what you’ll need to create these spooky delights:
- Bread: Choose your favorite type—white, whole grain, or even gluten-free. The bread serves as the canvas for our creepy creation.
- Cream Cheese: This creamy base adds richness and a smooth texture. It’s the perfect partner for our vibrant green food coloring.
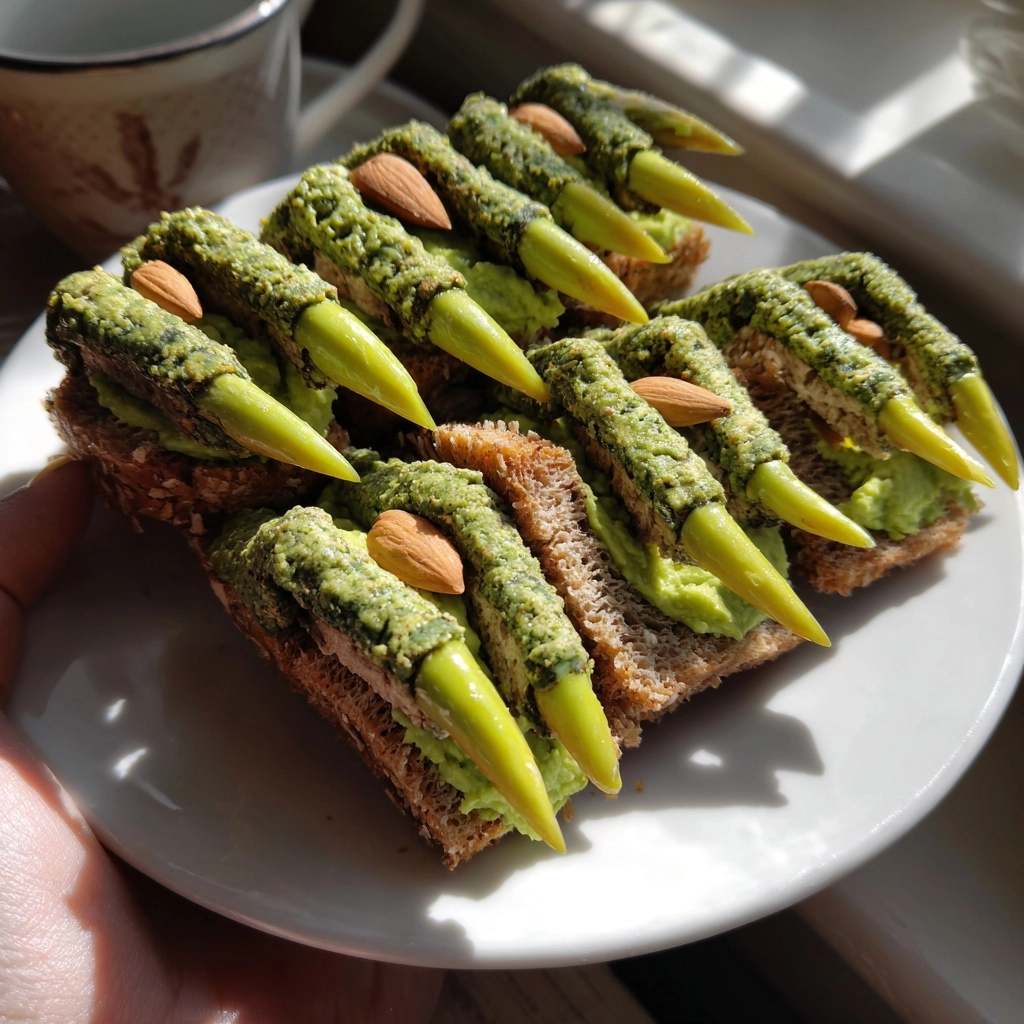
- Green Food Coloring: A few drops transform the cream cheese into a witchy green hue. It’s what makes these sandwiches visually striking!
- Sliced Almonds: These serve as the “fingernails” of our sandwiches. Their crunch adds a delightful texture and a touch of realism.
- Cucumber Slices: Fresh and crisp, cucumbers add a refreshing bite. They balance the creaminess of the cheese beautifully.
- Salt and Pepper: A pinch of seasoning enhances the flavors. It’s a simple touch that makes a big difference.
Feel free to get creative! You can add chopped jalapeños for a spicy kick or swap in different veggies for variety. If you’re looking for exact quantities, they’re listed at the bottom of the article for easy printing. Happy cooking!
How to Make Witch’s Finger Sandwiches
Now that we have our ingredients ready, let’s get to the fun part—making these Witch’s Finger Sandwiches! Follow these simple steps, and you’ll have a spooky treat that’s sure to impress.
Step 1: Prepare the Cream Cheese Mixture
Start by taking your cream cheese and placing it in a mixing bowl. Add a few drops of green food coloring. Mix them together until the cream cheese turns a vibrant green. This is where the magic happens! The color should be even and bright, resembling a witch’s potion.
Step 2: Spread the Mixture
Next, grab your slices of bread. Using a butter knife or a spatula, spread the green cream cheese mixture generously on one side of each slice. Make sure to cover the entire surface for maximum flavor. The more, the merrier!
Step 3: Layer the Cucumber
Now, it’s time to add some crunch! Take half of the bread slices and layer cucumber slices on top of the cream cheese. You can arrange them neatly or pile them high—whatever suits your spooky style. The fresh cucumbers will add a refreshing bite to each sandwich.
Step 4: Assemble the Sandwiches
Take the remaining bread slices and place them on top of the cucumber-covered slices, cream cheese side down. Gently press down to help them stick together. You’re creating a delicious sandwich that looks like a witch’s finger!
Step 5: Cut into Finger Shapes
With a sharp knife, cut each sandwich into finger shapes. Aim for a long, slender look to mimic fingers. You can even add a slight curve to make them more realistic. This is where your creativity shines!
Step 6: Add the Fingernails
To finish off your spooky sandwiches, take a sliced almond and press it onto the tip of each sandwich. This will resemble a fingernail, adding that final touch of fright. Make sure to press firmly so they stay in place!
Step 7: Season and Serve
Finally, sprinkle a little salt and pepper on top to enhance the flavors. Serve your Witch’s Finger Sandwiches immediately for the best taste, or refrigerate them until you’re ready to wow your guests. Either way, they’re sure to be a hit!
Tips for Success
- Use fresh bread for the best texture and flavor.
- Mix the cream cheese thoroughly to avoid any lumps.
- Experiment with different veggies like bell peppers or carrots for added crunch.
- Make a double batch; these sandwiches disappear quickly!
- For a fun twist, try adding herbs like dill or chives to the cream cheese.
Equipment Needed
- Mixing Bowl: A medium-sized bowl works best. You can also use a large plate if you’re in a pinch.
- Butter Knife or Spatula: For spreading the cream cheese. A regular knife will do if you don’t have a spatula.
- Sharp Knife: Essential for cutting the sandwiches into finger shapes. A serrated knife can also work well.
- Cutting Board: A sturdy surface for cutting. Any clean surface will suffice in a hurry.
Variations
- Spicy Witch’s Fingers: Add chopped jalapeños or a dash of hot sauce to the cream cheese for a fiery kick.
- Herbed Delight: Mix in fresh herbs like dill, chives, or parsley into the cream cheese for an aromatic twist.
- Gluten-Free Option: Use gluten-free bread to make these sandwiches suitable for those with dietary restrictions.
- Veggie Medley: Swap cucumbers for other crunchy veggies like bell peppers, carrots, or radishes for a colorful variety.
- Sweet Treat: For a dessert version, use sweetened cream cheese and add fruit slices like strawberries or kiwi instead of cucumbers.
Serving Suggestions
- Pair with a spooky punch or themed cocktails for a festive touch.
- Serve alongside a colorful veggie platter for a balanced spread.
- Garnish with fresh herbs like parsley or dill for a pop of color.
- Present on a Halloween-themed platter to enhance the spooky vibe.
- Include a side of spooky dips, like guacamole or hummus, for extra fun!
FAQs about Witch’s Finger Sandwiches
Can I make Witch’s Finger Sandwiches ahead of time?
Absolutely! These sandwiches can be made a few hours in advance. Just keep them covered in the refrigerator until you’re ready to serve. This makes them a perfect option for busy days or last-minute gatherings.
What can I substitute for cream cheese?
If you’re looking for a lighter option, you can use Greek yogurt or a dairy-free cream cheese alternative. Both will still give you that creamy texture while accommodating different dietary needs.
How can I make these sandwiches more filling?
To add more substance, consider layering in some protein like sliced turkey or ham. You can also add more veggies like shredded carrots or spinach for extra nutrition and crunch.
Are Witch’s Finger Sandwiches suitable for kids?
Can I use different types of bread?
Final Thoughts
Creating Witch’s Finger Sandwiches is more than just making a snack; it’s about bringing a little magic to your kitchen. The joy of seeing your family’s faces light up as they bite into these spooky treats is priceless. They’re not only fun to make but also a fantastic way to spark creativity in the kitchen. Whether you’re hosting a Halloween party or just looking to add some festive flair to your day, these sandwiches are sure to be a hit. So, roll up your sleeves and let the witchy fun begin!
Print
Witch’s Finger Sandwiches: A Spooky Delight to Try!
- Total Time: 15 minutes
- Yield: 4 servings 1x
- Diet: Vegetarian
Description
Witch’s Finger Sandwiches are a fun and spooky treat perfect for Halloween parties or themed gatherings. These finger-shaped sandwiches are not only delicious but also visually striking, making them a hit among guests.
Ingredients
- 8 slices of bread
- 4 oz cream cheese
- 1/4 cup green food coloring
- 1/2 cup sliced almonds
- 1/2 cup cucumber slices
- Salt and pepper to taste
Instructions
- In a bowl, mix the cream cheese with green food coloring until well combined.
- Spread the green cream cheese mixture on one side of each slice of bread.
- Layer cucumber slices on half of the bread slices.
- Top with the remaining bread slices, cream cheese side down, to form sandwiches.
- Cut the sandwiches into finger shapes, making them look like fingers.
- Press an almond slice onto the tip of each sandwich to resemble a fingernail.
- Season with salt and pepper to taste.
- Serve immediately or refrigerate until ready to serve.
Notes
- For a spicier version, add some chopped jalapeños to the cream cheese mixture.
- These sandwiches can be made a few hours in advance; just keep them covered in the refrigerator.
- Feel free to use different types of bread for variety.
- Prep Time: 15 minutes
- Cook Time: 0 minutes
- Category: Appetizer
- Method: No-cook
- Cuisine: American
Nutrition
- Serving Size: 1 sandwich
- Calories: 150
- Sugar: 1g
- Sodium: 200mg
- Fat: 10g
- Saturated Fat: 3g
- Unsaturated Fat: 5g
- Trans Fat: 0g
- Carbohydrates: 12g
- Fiber: 1g
- Protein: 4g
- Cholesterol: 10mg