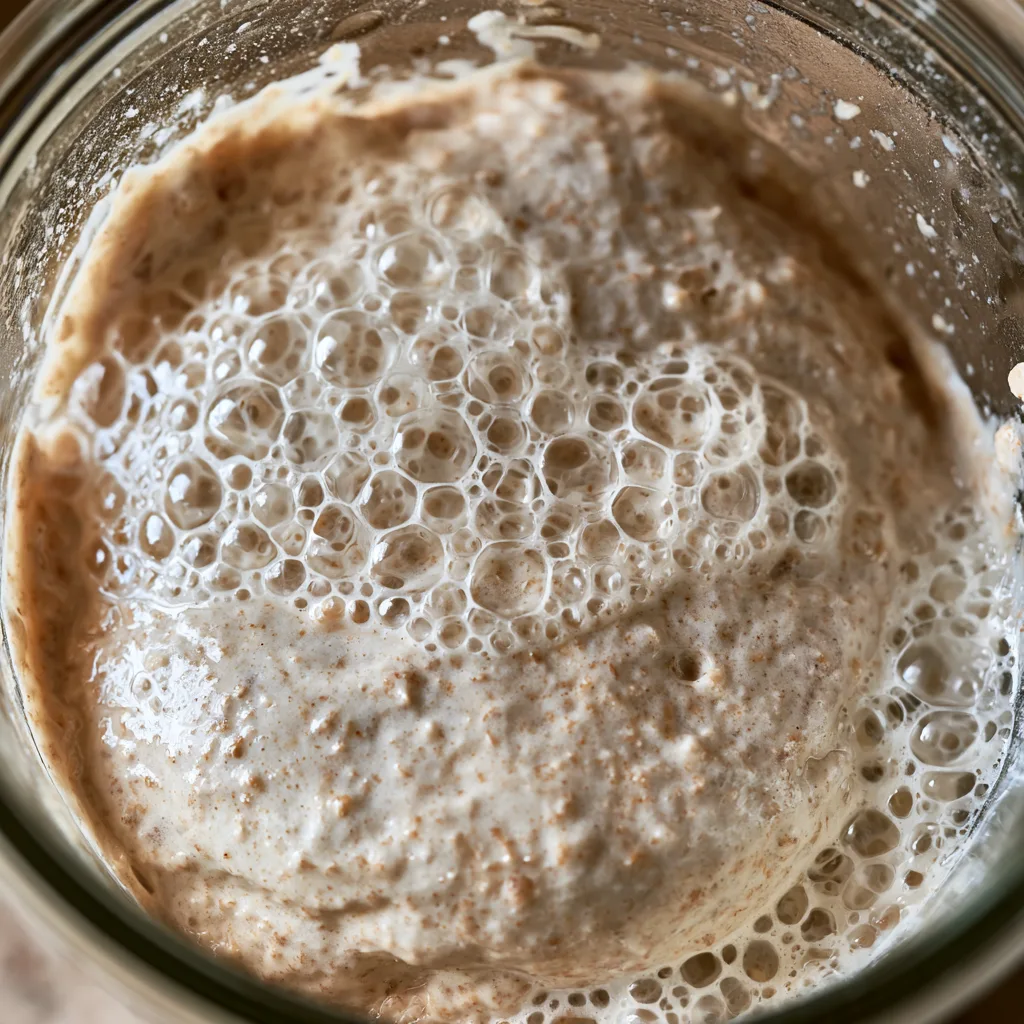
Introduction to 7-Day Sourdough Starter Recipe from Scratch
Welcome to the wonderful world of sourdough! If you’ve ever dreamed of creating your own bread from scratch, this 7-Day Sourdough Starter Recipe from Scratch is just what you need. I know how busy life can get, especially for moms and professionals juggling a million things. This recipe is not only simple but also a delightful way to impress your loved ones with homemade bread. Imagine the aroma of fresh sourdough wafting through your home, bringing everyone together. Let’s embark on this delicious journey together!
Why You’ll Love This 7-Day Sourdough Starter Recipe from Scratch
This 7-Day Sourdough Starter Recipe from Scratch is a game-changer for busy cooks like us. It’s incredibly easy to follow, making it perfect for those hectic weeks. Plus, the taste of homemade sourdough is simply unbeatable! You’ll enjoy the satisfaction of nurturing your starter, watching it grow, and ultimately baking delicious bread that fills your home with warmth and love. Trust me, it’s worth every moment!
Ingredients for 7-Day Sourdough Starter Recipe from Scratch
Gathering the right ingredients is the first step in your sourdough adventure! Here’s what you’ll need:
- Whole wheat flour: This flour is packed with nutrients and helps kickstart the fermentation process. It’s the heart of your starter!
- All-purpose flour: A versatile flour that balances the whole wheat, giving your starter a lovely texture. It’s perfect for everyday baking.
- Water: Use filtered or bottled water for the best results. Chlorine in tap water can hinder the fermentation process, so let’s keep it pure!
- Ripe sourdough starter (optional): If you have a friend with a thriving starter, a tablespoon can give yours a head start. It’s like a little boost of sourdough magic!
For exact measurements, check the bottom of the article where you can find everything listed for easy printing. Remember, the quality of your ingredients can make a big difference in your sourdough journey!
How to Make 7-Day Sourdough Starter Recipe from Scratch
Day 1: Mixing the Base
Let’s kick off our sourdough journey! In a clean glass jar, combine 1 cup of whole wheat flour with 1 cup of filtered water. Stir until everything is well mixed. The mixture should be thick but smooth, like a pancake batter. Cover the jar loosely with a cloth or lid to allow air in, but keep dust out. Place it in a warm spot, around 70-75°F (21-24°C). This warmth is crucial for fermentation!
Day 2: Feeding and Observing
On day two, check your mixture for bubbles. If you see some, that’s a great sign! Discard half of the mixture, about 1 cup, and add 1/2 cup of all-purpose flour and 1/2 cup of water. Stir it up again and cover loosely. This feeding process helps your starter grow stronger. Remember, patience is key here!
Day 3: Continuing the Process
Day three is all about consistency. Repeat the same process: discard half of your starter and feed it with 1/2 cup of all-purpose flour and 1/2 cup of water. Stir well and cover. You might notice more bubbles today, which means your starter is waking up! Keep that warm spot cozy for your little fermentation friend.
Day 4: Noticing Changes
By day four, you should see even more bubbles and a slight rise in your starter. This is exciting! Continue the routine of discarding half and feeding with flour and water. The smell might start to change too, becoming pleasantly sour. This is a good sign that your starter is developing its unique character!
Day 5: Doubling in Size
On day five, your starter should be doubling in size within a few hours of feeding. If it is, congratulations! You’re on the right track. Keep feeding it daily with the same method. If it’s not quite there yet, don’t worry. Just give it a little more time and love. Every starter has its own pace!
Day 6: Checking for Bubbles
Day six is all about observation. Check for bubbles and a pleasant, tangy smell. If your starter is bubbly and lively, continue with the daily feeding. If it’s still a bit sluggish, give it another day. Sometimes, it just needs a little extra encouragement. Keep that warm environment going!
Day 7: Ready to Use
Hooray! By day seven, your sourdough starter should be ready to use. It should double in size within 4-6 hours of feeding. If it does, you’ve successfully created your own starter! Now you can use it for baking delicious sourdough bread. If you’re not ready to bake yet, just keep feeding it daily and store it in the fridge. Your sourdough adventure has just begun!
Tips for Success
- Always use clean utensils and jars to avoid unwanted bacteria.
- Keep your starter in a warm, draft-free spot for optimal fermentation.
- Be consistent with your feeding schedule; it helps develop a strong starter.
- Don’t rush the process; every starter has its own unique timeline.
- If you miss a day, don’t panic! Just resume feeding as usual.
Equipment Needed
- Glass jar: A quart-sized jar works great. You can also use a bowl covered with plastic wrap.
- Spoon: A wooden or silicone spoon is ideal for mixing. Avoid metal, as it can react with the starter.
- Kitchen scale: Optional, but helpful for precise measurements.
- Cloth or lid: Use a breathable cloth or a loose lid to cover your jar.
Variations
- Gluten-Free Option: Substitute whole wheat and all-purpose flour with a gluten-free flour blend. Make sure it contains xanthan gum for better texture.
- Whole Grain Twist: Use spelt or rye flour instead of whole wheat for a nuttier flavor and added nutrients.
- Herb-Infused Starter: Add a teaspoon of dried herbs like rosemary or thyme to the flour mixture on Day 1 for a fragrant twist.
- Fruit-Enhanced Starter: Incorporate a tablespoon of mashed ripe banana or applesauce on Day 2 for a hint of sweetness and extra moisture.
- Sweet Sourdough Starter: Mix in a tablespoon of honey or maple syrup on Day 1 to create a naturally sweet starter, perfect for breakfast breads.
Serving Suggestions
- Pair with butter: Serve warm slices of sourdough with creamy butter for a simple yet delightful treat.
- Accompany with soup: Enjoy your sourdough alongside a hearty bowl of tomato or vegetable soup for a comforting meal.
- Toast it up: Top toasted sourdough with avocado, poached eggs, or your favorite spreads for a delicious breakfast.
- Wine pairing: A glass of crisp white wine complements the tangy flavors of sourdough beautifully.
- Presentation: Serve your bread on a rustic wooden board for an inviting, homemade touch.
FAQs about 7-Day Sourdough Starter Recipe from Scratch
How do I know if my sourdough starter is ready?
Your sourdough starter is ready when it doubles in size within 4-6 hours of feeding. It should also be bubbly and have a pleasant, tangy aroma. If it meets these criteria, you’re all set to bake!
Can I use tap water for my sourdough starter?
While you can use tap water, it’s best to avoid it if possible. Chlorine and other chemicals can hinder the fermentation process. Using filtered or bottled water ensures a healthier starter.
What should I do if my starter isn’t bubbling?
If your starter isn’t bubbling, don’t worry! It may just need more time or a warmer environment. Ensure it’s in a cozy spot and continue feeding it daily. Patience is key in this sourdough journey!
How often should I feed my sourdough starter?
Feed your sourdough starter daily during the initial 7-day process. Once established, you can reduce feeding to once a week if you store it in the fridge. Just remember to bring it back to room temperature before baking!
Can I use my sourdough starter for other recipes?
Absolutely! Your sourdough starter can be used in various recipes, from pancakes to pizza dough. It adds a delightful flavor and texture to many baked goods. Get creative and enjoy the versatility of your homemade starter!
Final Thoughts
Creating your own sourdough starter from scratch is more than just a baking project; it’s a delightful journey filled with anticipation and joy. Each day brings new changes, and watching your starter come to life is incredibly rewarding. The aroma of freshly baked sourdough bread will fill your home with warmth, inviting loved ones to gather around the table. Plus, the satisfaction of knowing you made it all from scratch is unmatched. So, embrace the process, enjoy the little moments, and let your sourdough adventure unfold. Happy baking, my fellow kitchen enthusiasts!
7-Day Sourdough Starter Recipe from Scratch Made Easy!
- Total Time: 7 days
- Yield: 1 sourdough starter
- Diet: Vegan
Description
A simple and easy guide to creating a sourdough starter from scratch in just 7 days.
Ingredients
- Whole wheat flour – 1 cup
- All-purpose flour – 1 cup
- Water – 1 cup (filtered or bottled)
- Ripe sourdough starter (optional) – 1 tablespoon
Instructions
- Day 1: Mix 1 cup of whole wheat flour with 1 cup of water in a glass jar. Stir until combined and cover loosely.
- Day 2: Check for bubbles. Discard half of the mixture and add 1/2 cup of all-purpose flour and 1/2 cup of water. Stir and cover loosely.
- Day 3: Repeat the process of discarding half and feeding with flour and water.
- Day 4: You should see more bubbles. Continue the feeding process.
- Day 5: The starter should be doubling in size. Keep feeding it daily.
- Day 6: If it’s bubbly and has a pleasant smell, continue feeding.
- Day 7: Your sourdough starter is ready to use when it doubles in size within 4-6 hours of feeding.
Notes
- Use filtered water for best results.
- Keep the starter in a warm place, around 70-75°F (21-24°C).
- Feed the starter daily for best results.
- Prep Time: 10 minutes
- Cook Time: N/A
- Category: Baking
- Method: Fermentation
- Cuisine: American
Nutrition
- Serving Size: 1 tablespoon
- Calories: 30
- Sugar: 0g
- Sodium: 0mg
- Fat: 0g
- Saturated Fat: 0g
- Unsaturated Fat: 0g
- Trans Fat: 0g
- Carbohydrates: 7g
- Fiber: 1g
- Protein: 1g
- Cholesterol: 0mg