
Introduction to Rainbow Layer Jell-O Cups
Hey there, fellow home cooks! If you’re looking for a delightful treat that brings a splash of color and joy to your table, look no further than Rainbow Layer Jell-O Cups. These vibrant, layered desserts are not just a feast for the eyes; they’re also incredibly easy to whip up, making them perfect for busy days or special gatherings. I love how they can turn an ordinary afternoon into a fun culinary adventure. Plus, they’re a hit with kids and adults alike, ensuring smiles all around!
Why You’ll Love This Rainbow Layer Jell-O Cups
Rainbow Layer Jell-O Cups are a breeze to make, even on the busiest of days. With just a few simple ingredients, you can create a stunning dessert that looks like it took hours to prepare. The taste is as delightful as the appearance, with each layer bursting with flavor. Plus, they’re a fantastic way to get the kids involved in the kitchen, making memories while you create this colorful treat together!
Ingredients for Rainbow Layer Jell-O Cups
Creating these Rainbow Layer Jell-O Cups is as simple as gathering a few colorful ingredients. Here’s what you’ll need:
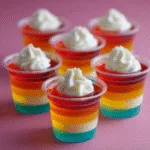
- Red Jell-O: This classic flavor adds a sweet and fruity base to your first layer.
- Orange Jell-O: Bright and zesty, it brings a cheerful pop of color and taste.
- Yellow Jell-O: A sunny layer that adds a hint of tropical sweetness to the mix.
- Green Jell-O: This layer introduces a refreshing twist, reminiscent of a summer garden.
- Blue Jell-O: A cool and calming color that balances the vibrant hues above.
- Purple Jell-O: The final layer, adding a touch of elegance and a burst of berry flavor.
- Boiling water: Essential for dissolving the Jell-O, transforming it from powder to a delightful liquid.
- Cold water: This helps to cool down the mixture, ensuring it sets perfectly.
- Whipped cream (optional): A fluffy topping that adds a creamy finish, making each cup even more indulgent.
Feel free to mix and match flavors based on your family’s favorites! You can find all the exact quantities for these ingredients at the bottom of the article, ready for printing. Happy layering!
How to Make Rainbow Layer Jell-O Cups
Now that you have your ingredients ready, let’s dive into the fun part—making these Rainbow Layer Jell-O Cups! Follow these simple steps, and you’ll have a colorful dessert that’s sure to impress.
Step 1: Prepare the Red Layer
Start by boiling 1 cup of water. In a mixing bowl, dissolve the red Jell-O powder in the boiling water. Stir it well until it’s completely dissolved. Then, add 1 cup of cold water to the mixture. This helps cool it down.
Pour the red mixture into clear cups, filling them about a third of the way. Place the cups in the refrigerator and let them set for about 30 minutes. This layer is the foundation of your colorful creation!
Step 2: Add the Orange Layer
Once the red layer is firm, it’s time for the orange layer. Repeat the same process: dissolve the orange Jell-O in 1 cup of boiling water, then mix in 1 cup of cold water.
Carefully pour the orange mixture over the set red layer. Be gentle to avoid mixing the colors. Return the cups to the fridge and let this layer set for another 30 minutes.
Step 3: Create the Yellow Layer
With the orange layer set, let’s brighten things up with yellow! Again, dissolve the yellow Jell-O in 1 cup of boiling water, followed by 1 cup of cold water.
Pour the yellow mixture over the orange layer, taking care to keep the layers distinct. Refrigerate the cups for another 30 minutes until set.
Step 4: Make the Green Layer
Next up is the green layer! Dissolve the green Jell-O in 1 cup of boiling water, then add 1 cup of cold water.
Pour the green mixture over the yellow layer, ensuring it doesn’t mix. Place the cups back in the fridge for another 30 minutes to set.
Step 5: Pour the Blue Layer
Now, let’s add some coolness with the blue layer. Just like before, dissolve the blue Jell-O in 1 cup of boiling water, then mix in 1 cup of cold water.
Carefully pour the blue mixture over the green layer. Refrigerate for another 30 minutes until it’s set and ready for the final touch!
Step 6: Finish with the Purple Layer
It’s time for the grand finale! Dissolve the purple Jell-O in 1 cup of boiling water, followed by 1 cup of cold water.
Pour the purple mixture over the blue layer, making sure to keep the layers separate. Once again, return the cups to the fridge and let them set for about 30 minutes.
Step 7: Top with Whipped Cream (optional)
Once all the layers are set, it’s time to add a little flair! Top each cup with a dollop of whipped cream if you like. This adds a creamy finish that complements the fruity flavors beautifully.
Serve your Rainbow Layer Jell-O Cups chilled, and watch as everyone’s faces light up with joy!
Tips for Success
- Ensure each layer is fully set before adding the next to keep colors distinct.
- Use clear cups for a beautiful presentation; it showcases the vibrant layers.
- Experiment with different Jell-O flavors for a unique twist.
- Make these cups a day ahead to save time on the day of your event.
- For a fun touch, add sprinkles or fruit on top of the whipped cream!
Equipment Needed
- Mixing bowls: Any size will do; just make sure they’re heatproof for boiling water.
- Measuring cups: Essential for accuracy; you can also use a liquid measuring jug.
- Whisk or spoon: For stirring the Jell-O until fully dissolved.
- Clear cups: Use plastic or glass cups to showcase those beautiful layers.
- Refrigerator: A must for setting those colorful layers!
Variations of Rainbow Layer Jell-O Cups
- Fruit-Infused Layers: Add pureed fruit like strawberries or mango to the Jell-O for a natural flavor boost.
- Gelatin Alternatives: Use agar-agar for a vegan-friendly version that still holds those beautiful layers.
- Flavored Whipped Cream: Mix in a splash of vanilla or almond extract to your whipped cream for an extra flavor kick.
- Alcoholic Twist: For adults, add a splash of flavored liqueur to the Jell-O for a fun party treat.
- Layered Yogurt Cups: Swap out some Jell-O layers for yogurt to create a healthier, creamy dessert option.
Serving Suggestions for Rainbow Layer Jell-O Cups
- Pair with Fresh Fruit: Serve alongside sliced strawberries or blueberries for a refreshing contrast.
- Fun Drinks: Offer colorful fruit juices or sparkling water to complement the vibrant dessert.
- Creative Presentation: Arrange the cups on a bright platter for a festive look.
- Party Favors: Wrap individual cups in cellophane for a delightful take-home treat.
FAQs about Rainbow Layer Jell-O Cups
Can I use sugar-free Jell-O for these cups?
Absolutely! Sugar-free Jell-O works just as well, allowing you to enjoy a lighter version of these colorful treats without sacrificing flavor.
How long do Rainbow Layer Jell-O Cups last in the fridge?
These delightful cups can last up to a week in the fridge, making them a great make-ahead dessert for parties or family gatherings.
Can I make these Jell-O cups in advance?
Yes! In fact, making them a day ahead is a fantastic idea. This way, you can save time and ensure they’re perfectly set for your event.
What if my layers mix together?
If your layers mix, it’s likely that the previous layer wasn’t fully set. Just be patient and let each layer cool completely before adding the next one!
Can I use different flavors for each layer?
Definitely! Feel free to mix and match your favorite Jell-O flavors. The more colorful and varied, the more fun your Rainbow Layer Jell-O Cups will be!
Final Thoughts
Creating Rainbow Layer Jell-O Cups is more than just making a dessert; it’s about bringing joy and color to your table. Each layer tells a story, from the vibrant red to the elegant purple, making every bite a delightful experience. I love how this recipe invites creativity and fun, whether you’re cooking with kids or impressing guests at a gathering. Plus, the smiles on everyone’s faces when they see these colorful cups are priceless. So, roll up your sleeves, gather your ingredients, and let the magic of these Rainbow Layer Jell-O Cups brighten your day!
Rainbow Layer Jell-O Cups: A Fun Treat to Make Today!
- Total Time: 4 hours
- Yield: 12 cups 1x
- Diet: Vegetarian
Description
Rainbow Layer Jell-O Cups are a colorful and fun dessert that is perfect for parties and gatherings. These layered treats are easy to make and visually appealing.
Ingredients
- 3 oz package of red Jell-O
- 3 oz package of orange Jell-O
- 3 oz package of yellow Jell-O
- 3 oz package of green Jell-O
- 3 oz package of blue Jell-O
- 3 oz package of purple Jell-O
- 2 cups boiling water
- 2 cups cold water
- Whipped cream for topping (optional)
Instructions
- In a bowl, dissolve the red Jell-O in 1 cup of boiling water. Stir until fully dissolved, then add 1 cup of cold water. Pour into clear cups and refrigerate until set.
- Repeat the process for the orange, yellow, green, blue, and purple Jell-O layers, allowing each layer to set before adding the next.
- Once all layers are set, top with whipped cream if desired.
- Serve chilled and enjoy your colorful treat!
Notes
- Make sure each layer is fully set before adding the next to avoid mixing colors.
- You can use any flavor of Jell-O you prefer.
- These can be made a day in advance for convenience.
- Prep Time: 30 minutes
- Cook Time: 0 minutes
- Category: Dessert
- Method: Refrigeration
- Cuisine: American
Nutrition
- Serving Size: 1 cup
- Calories: 100
- Sugar: 20g
- Sodium: 50mg
- Fat: 0g
- Saturated Fat: 0g
- Unsaturated Fat: 0g
- Trans Fat: 0g
- Carbohydrates: 25g
- Fiber: 0g
- Protein: 1g
- Cholesterol: 0mg