Introduction to Flag Cake with Fresh Berries (Instagram-Worthy!)
As a busy mom, I know how important it is to find recipes that are not only delicious but also visually stunning. That’s where this Flag Cake with Fresh Berries comes in! It’s a vibrant, festive dessert that’s perfect for celebrations, and it’s sure to impress your loved ones. Plus, it’s surprisingly easy to whip up, making it a quick solution for those hectic days. Imagine the smiles on your family’s faces as they dig into this colorful treat, all while you capture that Instagram-worthy moment. Let’s dive into this delightful recipe!
Why You’ll Love This Flag Cake with Fresh Berries (Instagram-Worthy!)
This Flag Cake with Fresh Berries is a game-changer for busy moms like us! It’s not just quick to make, but it also brings a burst of flavor and color to any gathering. The combination of fluffy vanilla cake and fresh, juicy berries is simply irresistible. Plus, it’s a fun way to get the kids involved in the kitchen. Trust me, this cake will be the star of your next celebration!
Ingredients for Flag Cake with Fresh Berries (Instagram-Worthy!)
Gathering the right ingredients is the first step to creating your stunning Flag Cake with Fresh Berries. Here’s what you’ll need:
- Vanilla cake mix: This is the base of your cake, providing a light and fluffy texture. You can use a store-bought mix for convenience or make your own from scratch if you’re feeling adventurous.
- Large eggs: Eggs add moisture and richness to the cake. They also help bind the ingredients together, ensuring a perfect rise.
- Water: This is essential for mixing with the cake mix. It helps create the right batter consistency.
- Whipped cream: This fluffy topping adds a creamy layer that complements the berries beautifully. You can use store-bought or whip your own for a fresher taste.
- Strawberries: Sliced strawberries bring a sweet and slightly tart flavor, making them perfect for the flag design.
- Blueberries: These little gems add a burst of color and sweetness. They’re also packed with antioxidants!
- Raspberries: Their vibrant red color and tangy taste make them a delightful addition to the cake’s decoration.
- Red and blue food coloring (optional): If you want to enhance the colors of your cake, a few drops of gel food coloring can make it pop even more.
For exact measurements, check the bottom of the article where you can find everything listed for easy printing. Now that you have your ingredients ready, let’s get baking!
How to Make Flag Cake with Fresh Berries (Instagram-Worthy!)
Now that we have our ingredients ready, let’s dive into the fun part—making the Flag Cake with Fresh Berries! Follow these simple steps, and you’ll have a stunning dessert that’s sure to wow everyone.
Step 1: Preheat the Oven
First things first, preheat your oven to 350°F (175°C). Preheating is crucial because it ensures that your cake bakes evenly. A hot oven helps the cake rise properly, giving it that fluffy texture we all love. So, don’t skip this step!
Step 2: Prepare the Cake Mix
Next, grab your bowl and mix the vanilla cake mix with the eggs and water according to the package instructions. Stir until everything is well combined. For the best texture, mix until just combined—overmixing can lead to a dense cake. We want it light and airy!
Step 3: Divide and Color the Batter
Now, it’s time to get creative! Divide the batter into two bowls. In one bowl, add a few drops of red food coloring and mix until you achieve your desired shade. The other bowl will remain plain. This colorful twist will make your cake look festive and fun!
Step 4: Bake the Cake
Pour the red batter into a greased baking pan and pop it in the oven. Bake for 25-30 minutes. To check if it’s done, insert a toothpick in the center. If it comes out clean, your cake is ready! If not, give it a few more minutes.
Step 5: Layer the Cakes
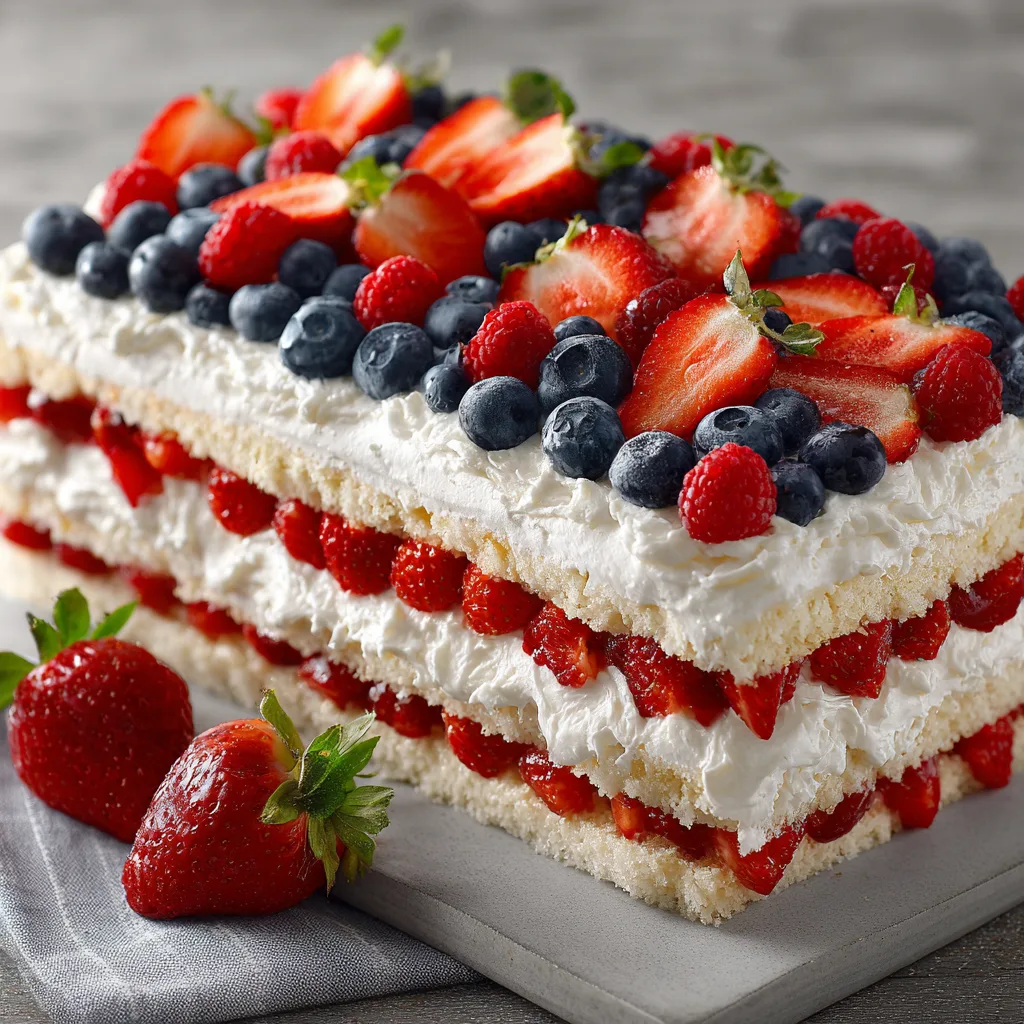
Once your cakes are cooled, it’s time to layer them. Place the plain cake on top of the red one. This creates a beautiful contrast that will shine through once we add the whipped cream and berries. Make sure they’re aligned for a neat presentation!
Step 6: Frost with Whipped Cream
Spread the whipped cream evenly over the top layer of the cake. Use a spatula to create a smooth finish. If you want to get fancy, you can create swirls or peaks for a more textured look. This creamy layer is the perfect canvas for our berry decoration!
Step 7: Decorate with Fresh Berries
Now comes the fun part—decorating! Arrange the sliced strawberries, blueberries, and raspberries on top to create a flag design. Let your creativity flow! This is where your cake becomes Instagram-worthy, so take your time to make it look fabulous.
Step 8: Chill Before Serving
Finally, chill your cake in the refrigerator for at least 1 hour before serving. This step is essential as it allows the flavors to meld together and the whipped cream to set. Plus, a chilled cake is refreshing on a warm day!
Tips for Success
- Use room temperature eggs for better mixing and texture.
- Grease your baking pan well to prevent sticking.
- For a more vibrant cake, opt for gel food coloring instead of liquid.
- Let the cake cool completely before frosting to avoid melting the whipped cream.
- Get the kids involved in decorating; it’s a fun family activity!
Equipment Needed for Flag Cake with Fresh Berries (Instagram-Worthy!)
- Baking pan: A 9×13 inch pan works perfectly. If you don’t have one, a round cake pan will do!
- Mixing bowls: Use two medium-sized bowls for mixing the batter and coloring.
- Spatula: A rubber spatula is great for spreading whipped cream evenly.
- Toothpick: Essential for checking if your cake is done baking.
- Refrigerator: To chill your cake before serving, ensuring it’s refreshing!
Variations of Flag Cake with Fresh Berries (Instagram-Worthy!)
- Gluten-Free Option: Substitute the vanilla cake mix with a gluten-free blend. This way, everyone can enjoy the cake without worry!
- Fruit Swap: Try using different berries like blackberries or even tropical fruits like mango for a unique twist on the classic flag design.
- Vegan Version: Replace eggs with flaxseed meal and use a plant-based whipped cream. This makes the cake suitable for vegan diets!
- Chocolate Cake Base: For chocolate lovers, use a chocolate cake mix instead of vanilla. The rich flavor pairs beautifully with the fresh berries.
- Layered Flag Cake: Create a multi-layered cake by baking additional layers. Alternate colors for a stunning visual effect!
Serving Suggestions for Flag Cake with Fresh Berries (Instagram-Worthy!)
- Pair with Ice Cream: A scoop of vanilla or strawberry ice cream complements the cake perfectly.
- Fresh Mint Leaves: Garnish with mint for a pop of color and refreshing flavor.
- Serve with Lemonade: A glass of homemade lemonade adds a zesty touch to your dessert.
- Presentation: Use a decorative cake stand to elevate the cake’s visual appeal.
- Festive Plates: Serve on colorful plates to enhance the celebratory vibe!
FAQs about Flag Cake with Fresh Berries (Instagram-Worthy!)
As you embark on your baking adventure with this Flag Cake with Fresh Berries, you might have a few questions. Here are some common queries I’ve encountered, along with helpful answers to guide you along the way!
Can I make this cake ahead of time?
Absolutely! You can bake the cake a day in advance. Just wait to add the fresh berries until right before serving to keep them looking vibrant and fresh.
What if I don’t have food coloring?
No worries! The cake will still look beautiful with just the plain vanilla and the colorful berries. The fresh strawberries, blueberries, and raspberries will create a stunning flag design on their own!
How do I store leftovers?
Store any leftover cake in an airtight container in the refrigerator. It should stay fresh for up to three days. Just be aware that the whipped cream may soften over time.
Can I use frozen berries instead of fresh?
Yes, you can! Just make sure to thaw and drain them well before decorating. Frozen berries can be a great alternative if fresh ones aren’t available.
Is this cake suitable for special diets?
Definitely! You can easily adapt this Flag Cake with Fresh Berries to fit gluten-free or vegan diets by using appropriate substitutes. Check out the variations section for more ideas!
Final Thoughts on Flag Cake with Fresh Berries (Instagram-Worthy!)
Creating this Flag Cake with Fresh Berries has been such a joyful experience for me, and I hope it brings the same delight to your kitchen! The vibrant colors and fresh flavors make it a perfect centerpiece for any celebration. Plus, it’s a wonderful way to involve your family in the baking process, creating lasting memories together. Whether it’s a holiday gathering or a simple family dinner, this cake is sure to impress. So, grab your ingredients, unleash your creativity, and enjoy every delicious bite of this Instagram-worthy treat!
Print
Flag Cake with Fresh Berries: Perfect for Your Feed!
- Total Time: 1 hour 50 minutes
- Yield: 12 servings 1x
- Diet: Vegetarian
Description
A vibrant and festive Flag Cake topped with fresh berries, perfect for celebrations and Instagram-worthy moments.
Ingredients
- 1 box of vanilla cake mix
- 3 large eggs
- 1 cup of water
- 1 cup of whipped cream
- 1 cup of strawberries, sliced
- 1 cup of blueberries
- 1/2 cup of raspberries
- Red and blue food coloring (optional)
Instructions
- Preheat the oven to 350°F (175°C).
- Prepare the cake mix according to package instructions, adding eggs and water.
- Divide the batter into two bowls; tint one with red food coloring and leave the other plain.
- Pour the red batter into a greased baking pan and bake for 25-30 minutes.
- Once cooled, layer the plain cake on top of the red cake.
- Spread whipped cream evenly over the top layer.
- Arrange strawberries, blueberries, and raspberries on top to create a flag design.
- Chill in the refrigerator for at least 1 hour before serving.
Notes
- For a more vibrant color, use gel food coloring.
- Make sure the cake is completely cooled before frosting.
- Can be made a day in advance; just add berries before serving.
- Prep Time: 20 minutes
- Cook Time: 30 minutes
- Category: Dessert
- Method: Baking
- Cuisine: American
Nutrition
- Serving Size: 1 slice
- Calories: 250
- Sugar: 20g
- Sodium: 150mg
- Fat: 10g
- Saturated Fat: 5g
- Unsaturated Fat: 3g
- Trans Fat: 0g
- Carbohydrates: 35g
- Fiber: 1g
- Protein: 3g
- Cholesterol: 50mg