
Introduction to Homemade Drumstick Cones (Copycat Recipe!)
Ah, summer! The season of sunshine, laughter, and, of course, ice cream. If you’re like me, you have fond memories of enjoying those delightful drumstick cones on hot days. Well, I’m here to share my version of this classic treat with you—my Homemade Drumstick Cones (Copycat Recipe!). This recipe is a quick solution for busy days when you want to impress your loved ones without spending hours in the kitchen. With just a few simple ingredients, you can create a delicious dessert that will bring smiles to everyone’s faces. Let’s dive into this sweet adventure together!
Why You’ll Love This Homemade Drumstick Cones (Copycat Recipe!)
These Homemade Drumstick Cones are a delightful treat that combines ease and flavor in one delicious package. They come together in just 15 minutes, making them perfect for busy moms like us. Plus, the joy of customizing each cone means you can cater to everyone’s tastes. Whether it’s a hot summer day or a cozy family gathering, these cones are sure to bring smiles and sweet memories!
Ingredients for Homemade Drumstick Cones (Copycat Recipe!)
Gathering the right ingredients is the first step to creating your own Homemade Drumstick Cones. Here’s what you’ll need:
- Vanilla Ice Cream: The star of the show! You can use any flavor you love, but vanilla is classic.
- Sugar Cones: These provide the perfect crunchy base. Feel free to swap with waffle cones for a different texture.
- Chocolate Chips: Melted chocolate creates that irresistible coating. Dark, milk, or even white chocolate works beautifully.
- Chopped Nuts: A sprinkle of nuts adds a delightful crunch. Almonds, peanuts, or walnuts are great choices.
- Hot Fudge Sauce: This sweet drizzle takes your cones to the next level. You can use store-bought or homemade for a personal touch.
For those who want to get creative, consider adding sprinkles or even a layer of caramel sauce for extra sweetness. The exact quantities for each ingredient are listed at the bottom of the article, ready for you to print and take to the kitchen!
How to Make Homemade Drumstick Cones (Copycat Recipe!)
Now that we have our ingredients ready, let’s get started on making these delightful Homemade Drumstick Cones! Follow these simple steps, and you’ll have a delicious treat in no time.
Step 1: Scoop the Ice Cream
Begin by scooping the vanilla ice cream into each sugar cone. Fill them to the top, but don’t worry about being perfect. A little overflow just adds to the charm! If the ice cream is too hard, let it sit for a few minutes to soften. This makes scooping easier and more fun.
Step 2: Melt the Chocolate
Next, grab a microwave-safe bowl and add your chocolate chips. Microwave them in 30-second intervals, stirring in between, until smooth. Be careful not to overheat; burnt chocolate is a sad fate! This melted chocolate will create that signature coating we all love.
Step 3: Dip the Cones
Once your chocolate is melted, it’s time to dip! Hold each filled cone upside down and dip the top into the chocolate. Allow any excess chocolate to drip off. This step is where the magic happens, so don’t rush it! You want a nice, thick layer of chocolate.
Step 4: Add the Nuts
Before the chocolate hardens, sprinkle the chopped nuts over the top. This adds a delightful crunch and a nutty flavor that pairs perfectly with the sweet chocolate. If you’re feeling adventurous, try mixing different nuts for a unique twist!
Step 5: Drizzle the Fudge
Now, grab your hot fudge sauce and drizzle it over the top of each cone. This step is like the cherry on top! It adds an extra layer of sweetness and makes your cones look irresistible. Don’t be shy—go for it!
Step 6: Freeze the Cones
Place the cones upright in the freezer for at least 30 minutes. This allows the chocolate to set and the ice cream to firm up. If you’re in a hurry, you can pop them in for a shorter time, but I recommend letting them freeze fully for the best experience.
Step 7: Serve and Enjoy
Finally, it’s time to enjoy your Homemade Drumstick Cones! Serve them to your family or keep them all to yourself—no judgment here! These cones are perfect for summer gatherings, movie nights, or just a sweet treat after a long day. Enjoy every delicious bite!
Tips for Success
- Let the ice cream soften slightly for easier scooping.
- Use a tall glass or cup to hold the cones while they freeze.
- Experiment with different ice cream flavors for variety.
- Keep a close eye on the chocolate while melting to avoid burning.
- For a fun twist, add colorful sprinkles before the chocolate sets.
Equipment Needed for Homemade Drumstick Cones (Copycat Recipe!)
- Microwave-safe Bowl: For melting chocolate. A small saucepan works too!
- Spoon or Ice Cream Scoop: To fill the cones. A regular spoon can do the job as well.
- Freezer-safe Container: To hold the cones while they freeze. A tall glass can work in a pinch.
Variations of Homemade Drumstick Cones (Copycat Recipe!)
- Fruit Flavored Ice Cream: Swap vanilla for strawberry, mango, or mint chocolate chip for a fruity twist.
- Nut-Free Option: Omit the nuts and use crushed cookies or granola for a different crunch.
- Vegan Version: Use dairy-free ice cream and dark chocolate chips to create a vegan-friendly treat.
- Caramel Drizzle: Instead of hot fudge, try drizzling caramel sauce for a sweet and salty combination.
- Chocolate-Covered Cones: Dip the entire cone in chocolate before filling it with ice cream for an extra chocolatey experience.
Serving Suggestions for Homemade Drumstick Cones (Copycat Recipe!)
- Fresh Fruit: Serve with a side of sliced strawberries or blueberries for a refreshing contrast.
- Cold Beverages: Pair with iced tea or lemonade to keep things cool and refreshing.
- Presentation: Place cones in colorful cups or jars for a fun and festive look.
- Sharing Platter: Create a dessert platter with various toppings for a DIY ice cream cone bar.
FAQs about Homemade Drumstick Cones (Copycat Recipe!)
Can I use different flavors of ice cream for my Homemade Drumstick Cones?
Absolutely! Feel free to experiment with any flavor you love. Chocolate, strawberry, or even mint chocolate chip can add a fun twist to your cones.
How long can I store the Homemade Drumstick Cones in the freezer?
You can store these cones in the freezer for up to two weeks. Just make sure they’re in an airtight container to keep them fresh!
Can I make these cones ahead of time for a party?
Yes! You can prepare them a day in advance. Just keep them in the freezer until you’re ready to serve. They’ll be a hit!
What if I don’t have chocolate chips?
No worries! You can use chocolate bars, or even melted candy melts as a substitute. Just chop them up and melt as you would with chocolate chips.
Are these Homemade Drumstick Cones suitable for kids?
Definitely! Kids love these cones, and they can even help with the assembly. Just keep an eye on the melting chocolate—it can be hot!
Final Thoughts on Homemade Drumstick Cones (Copycat Recipe!)
Creating these Homemade Drumstick Cones is more than just making a dessert; it’s about crafting sweet memories with your loved ones. Each bite is a delightful reminder of carefree summer days, laughter, and joy. The best part? You can customize them to suit everyone’s tastes, making them a hit at any gathering. Whether you’re enjoying them on a sunny afternoon or after a long day, these cones bring a smile to your face. So, gather your ingredients, unleash your creativity, and indulge in this delicious treat that’s sure to become a family favorite!
Print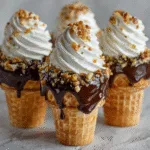
Homemade Drumstick Cones (Copycat Recipe!) You’ll Love!
- Total Time: 45 minutes
- Yield: 4 cones 1x
- Diet: Vegetarian
Description
A delicious homemade version of the classic drumstick ice cream cones, perfect for summer treats.
Ingredients
- 1 cup of vanilla ice cream
- 4 sugar cones
- 1 cup of chocolate chips
- 1/4 cup of chopped nuts
- 1/4 cup of hot fudge sauce
Instructions
- Start by scooping the vanilla ice cream into each sugar cone, filling them to the top.
- In a microwave-safe bowl, melt the chocolate chips until smooth.
- Dip the top of each filled cone into the melted chocolate, allowing excess to drip off.
- Sprinkle chopped nuts over the chocolate before it hardens.
- Drizzle hot fudge sauce over the top of each cone.
- Place the cones in the freezer for at least 30 minutes to set.
- Serve and enjoy your homemade drumstick cones!
Notes
- Feel free to use any flavor of ice cream you prefer.
- For a fun twist, add sprinkles on top of the chocolate before it sets.
- Store any leftover cones in the freezer for later enjoyment.
- Prep Time: 15 minutes
- Cook Time: 0 minutes
- Category: Dessert
- Method: No-bake
- Cuisine: American
Nutrition
- Serving Size: 1 cone
- Calories: 250
- Sugar: 20g
- Sodium: 50mg
- Fat: 12g
- Saturated Fat: 7g
- Unsaturated Fat: 3g
- Trans Fat: 0g
- Carbohydrates: 30g
- Fiber: 1g
- Protein: 3g
- Cholesterol: 30mg