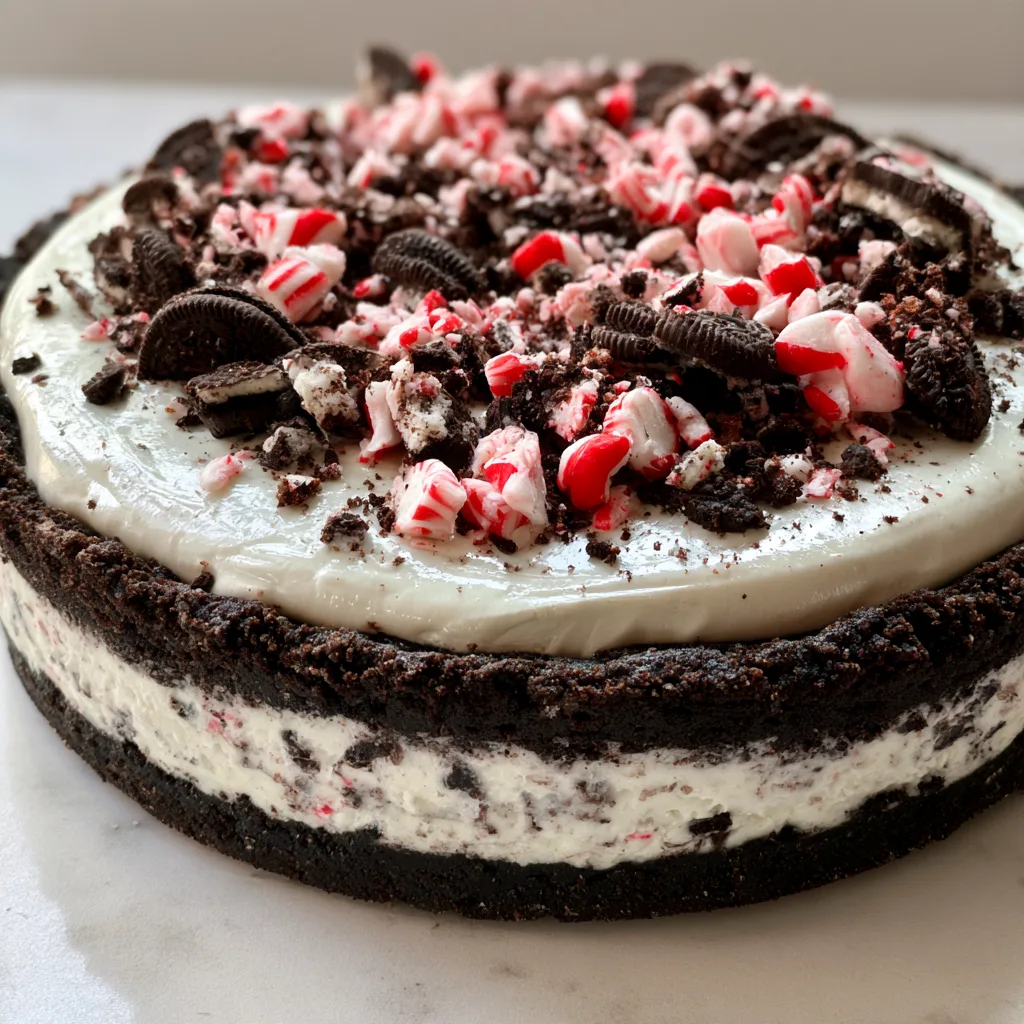
Introduction to Easy Oreo Peppermint Pie
As the holiday season approaches, I find myself searching for delightful treats that are both simple and impressive. That’s where my Easy Oreo Peppermint Pie comes into play! This dessert is a quick solution for busy days, allowing you to whip up something special without spending hours in the kitchen. With its creamy filling and crunchy Oreo crust, it’s sure to become a favorite at your holiday gatherings. Plus, the refreshing peppermint flavor adds a festive touch that everyone will love. Trust me, this pie will make you the star of any dessert table!
Why You’ll Love This Easy Oreo Peppermint Pie
This Easy Oreo Peppermint Pie is a dream come true for busy moms and professionals alike. It’s incredibly easy to make, requiring minimal effort and time. The rich, creamy filling paired with the crunchy Oreo crust creates a delightful contrast that will have your taste buds dancing. Plus, it’s a no-bake recipe, so you can spend more time with your loved ones and less time in the kitchen. What’s not to love?
Ingredients for Easy Oreo Peppermint Pie
Gathering the right ingredients is the first step to creating your Easy Oreo Peppermint Pie. Here’s what you’ll need:
- Oreo cookies: The star of the crust! Their chocolatey goodness adds a rich flavor.
- Unsalted butter: This helps bind the crushed Oreos together, creating a deliciously firm crust.
- Heavy whipping cream: Essential for that light and airy texture in the filling.
- Powdered sugar: Adds sweetness and helps achieve a smooth consistency in the cream cheese mixture.
- Peppermint extract: This gives the pie its refreshing holiday flavor. Adjust to your taste!
- Cream cheese: Provides a creamy base for the filling, making it rich and decadent.
- Whipped topping: Lightens the filling and adds a fluffy texture that complements the cream cheese.
- Crushed peppermint candies: These are for garnish, adding a festive crunch and a pop of color.
For exact measurements, check the bottom of the article where you can find a printable version of the recipe. Feel free to get creative! You can swap out the Oreos for another cookie or use a dairy-free cream cheese for a vegan twist. The possibilities are endless!
How to Make Easy Oreo Peppermint Pie
Now that you have your ingredients ready, let’s dive into the fun part: making your Easy Oreo Peppermint Pie! Follow these simple steps, and you’ll have a delicious dessert that will impress everyone.
Step 1: Preheat the Oven
First things first, preheat your oven to 350°F (175°C). Preheating is crucial because it ensures that your crust bakes evenly. A well-preheated oven helps the butter in the crust melt and bind the Oreos perfectly, giving you that delightful crunch.
Step 2: Prepare the Oreo Crust
In a mixing bowl, combine your crushed Oreo cookies with the melted butter. Stir until the crumbs are fully coated. This mixture should resemble wet sand. Next, press it firmly into the bottom of your pie dish. Use the back of a measuring cup or your fingers to create an even layer. This crust is the foundation of your pie, so make sure it’s packed tightly!
Step 3: Bake the Crust
Pop the crust into your preheated oven and bake for about 10 minutes. You’ll know it’s done when it’s slightly firm to the touch and smells heavenly. Let it cool completely before adding the filling. This cooling step is essential; it prevents the filling from melting into a soggy mess!
Step 4: Make the Cream Cheese Filling
In a separate bowl, beat the softened cream cheese until it’s smooth and creamy. This step is key for a luscious filling. Gradually add the powdered sugar and peppermint extract, mixing until everything is well combined. The peppermint extract will give your filling that festive flavor, so don’t be shy!
Step 5: Whip the Cream
In another bowl, whip the heavy cream until stiff peaks form. This means when you lift the whisk, the cream holds its shape. Be careful not to over-whip, or it might turn grainy. Gently fold the whipped cream into the cream cheese mixture. This folding technique keeps the filling light and airy, which is what we want!
Step 6: Combine and Fill
Now, it’s time to combine the two mixtures. Carefully fold the whipped cream into the cream cheese mixture until fully incorporated. Pour this delightful filling into your cooled Oreo crust, spreading it evenly. This is where the magic happens, and you can already imagine how delicious it will be!
Step 7: Chill the Pie
Cover your pie with plastic wrap and chill it in the refrigerator for at least 4 hours, or until it’s set. Chilling is crucial for the filling to firm up, making it easier to slice. Plus, the flavors meld beautifully during this time, enhancing the overall taste.
Step 8: Garnish and Serve
Before serving, top your pie with whipped topping and sprinkle crushed peppermint candies on top. This adds a festive touch and a delightful crunch. Slice it up, serve it to your loved ones, and watch their faces light up with joy!
Tips for Success
- Use room temperature cream cheese for easier mixing.
- Don’t skip the chilling time; it’s essential for the pie to set properly.
- For a stronger peppermint flavor, add a bit more extract.
- Crush the Oreos finely for a smoother crust.
- Feel free to experiment with different toppings like chocolate shavings or crushed cookies.
Equipment Needed
- Mixing bowls: Use any size you have on hand; just make sure they’re large enough for mixing.
- Pie dish: A standard 9-inch pie dish works best, but a springform pan is a great alternative.
- Electric mixer: A hand mixer is perfect, but a whisk will do if you’re feeling adventurous!
- Measuring cups and spoons: Essential for accuracy, but you can eyeball it if you’re confident.
Variations of Easy Oreo Peppermint Pie
- Chocolate Mint Delight: Swap out the regular Oreos for mint-flavored Oreos for an extra minty kick!
- Vegan Version: Use dairy-free cream cheese and coconut whipped cream to make this pie vegan-friendly.
- Gluten-Free Option: Substitute regular Oreos with gluten-free cookies to accommodate dietary restrictions.
- Chocolate Ganache Topping: Drizzle a rich chocolate ganache over the top for a decadent twist.
- Layered Pie: Add a layer of chocolate pudding between the crust and cream cheese filling for a delightful surprise.
Serving Suggestions for Easy Oreo Peppermint Pie
- Pair with Coffee: A warm cup of coffee complements the pie’s sweetness perfectly.
- Festive Drinks: Serve with hot chocolate or peppermint-infused cocktails for a holiday twist.
- Presentation: Garnish with extra crushed peppermint candies and a sprig of mint for a pop of color.
- Ice Cream: A scoop of vanilla or mint chocolate chip ice cream makes a delightful addition.
FAQs about Easy Oreo Peppermint Pie
Can I make Easy Oreo Peppermint Pie ahead of time?
Absolutely! This pie can be made a day in advance, making it a perfect choice for busy holiday schedules. Just keep it covered in the refrigerator until you’re ready to serve.
How do I store leftovers?
Store any leftovers in the refrigerator for up to three days. Just make sure to cover it well to keep it fresh and delicious!
Can I use different cookies for the crust?
Yes! Feel free to experiment with different cookies. Chocolate graham crackers or even gluten-free cookies can work beautifully in this Easy Oreo Peppermint Pie.
What if I don’t have peppermint extract?
If you’re out of peppermint extract, you can use mint extract instead. Just be cautious, as it can be more potent. A little goes a long way!
Is this pie suitable for a gluten-free diet?
Yes! Simply substitute the regular Oreos with gluten-free cookies, and you’ll have a delicious gluten-free version of this festive dessert.
Final Thoughts
Creating this Easy Oreo Peppermint Pie is more than just baking; it’s about sharing joy and deliciousness with those you love. The smiles on your family’s faces as they savor each creamy, minty bite are priceless. This pie is a reminder that even during the busiest times, we can whip up something special without breaking a sweat. So, gather your loved ones, slice into this festive treat, and let the flavors spark joy and laughter around your holiday table. Trust me, this pie will become a cherished tradition in your home!

Easy Oreo Peppermint Pie: A Delightful Holiday Treat!
- Total Time: 4 hours 30 minutes
- Yield: 8 servings 1x
- Diet: Vegetarian
Description
A delicious and easy-to-make Oreo Peppermint Pie, perfect for holiday gatherings.
Ingredients
- 24 Oreo cookies, crushed
- 1/2 cup unsalted butter, melted
- 1 cup heavy whipping cream
- 1/2 cup powdered sugar
- 1 teaspoon peppermint extract
- 8 oz cream cheese, softened
- 1 cup whipped topping
- 1/4 cup crushed peppermint candies for garnish
Instructions
- Preheat the oven to 350°F (175°C).
- In a bowl, combine crushed Oreo cookies and melted butter, then press into the bottom of a pie dish to form the crust.
- Bake the crust for 10 minutes, then let it cool.
- In a separate bowl, beat the cream cheese until smooth.
- Add powdered sugar and peppermint extract to the cream cheese and mix until well combined.
- In another bowl, whip the heavy cream until stiff peaks form, then gently fold it into the cream cheese mixture.
- Pour the filling into the cooled Oreo crust and spread evenly.
- Chill the pie in the refrigerator for at least 4 hours or until set.
- Before serving, top with whipped topping and crushed peppermint candies.
Notes
- For a stronger peppermint flavor, increase the amount of peppermint extract.
- This pie can be made a day in advance for convenience.
- Store leftovers in the refrigerator for up to 3 days.
- Prep Time: 20 minutes
- Cook Time: 10 minutes
- Category: Dessert
- Method: No-Bake
- Cuisine: American
Nutrition
- Serving Size: 1 slice
- Calories: 320
- Sugar: 18g
- Sodium: 200mg
- Fat: 22g
- Saturated Fat: 10g
- Unsaturated Fat: 8g
- Trans Fat: 0g
- Carbohydrates: 30g
- Fiber: 1g
- Protein: 3g
- Cholesterol: 40mg