
Introduction to No-Bake Flag Cheesecake Bars
As a busy mom, I know how precious time can be, especially during the summer months filled with celebrations. That’s why I absolutely adore these No-Bake Flag Cheesecake Bars! They’re not just a treat; they’re a delightful way to impress your loved ones without spending hours in the kitchen. With a creamy cheesecake layer and vibrant berries arranged like the American flag, these bars are perfect for picnics, barbecues, or any festive gathering. Plus, they require no baking, making them a quick solution for those hot days when you want something sweet but don’t want to heat up the house!
Why You’ll Love This No-Bake Flag Cheesecake Bars
These No-Bake Flag Cheesecake Bars are a dream come true for anyone short on time but big on flavor. They come together in just 20 minutes, leaving you with more time to enjoy the summer sun. The creamy texture and fresh berries create a taste sensation that’s both refreshing and indulgent. Plus, they’re a hit with kids and adults alike, making them the perfect dessert for any gathering!
Ingredients for No-Bake Flag Cheesecake Bars
Gathering the right ingredients is the first step to creating these delightful No-Bake Flag Cheesecake Bars. Here’s what you’ll need:
- Graham cracker crumbs: These form the base of your crust, providing a sweet and crunchy texture.
- Unsalted butter: Melted butter binds the crumbs together, adding richness to the crust.
- Granulated sugar: A touch of sweetness enhances the crust and balances the flavors.
- Cream cheese: The star of the show! Softened cream cheese creates a smooth and creamy filling.
- Powdered sugar: This sweetener dissolves easily, giving the cheesecake a silky texture without any graininess.
- Vanilla extract: A splash of vanilla adds warmth and depth to the cheesecake flavor.
- Heavy whipping cream: Whipped to perfection, it lightens the filling and gives it a fluffy texture.
- Blueberries: These juicy berries create the blue field of the flag, bursting with flavor.
- Strawberries: Sliced strawberries form the red stripes, adding a fresh and fruity touch.
For those looking for alternatives, you can use gluten-free graham crackers for a gluten-free version. Make sure your cream cheese is at room temperature for easier mixing. And if you want to get creative, feel free to swap in other berries for decoration!
Exact quantities for each ingredient are available at the bottom of the article for easy printing.
How to Make No-Bake Flag Cheesecake Bars
Now that you have all your ingredients ready, let’s dive into the fun part—making these No-Bake Flag Cheesecake Bars! Follow these simple steps, and you’ll have a stunning dessert that’s sure to impress.
Step 1: Prepare the Crust
Start by combining the graham cracker crumbs, melted butter, and granulated sugar in a mixing bowl. Mix until everything is well combined and resembles wet sand. Then, press this mixture firmly into the bottom of a 9×13 inch pan. Use the back of a measuring cup or your fingers to create an even layer. This crust is the foundation of your bars, so make sure it’s packed tightly!
Step 2: Make the Cheesecake Filling
In a large mixing bowl, beat the softened cream cheese, powdered sugar, and vanilla extract together. Use an electric mixer on medium speed until the mixture is smooth and creamy. This step is crucial for achieving that luscious cheesecake texture. You want it to be free of lumps, so take your time here!
Step 3: Whip the Cream
In a separate bowl, whip the heavy cream until stiff peaks form. This means when you lift the beaters, the cream should hold its shape. Gently fold the whipped cream into the cream cheese mixture. Be careful not to deflate the whipped cream; you want to keep that light and airy texture!
Step 4: Combine and Spread
Once the whipped cream is fully incorporated, spread the cheesecake filling evenly over the prepared crust. Use a spatula to smooth the top. This layer is where the magic happens, so make sure it’s nice and even. It should look inviting and creamy!
Step 5: Decorate with Berries
Now comes the fun part—decorating! Arrange the blueberries in the top left corner to create the blue field of the flag. Then, place the sliced strawberries in rows to form the red stripes. Get creative! This is your chance to make it visually stunning. The vibrant colors will make your dessert pop!
Step 6: Chill and Serve
Cover the pan with plastic wrap and refrigerate for at least 4 hours, or until set. This chilling time allows the flavors to meld beautifully. Once set, cut into bars and serve chilled. Trust me, the first bite will be a delightful explosion of creamy goodness and fresh fruit!
Tips for Success
- Make sure your cream cheese is at room temperature for easy mixing.
- Use a measuring cup to pack the crust tightly for a sturdy base.
- Don’t skip the chilling time; it’s essential for the bars to set properly.
- For a smoother filling, sift the powdered sugar before adding it.
- Experiment with different berries for a unique twist on decoration!
Equipment Needed
- 9×13 inch pan: A standard baking dish works well, but any similar-sized dish will do.
- Mixing bowls: Use any size you have on hand; just ensure they’re large enough for mixing.
- Electric mixer: A hand mixer is perfect, but a whisk can work if you’re feeling adventurous!
- Spatula: A rubber spatula helps in spreading the filling evenly.
- Plastic wrap: This is essential for covering the pan while chilling.
Variations
- For a chocolate twist, add cocoa powder to the cheesecake filling for a rich flavor.
- Try using crushed Oreos instead of graham cracker crumbs for a cookies-and-cream version.
- Substitute Greek yogurt for half of the cream cheese for a lighter, tangy filling.
- Use seasonal fruits like peaches or raspberries for a different berry arrangement.
- For a vegan option, use dairy-free cream cheese and coconut cream in place of heavy whipping cream.
Serving Suggestions
- Pair these bars with a refreshing glass of lemonade or iced tea for a perfect summer treat.
- Serve alongside a scoop of vanilla ice cream for an extra indulgent dessert experience.
- Garnish with mint leaves for a pop of color and a hint of freshness.
- Present on a festive platter to enhance the patriotic theme.
FAQs about No-Bake Flag Cheesecake Bars
Can I make No-Bake Flag Cheesecake Bars ahead of time?
Absolutely! These bars are perfect for making ahead. Just prepare them a day in advance and let them chill overnight. This allows the flavors to develop even more!
How long do No-Bake Flag Cheesecake Bars last in the fridge?
Stored in an airtight container, these bars can last up to five days in the fridge. Just be sure to keep them covered to maintain their freshness.
Can I use different fruits for decoration?
Yes! While blueberries and strawberries are traditional, feel free to get creative. Raspberries, blackberries, or even kiwi can add a fun twist to your No-Bake Flag Cheesecake Bars.
Is it possible to make these bars gluten-free?
Definitely! Simply swap out regular graham crackers for gluten-free ones. This way, everyone can enjoy this festive dessert!
What can I do if my cheesecake filling is too thick?
If your filling seems too thick, try adding a splash of milk or cream to loosen it up. Just mix it in gradually until you reach your desired consistency.
Final Thoughts
Creating these No-Bake Flag Cheesecake Bars is more than just whipping up a dessert; it’s about bringing joy to your gatherings. The vibrant colors and creamy texture make them a showstopper, while the ease of preparation means you can focus on what truly matters—spending time with loved ones. Each bite is a celebration of summer, reminding us of the simple pleasures in life. So, whether it’s a backyard barbecue or a family picnic, these bars will surely be the highlight of your table. Trust me, they’ll leave everyone asking for seconds!
Print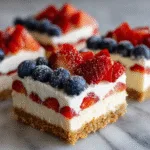
No-Bake Flag Cheesecake Bars: A Festive Treat!
- Total Time: 4 hours 20 minutes
- Yield: 12 bars 1x
- Diet: Vegetarian
Description
No-Bake Flag Cheesecake Bars are a delicious and festive dessert perfect for summer celebrations, featuring a creamy cheesecake layer topped with fresh berries arranged to resemble the American flag.
Ingredients
- 2 cups graham cracker crumbs
- 1/2 cup unsalted butter, melted
- 1/4 cup granulated sugar
- 16 oz cream cheese, softened
- 1 cup powdered sugar
- 1 tsp vanilla extract
- 1 cup heavy whipping cream
- 1 cup blueberries
- 1 cup strawberries, sliced
Instructions
- In a bowl, combine graham cracker crumbs, melted butter, and granulated sugar. Press the mixture into the bottom of a 9×13 inch pan to form the crust.
- In a large mixing bowl, beat the softened cream cheese, powdered sugar, and vanilla extract until smooth and creamy.
- In a separate bowl, whip the heavy cream until stiff peaks form, then gently fold it into the cream cheese mixture.
- Spread the cheesecake mixture evenly over the crust in the pan.
- Arrange the blueberries in the top left corner to create the blue field of the flag.
- Place the sliced strawberries in rows to form the red stripes of the flag.
- Refrigerate for at least 4 hours or until set.
- Cut into bars and serve chilled.
Notes
- For a gluten-free version, use gluten-free graham crackers.
- Make sure the cream cheese is at room temperature for easier mixing.
- Feel free to use other berries for decoration if desired.
- Prep Time: 20 minutes
- Cook Time: 0 minutes
- Category: Dessert
- Method: No-Bake
- Cuisine: American
Nutrition
- Serving Size: 1 bar
- Calories: 250
- Sugar: 15g
- Sodium: 150mg
- Fat: 18g
- Saturated Fat: 10g
- Unsaturated Fat: 8g
- Trans Fat: 0g
- Carbohydrates: 22g
- Fiber: 1g
- Protein: 3g
- Cholesterol: 50mg