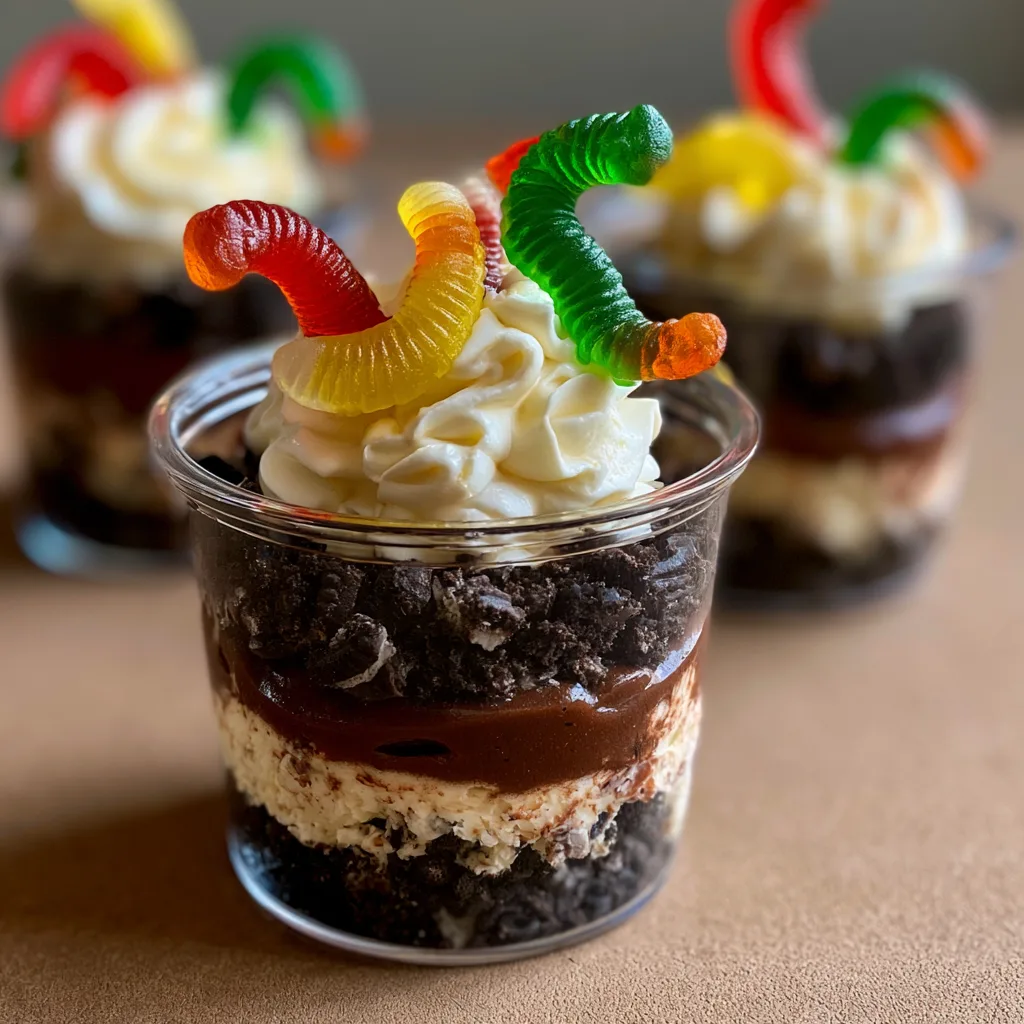
Introduction to No-Bake Oreo Dirt Cups with Gummy Worms
As a busy mom, I know how challenging it can be to whip up something fun and delicious for the kids. That’s why I absolutely adore these No-Bake Oreo Dirt Cups with Gummy Worms! They’re not just a treat; they’re a delightful adventure in a cup. With minimal effort and maximum fun, these cups are perfect for a quick dessert after dinner or a surprise snack on a lazy afternoon. Plus, who can resist the charm of gummy worms peeking out from a mound of chocolatey goodness? Trust me, your kids will go crazy for these!
Why You’ll Love This No-Bake Oreo Dirt Cups with Gummy Worms
These No-Bake Oreo Dirt Cups with Gummy Worms are a lifesaver for busy days! They come together in just 15 minutes, making them a quick and easy dessert option. The creamy pudding and crunchy Oreos create a delightful texture that kids adore. Plus, the playful presentation with gummy worms adds a fun twist that will have your little ones begging for more. It’s a win-win for everyone!
Ingredients for No-Bake Oreo Dirt Cups with Gummy Worms
Gathering the right ingredients is the first step to creating these delightful No-Bake Oreo Dirt Cups with Gummy Worms. Here’s what you’ll need:
- Oreo cookies: The star of the show! These chocolatey cookies provide the perfect crunch and flavor.
- Instant chocolate pudding mix: This is what gives the cups their creamy texture and rich chocolate taste.
- Milk: Essential for preparing the pudding. You can use whole, skim, or even a non-dairy alternative.
- Whipped topping: This adds a light, fluffy element to the dessert, making it extra indulgent.
- Gummy worms: The fun decoration that kids love! They add a playful touch to the dessert.
Feel free to get creative! You can swap regular Oreos for chocolate Oreos for an even richer flavor. If you want to add a little extra fun, consider topping your cups with chocolate sprinkles or edible grass. The exact quantities for each ingredient are listed at the bottom of the article for your convenience.
How to Make No-Bake Oreo Dirt Cups with Gummy Worms
Now that you have all your ingredients ready, let’s dive into the fun part—making these No-Bake Oreo Dirt Cups with Gummy Worms! This process is as easy as pie, or should I say, as easy as dirt cups! Follow these simple steps, and you’ll have a delightful dessert in no time.
Step 1: Crush the Oreo Cookies
Start by placing your Oreo cookies in a zip-top bag. Seal it tightly, then grab a rolling pin or a heavy pan. Give those cookies a good whack until they turn into fine crumbs. This is a great way to relieve stress, trust me! Set the crumbs aside for later.
Step 2: Prepare the Pudding Mixture
In a mixing bowl, combine the instant chocolate pudding mix with the milk. Whisk it together until it’s smooth and creamy. Let it sit for about five minutes. This waiting time is crucial as it allows the pudding to thicken up nicely. You’ll want that rich texture for your dirt cups!
Step 3: Fold in the Whipped Topping
Once your pudding has thickened, it’s time to add the whipped topping. Gently fold it into the pudding mixture using a spatula. This step is all about creating a light and fluffy texture. Be careful not to overmix; we want to keep that airy feel!
Step 4: Layer the Ingredients
Now comes the fun part—layering! Grab your serving cups and start with a layer of crushed Oreo cookies at the bottom. Next, spoon in a layer of the pudding mixture. Repeat these layers until your cups are filled, finishing with a generous sprinkle of crushed Oreos on top. It’s like building a delicious little dessert castle!
Step 5: Decorate and Chill
To finish off, it’s time to decorate! Place a few gummy worms on top of each cup, letting them peek out like they’re having a little adventure. Then, pop the cups in the refrigerator for at least 30 minutes. This chilling time helps everything set and makes the flavors meld beautifully. Plus, it gives you a moment to relax before the kids dive in!
Tips for Success
- Use a food processor to crush Oreos quickly if you have one; it saves time!
- For a creamier pudding, let it sit a bit longer after mixing with milk.
- Chill the cups longer if you can; it enhances the flavors.
- Get the kids involved! They’ll love layering the cups.
- Experiment with different toppings like sprinkles or mini chocolate chips!
Equipment Needed
- Mixing bowl: A medium-sized bowl works best. You can also use a large measuring cup for easy pouring.
- Whisk: A standard whisk is perfect, but a fork can do the job in a pinch.
- Spatula: Use a rubber spatula for folding in the whipped topping.
- Serving cups: Any small cups or jars will work; get creative with what you have!
Variations
- Nut Butter Delight: Add a layer of peanut butter or almond butter between the pudding and Oreos for a nutty twist.
- Fruit Fusion: Mix in some chopped strawberries or bananas into the pudding for a fruity flavor.
- Gluten-Free Option: Use gluten-free chocolate sandwich cookies instead of regular Oreos.
- Vegan Version: Substitute the pudding mix with a vegan chocolate pudding and use coconut whipped cream.
- Minty Fresh: Add a few drops of peppermint extract to the pudding for a refreshing mint flavor.
Serving Suggestions
- Pair these No-Bake Oreo Dirt Cups with a scoop of vanilla ice cream for an extra treat.
- Serve alongside fresh fruit like strawberries or blueberries for a colorful contrast.
- Present them in clear cups to showcase the fun layers.
- For a themed party, use garden-themed decorations!
FAQs about No-Bake Oreo Dirt Cups with Gummy Worms
As you embark on your journey to create these delightful No-Bake Oreo Dirt Cups with Gummy Worms, you might have a few questions. Here are some common queries that I’ve encountered, along with helpful answers to guide you along the way!
Can I make No-Bake Oreo Dirt Cups in advance?
Absolutely! These cups can be made a day ahead. Just store them in the refrigerator until you’re ready to serve. This makes them a perfect option for busy days!
What can I use instead of whipped topping?
If you prefer a homemade touch, you can whip up some heavy cream to use instead. Just make sure to sweeten it lightly for that creamy goodness!
Can I use different flavors of pudding?
Yes! While chocolate is a classic choice, vanilla or even butterscotch pudding can add a fun twist to your No-Bake Oreo Dirt Cups. Get creative!
How long do these cups last in the fridge?
These treats are best enjoyed within 2-3 days. After that, the Oreos may lose their crunch, but they’ll still taste delicious!
What if my kids don’t like gummy worms?
No worries! You can swap them out for other fun toppings like chocolate sprinkles, mini marshmallows, or even fruit. The possibilities are endless!
Final Thoughts
Creating these No-Bake Oreo Dirt Cups with Gummy Worms is more than just making a dessert; it’s about crafting joyful moments with your kids. Watching their eyes light up as they dig into these fun cups is priceless. The laughter, the smiles, and the little squeals of delight make all the effort worthwhile. Plus, the simplicity of this recipe means you can whip it up even on the busiest days. So, gather your ingredients, invite your little helpers, and enjoy the sweet chaos of making these delightful treats together. Trust me, it’s a memory you’ll cherish!
No-Bake Oreo Dirt Cups with Gummy Worms: A Fun Treat!
- Total Time: 30 minutes (plus chilling time)
- Yield: 4-6 servings 1x
- Diet: Vegetarian
Description
No-Bake Oreo Dirt Cups with Gummy Worms are a fun and easy dessert that kids love. These delightful cups combine crushed Oreo cookies, creamy pudding, and gummy worms for a playful treat.
Ingredients
- 1 package of Oreo cookies (about 15–20 cookies)
- 1 package of instant chocolate pudding mix (3.9 oz)
- 2 cups of milk
- 1 container of whipped topping (8 oz)
- Gummy worms (for decoration)
Instructions
- Crush the Oreo cookies into fine crumbs and set aside.
- In a mixing bowl, combine the instant chocolate pudding mix and milk. Whisk until smooth and let it sit for 5 minutes to thicken.
- Fold in the whipped topping into the pudding mixture until well combined.
- In serving cups, layer the crushed Oreo cookies at the bottom, followed by a layer of the pudding mixture.
- Repeat the layers until the cups are filled, finishing with a layer of crushed Oreos on top.
- Decorate with gummy worms on top of the cups.
- Chill in the refrigerator for at least 30 minutes before serving.
Notes
- For a more intense chocolate flavor, use chocolate Oreos.
- These cups can be made a day in advance and stored in the refrigerator.
- Feel free to add other toppings like chocolate sprinkles or edible grass for extra fun!
- Prep Time: 15 minutes
- Cook Time: 0 minutes
- Category: Dessert
- Method: No-Bake
- Cuisine: American
Nutrition
- Serving Size: 1 cup
- Calories: 250
- Sugar: 20g
- Sodium: 150mg
- Fat: 10g
- Saturated Fat: 5g
- Unsaturated Fat: 3g
- Trans Fat: 0g
- Carbohydrates: 35g
- Fiber: 1g
- Protein: 3g
- Cholesterol: 15mg