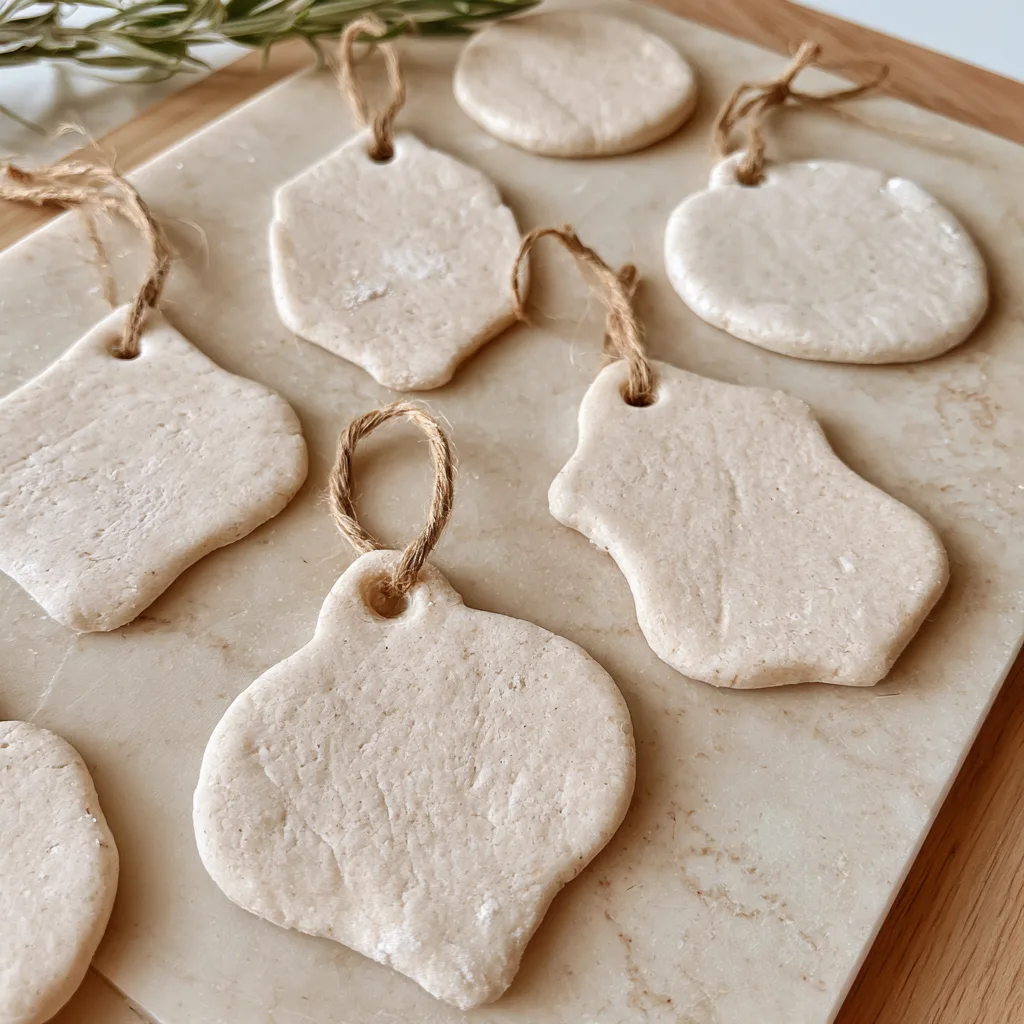
Introduction to Salt Dough Recipe for Homemade Gift Tags
As a busy mom, I know how hectic life can get, especially when special occasions sneak up on us. That’s why I adore this Salt Dough Recipe for Homemade Gift Tags. It’s not just a fun craft; it’s a heartfelt way to add a personal touch to your gifts. Imagine the joy on your loved ones’ faces when they see these charming, handmade tags! This recipe is simple, quick, and perfect for those moments when you want to create something special without spending hours in the kitchen. Let’s dive into this delightful project together!
Why You’ll Love This Salt Dough Recipe for Homemade Gift Tags
This Salt Dough Recipe for Homemade Gift Tags is a lifesaver for busy days. It’s incredibly easy to whip up, requiring just a few pantry staples. Plus, it’s a fantastic way to engage your kids in crafting, turning a simple task into a fun family activity. The best part? You can customize these tags to match any occasion, making your gifts feel extra special without breaking a sweat!
Ingredients for Salt Dough Recipe for Homemade Gift Tags
Gathering the right ingredients is the first step to crafting your beautiful gift tags. Here’s what you’ll need:
- All-purpose flour: This is the base of your dough, providing structure and texture. You can use whole wheat flour for a rustic look.
- Salt: Not just for flavor, salt helps preserve the dough and gives it that classic salt dough texture. Sea salt can add a nice touch!
- Water: The magic ingredient that brings everything together. Use room temperature water for the best results.
Feel free to get creative! You can add food coloring to the dough for vibrant tags or sprinkle in some glitter for a festive flair. If you’re looking for a gluten-free option, try using a gluten-free flour blend. Remember, the exact measurements are at the bottom of the article for easy printing!
How to Make Salt Dough Recipe for Homemade Gift Tags
Now that you have your ingredients ready, let’s get crafting! This Salt Dough Recipe for Homemade Gift Tags is straightforward and fun. Follow these simple steps, and you’ll have beautiful tags in no time!
Step 1: Preheat Your Oven
First things first, preheat your oven to 200°F (93°C). Preheating is crucial because it ensures even baking. If the oven isn’t hot enough, your dough may not harden properly. Trust me, you want those tags to be sturdy!
Step 2: Mix the Dry Ingredients
In a mixing bowl, combine the all-purpose flour and salt. Stir them together until they’re well blended. This step is essential because it ensures that the salt is evenly distributed throughout the dough. A good mix now means a better texture later!
Step 3: Add Water Gradually
Next, it’s time to add the water. Pour it in slowly while stirring the mixture. This gradual addition helps you achieve the right consistency. If you dump it all in at once, you might end up with a sticky mess. Aim for a dough that’s soft but not too wet!
Step 4: Knead the Dough
Once your dough comes together, it’s kneading time! Dust your countertop with a little flour and knead the dough for about 5 minutes. This process helps develop the gluten, giving your dough a smooth texture. If it feels too sticky, sprinkle a bit more flour as you knead.
Step 5: Roll Out the Dough
Now, roll out the dough to your desired thickness. I recommend about ¼ inch thick for sturdy tags. Use a rolling pin, and don’t forget to flour your surface to prevent sticking. The thicker the dough, the sturdier your tags will be!
Step 6: Cut Out Shapes
Here comes the fun part! Use cookie cutters to cut out shapes from the rolled dough. You can go for classic shapes like hearts or stars, or get creative with seasonal designs. The options are endless, and your imagination is the limit!
Step 7: Create Holes for Hanging
Before baking, use a straw to make holes at the top of each shape. This is where you’ll thread your string or ribbon later. Make sure the holes are big enough to fit your chosen string, but not so big that they compromise the tag’s structure.
Step 8: Bake the Shapes
Place your shapes on a baking sheet lined with parchment paper. Bake them in the preheated oven for 2-3 hours. Keep an eye on them; they should be hard and dry when done. You’ll know they’re ready when they feel firm to the touch!
Step 9: Cool and Decorate
Once baked, let your tags cool completely on a wire rack. This step is crucial because decorating on warm dough can lead to smudges. Once cool, unleash your creativity! Use paint, markers, or even stamps to personalize your tags. The sky’s the limit!
Tips for Success
- Always measure your ingredients accurately for the best results.
- Keep your workspace clean and organized to make the process smoother.
- If the dough is too dry, add a tiny bit of water; if too wet, sprinkle in more flour.
- Experiment with different shapes and decorations to make each tag unique.
- Store any leftover dough in an airtight container to keep it fresh for future projects.
Equipment Needed
- Mixing bowl: Any large bowl will do; a glass or stainless steel one works best.
- Rolling pin: If you don’t have one, a wine bottle can serve as a great alternative!
- Cookie cutters: Use any shapes you have on hand; even a knife can cut shapes.
- Baking sheet: A regular baking tray will work; just line it with parchment paper.
- Straw: Any straw will do for making holes; a skewer can also work in a pinch.
Variations
- Gluten-Free Option: Substitute all-purpose flour with a gluten-free flour blend for a gluten-free dough.
- Colorful Tags: Add a few drops of food coloring to the dough while mixing for vibrant, eye-catching tags.
- Fragrant Dough: Mix in a teaspoon of cinnamon or vanilla extract for a delightful scent that adds a sensory touch.
- Textured Designs: Press leaves, stamps, or textured fabrics into the dough before baking for unique patterns.
- Seasonal Themes: Create holiday-themed tags by using cookie cutters shaped like pumpkins, snowflakes, or hearts.
Serving Suggestions
- Pair with Twine: Use natural twine or colorful ribbon to tie your tags to gifts for a rustic look.
- Gift Wrapping: Attach these tags to beautifully wrapped presents for a personal touch.
- Display: Hang them on a decorative tree or garland during the holidays for added charm.
- Use as Place Cards: Write names on the tags for a lovely dinner party setting.
- Crafting Parties: Encourage friends to make their own tags for a fun crafting session!
FAQs about Salt Dough Recipe for Homemade Gift Tags
Can I use different types of flour for this salt dough recipe?
Absolutely! While all-purpose flour is the go-to, you can experiment with whole wheat flour for a rustic feel or a gluten-free blend if needed. Just remember, the texture might vary slightly.
How long do the salt dough gift tags last?
When stored properly in a cool, dry place, your salt dough gift tags can last for years. Just make sure they’re completely dry before storing to prevent any moisture damage!
Can I paint the tags after baking?
Yes! Once your tags are cool, unleash your creativity with paints, markers, or even stamps. Just ensure they’re fully dry before decorating to avoid smudging.
What if my dough is too sticky?
If your dough feels sticky, don’t panic! Simply sprinkle in a bit more flour while kneading until you achieve the right consistency. A little adjustment goes a long way!
Can I make these tags ahead of time?
Definitely! You can make your salt dough gift tags in advance. Just store them in an airtight container until you’re ready to use or decorate them. They’ll be waiting for you when you need them!
Final Thoughts
Creating these Salt Dough Recipe for Homemade Gift Tags has been such a joyful experience for me. It’s more than just a craft; it’s a way to express love and creativity. Each tag tells a story, adding a personal touch to every gift. I cherish the moments spent crafting with my kids, laughing and sharing ideas. Plus, the satisfaction of seeing their faces light up when they see the finished tags is priceless. So, gather your supplies and dive into this delightful project. You’ll not only make beautiful tags but also wonderful memories along the way!
Print
Salt Dough Recipe for Homemade Gift Tags You’ll Love!
- Total Time: 2 hours 15 minutes
- Yield: Approximately 10-15 gift tags 1x
- Diet: Vegetarian
Description
A simple and fun salt dough recipe perfect for creating homemade gift tags.
Ingredients
- 2 cups all-purpose flour
- 1 cup salt
- 1 cup water
Instructions
- Preheat your oven to 200°F (93°C).
- In a mixing bowl, combine the flour and salt.
- Gradually add water to the mixture, stirring until a dough forms.
- Knead the dough on a floured surface until smooth.
- Roll out the dough to your desired thickness.
- Cut out shapes using cookie cutters.
- Use a straw to make a hole for hanging.
- Place the shapes on a baking sheet and bake for 2-3 hours until hard.
- Let cool completely before decorating.
Notes
- Store any leftover dough in an airtight container.
- Decorate with paint or markers after baking.
- Make sure to let the tags dry completely before using.
- Prep Time: 15 minutes
- Cook Time: 2-3 hours
- Category: Crafts
- Method: Baking
- Cuisine: N/A
Nutrition
- Serving Size: 1 tag
- Calories: 50
- Sugar: 0g
- Sodium: 200mg
- Fat: 0g
- Saturated Fat: 0g
- Unsaturated Fat: 0g
- Trans Fat: 0g
- Carbohydrates: 12g
- Fiber: 0g
- Protein: 1g
- Cholesterol: 0mg