Introduction to Crispy Chicken Katsu Bowls
As a busy mom, I know how challenging it can be to whip up a meal that pleases everyone. That’s where my Crispy Chicken Katsu Bowls come in! This dish is not just a feast for the eyes; it’s a quick solution for those hectic weeknights when you want something delicious without spending hours in the kitchen. Imagine tender, breaded chicken served over fluffy rice, topped with fresh veggies and a savory sauce. It’s a meal that brings smiles to the table and makes you feel like a culinary rockstar!
Why You’ll Love This Crispy Chicken Katsu Bowls
These Crispy Chicken Katsu Bowls are a game-changer for busy families. They come together in just 35 minutes, making them perfect for those nights when time is tight. The combination of crunchy chicken, fluffy rice, and fresh veggies creates a delightful harmony of flavors and textures. Plus, they’re customizable! You can easily adapt them to suit your family’s tastes, ensuring everyone leaves the table happy and satisfied.
Ingredients for Crispy Chicken Katsu Bowls
Gathering the right ingredients is the first step to creating these delightful Crispy Chicken Katsu Bowls. Here’s what you’ll need:
- Boneless, skinless chicken breasts: The star of the show! They’re tender and cook quickly, making them perfect for busy nights.
- Panko breadcrumbs: These Japanese-style breadcrumbs give the chicken that irresistible crunch. They’re lighter and crispier than regular breadcrumbs.
- All-purpose flour: This helps the egg adhere to the chicken, creating a solid base for the panko coating.
- Large eggs: Beaten eggs act as the glue that holds the breadcrumbs to the chicken, ensuring a perfect crust.
- Salt and pepper: Simple seasonings that enhance the chicken’s natural flavor. Don’t skip this step!
- Vegetable oil: Essential for frying, it gives the chicken that golden-brown finish. You can also use canola or peanut oil if you prefer.
- Cooked rice: A fluffy bed for your chicken! White rice is traditional, but brown rice or jasmine rice works beautifully too.
- Shredded cabbage: Adds a fresh crunch and a pop of color. You can swap it for other veggies like carrots or cucumbers for extra texture.
- Sliced green onions: These provide a mild onion flavor and a lovely garnish. They brighten up the dish visually and taste-wise.
- Tonkatsu sauce: A sweet and savory sauce that ties everything together. It’s a must-have for that authentic flavor!
For exact measurements, check the bottom of the article where you can find everything listed for easy printing. Happy cooking!
How to Make Crispy Chicken Katsu Bowls
Now that you have all your ingredients ready, let’s dive into the fun part—making these Crispy Chicken Katsu Bowls! Follow these simple steps, and you’ll have a delicious meal on the table in no time.
Step 1: Prepare the Chicken
Start by seasoning the chicken breasts with salt and pepper. This simple step enhances the chicken’s natural flavor. Don’t be shy with the seasoning; it’s the foundation of your dish!
Step 2: Set Up the Breading Station
Create a three-bowl setup for easy breading. In the first bowl, add all-purpose flour. In the second, beat the eggs until smooth. Finally, fill the third bowl with panko breadcrumbs. This organized approach makes the process quick and efficient.
Step 3: Bread the Chicken
Now, it’s time to bread the chicken! Dredge each chicken breast in the flour, ensuring it’s fully coated. Next, dip it into the beaten eggs, letting any excess drip off. Finally, coat the chicken with panko breadcrumbs, pressing gently to ensure they stick. This creates that irresistible crispy texture!
Step 4: Fry the Chicken
Heat vegetable oil in a large skillet over medium heat. Once the oil is hot, carefully add the breaded chicken. Fry for about 4-5 minutes on each side, or until golden brown and cooked through. The sizzling sound is music to my ears! Make sure not to overcrowd the pan; you want each piece to fry evenly.
Step 5: Slice the Chicken
Once the chicken is perfectly golden, remove it from the skillet and let it drain on paper towels. This helps keep it crispy. After a few minutes, slice the chicken into strips. The aroma will have everyone gathering around the kitchen!
Step 6: Assemble the Bowls
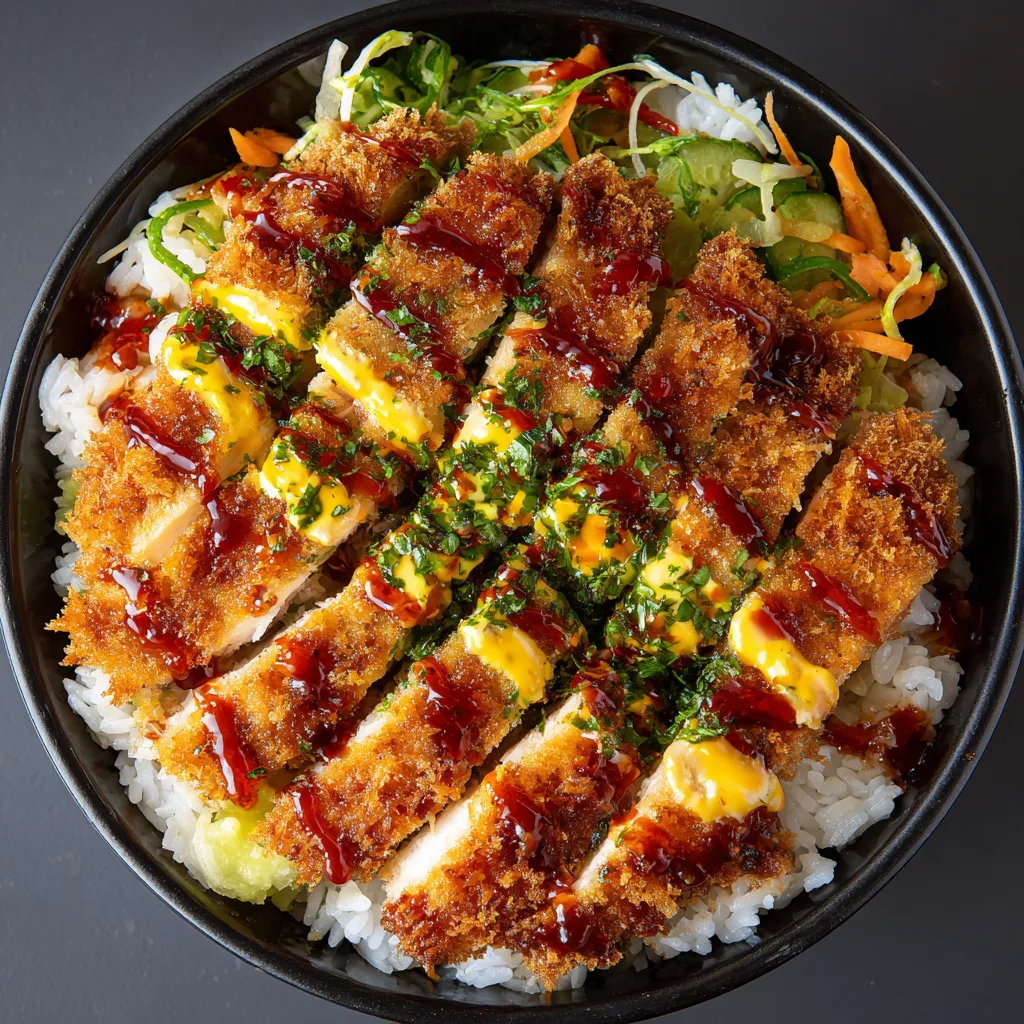
Now comes the fun part—assembling your bowls! Start with a generous layer of cooked rice at the bottom. Top it with shredded cabbage, then add the sliced chicken. Drizzle with tonkatsu sauce for that sweet and savory kick. Garnish with sliced green onions for a pop of color and flavor. Your Crispy Chicken Katsu Bowls are ready to impress!
Tips for Success
- Make sure your oil is hot enough before frying; this ensures a crispy coating.
- Don’t skip the seasoning! A little salt and pepper go a long way in enhancing flavor.
- For extra crunch, consider double-breading the chicken by repeating the egg and panko steps.
- Use a meat thermometer to check for doneness; chicken should reach 165°F.
- Feel free to prep the ingredients ahead of time to save on busy nights!
Equipment Needed
- Large skillet: A non-stick skillet works wonders, but any heavy-bottomed pan will do.
- Three mixing bowls: Use any bowls you have on hand for the breading station.
- Meat thermometer: Optional, but great for ensuring your chicken is cooked perfectly.
- Paper towels: Essential for draining excess oil from the fried chicken.
Variations for Crispy Chicken Katsu Bowls
- Spicy Katsu: Add a kick by mixing sriracha or chili paste into the tonkatsu sauce for a spicy twist.
- Vegetarian Option: Substitute chicken with eggplant or tofu, breading and frying them the same way for a delicious meat-free meal.
- Gluten-Free Version: Use gluten-free panko breadcrumbs and flour to make this dish suitable for gluten-sensitive diets.
- Asian-Inspired Veggies: Incorporate steamed broccoli, snap peas, or bell peppers for a colorful and nutritious boost.
- Rice Alternatives: Swap out white rice for quinoa or cauliflower rice for a healthier grain option.
Serving Suggestions for Crispy Chicken Katsu Bowls
- Side Salad: A light cucumber and tomato salad pairs beautifully, adding freshness to your meal.
- Pickled Vegetables: Serve with pickled ginger or radishes for a tangy contrast to the rich chicken.
- Drink Pairing: Enjoy with green tea or a light Japanese beer for a refreshing touch.
- Presentation: Use colorful bowls to make the dish visually appealing; a sprinkle of sesame seeds adds a nice touch!
FAQs about Crispy Chicken Katsu Bowls
Can I make Crispy Chicken Katsu Bowls ahead of time?
Absolutely! You can prepare the chicken and rice in advance. Just store them separately in the fridge. When you’re ready to eat, reheat the chicken in the oven to maintain its crispiness.
What can I substitute for tonkatsu sauce?
If you can’t find tonkatsu sauce, a mix of ketchup and Worcestershire sauce works well. You can also try a homemade version with soy sauce, sugar, and a splash of vinegar for a similar flavor.
Can I bake the chicken instead of frying it?
Yes, you can! For a healthier option, bake the breaded chicken at 400°F for about 20-25 minutes, flipping halfway through. This will give you a crispy texture without the extra oil.
What vegetables can I add to my bowls?
Feel free to get creative! Carrots, cucumbers, or even steamed broccoli can add color and crunch. The more veggies, the better!
How do I store leftovers?
Leftover Crispy Chicken Katsu Bowls can be stored in an airtight container in the fridge for up to three days. Just reheat gently to enjoy them again!
Final Thoughts
Creating Crispy Chicken Katsu Bowls is more than just cooking; it’s about bringing joy to your family’s table. The delightful crunch of the chicken, the fluffy rice, and the vibrant veggies come together to create a meal that feels special, even on the busiest nights. I love how this dish can be customized to suit everyone’s tastes, making it a family favorite. Plus, the smiles and satisfied sighs around the table remind me why I love cooking. So, roll up your sleeves and dive into this culinary adventure—you won’t regret it!

Crispy Chicken Katsu Bowls: A Tasty Delight Awaits!
- Total Time: 35 minutes
- Yield: 4 servings 1x
- Diet: Gluten Free
Description
Crispy Chicken Katsu Bowls are a delicious and satisfying meal featuring breaded and fried chicken served over rice with fresh vegetables and a savory sauce.
Ingredients
- 2 boneless, skinless chicken breasts
- 1 cup panko breadcrumbs
- 1/2 cup all-purpose flour
- 2 large eggs
- Salt and pepper to taste
- Vegetable oil for frying
- 2 cups cooked rice
- 1 cup shredded cabbage
- 1/2 cup sliced green onions
- Tonktasu sauce for drizzling
Instructions
- Begin by seasoning the chicken breasts with salt and pepper.
- Set up a breading station with three bowls: one with flour, one with beaten eggs, and one with panko breadcrumbs.
- Dredge each chicken breast in flour, dip in the egg, and then coat with panko breadcrumbs.
- Heat vegetable oil in a large skillet over medium heat.
- Fry the breaded chicken for about 4-5 minutes on each side, or until golden brown and cooked through.
- Remove the chicken from the skillet and let it drain on paper towels.
- Slice the chicken into strips.
- To assemble the bowls, place cooked rice at the bottom, top with shredded cabbage, sliced chicken, and drizzle with tonkatsu sauce.
- Garnish with sliced green onions and serve immediately.
Notes
- For a healthier option, you can bake the chicken instead of frying.
- Feel free to add other vegetables like carrots or cucumbers for extra crunch.
- Leftover chicken can be stored in the refrigerator for up to 3 days.
- Prep Time: 20 minutes
- Cook Time: 15 minutes
- Category: Main Course
- Method: Frying
- Cuisine: Japanese
Nutrition
- Serving Size: 1 bowl
- Calories: 600
- Sugar: 2g
- Sodium: 800mg
- Fat: 30g
- Saturated Fat: 5g
- Unsaturated Fat: 20g
- Trans Fat: 0g
- Carbohydrates: 60g
- Fiber: 3g
- Protein: 30g
- Cholesterol: 100mg