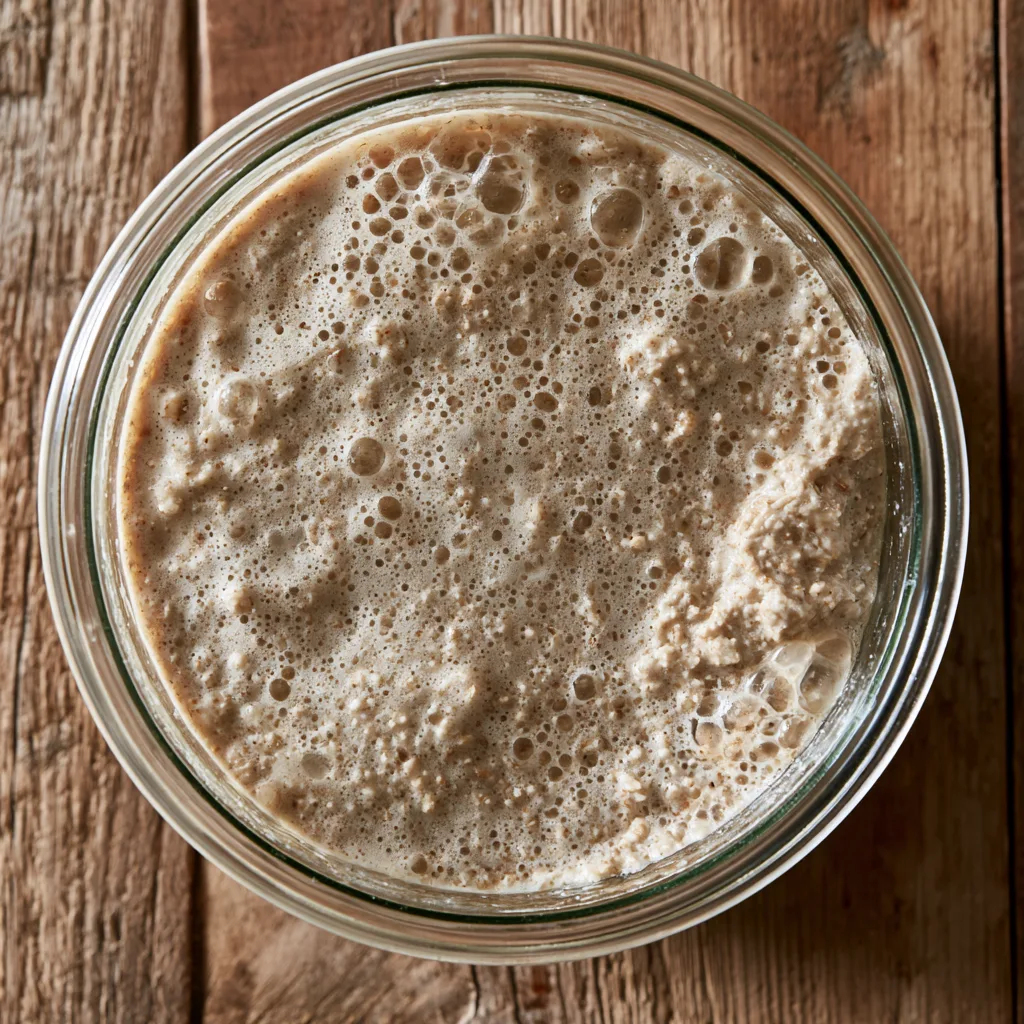
Introduction to Easy Rye Flour Sourdough Starter from Scratch
Welcome to the wonderful world of sourdough! If you’ve ever dreamed of baking your own bread, then this Easy Rye Flour Sourdough Starter from Scratch is just the ticket. I know how busy life can get, especially for moms and professionals juggling a million things. This starter is not only simple to make, but it also brings a delightful tang to your bread that will impress your family and friends. Imagine the aroma of freshly baked bread wafting through your home, all thanks to a little patience and love. Let’s dive in!
Why You’ll Love This Easy Rye Flour Sourdough Starter from Scratch
This Easy Rye Flour Sourdough Starter from Scratch is a game-changer for busy cooks like us. It’s incredibly easy to whip up, requiring just a few minutes of your time. The flavor? Oh, it’s out of this world! Rye flour adds a rich, nutty taste that elevates your bread to bakery-level perfection. Plus, the satisfaction of nurturing your own starter is truly rewarding. You’ll feel like a baking rockstar in no time!
Ingredients for Easy Rye Flour Sourdough Starter from Scratch
Creating your own Easy Rye Flour Sourdough Starter from Scratch is a delightful journey, and it all begins with just a couple of key ingredients. Here’s what you’ll need:
- Rye Flour: This is the star of the show! Rye flour is packed with flavor and nutrients, making it perfect for a robust starter. It ferments beautifully, giving your bread that signature tang.
- Water: Use filtered or bottled water for the best results. Tap water can contain chlorine, which might hinder the fermentation process. The right water helps your starter thrive!
While these are the essentials, feel free to experiment! You can mix in a bit of whole wheat flour for added flavor or even try a blend of flours once your starter is established. Just remember, the exact quantities are listed at the bottom of the article for easy printing. Happy baking!
How to Make Easy Rye Flour Sourdough Starter from Scratch
Now that you have your ingredients ready, let’s get started on this Easy Rye Flour Sourdough Starter from Scratch. I promise, it’s as simple as pie—well, maybe simpler! Follow these steps, and soon you’ll have a bubbly starter that’s ready to make delicious bread.
Step 1: Mix the Ingredients
In a clean jar, combine 100g of rye flour with 100ml of water. Stir until everything is well blended. The mixture should have a thick, paste-like consistency. This is where the magic begins! The rye flour will start to absorb the water, creating a perfect environment for fermentation.
Step 2: Cover and Let Sit
Once mixed, cover the jar loosely with a lid or a cloth. This allows air to flow in while keeping dust out. Place the jar in a warm spot, ideally around 75°F (24°C). This warmth is crucial for the fermentation process. Think of it as tucking your starter in for a cozy nap!
Step 3: Check for Bubbles
After 24 hours, it’s time to check on your starter. Look for bubbles forming on the surface. These little guys are a sign that fermentation is happening! If you see them, congratulations! If not, don’t worry—just give it more time. Sometimes, starters take a little longer to wake up.
Step 4: Feed the Starter
Once you spot those bubbles, it’s feeding time! Discard half of the mixture—about 100g—and add another 100g of rye flour and 100ml of water. Stir well to combine. This feeding process gives your starter fresh nutrients to keep it growing strong. It’s like giving it a hearty meal!
Step 5: Repeat the Feeding Process
Continue this feeding routine every 24 hours for about 5-7 days. Each day, you’ll notice your starter becoming more bubbly and doubling in size. It’s a beautiful transformation! Soon, you’ll have a lively sourdough starter ready to create amazing bread. Just remember, patience is key!
Tips for Success
- Keep your starter in a warm, draft-free spot for optimal fermentation.
- Use a clean jar each time to prevent unwanted bacteria.
- Be consistent with your feeding schedule; routine is key!
- Don’t panic if your starter doesn’t bubble right away; it takes time.
- Label your jar with the date to track its progress easily.
Equipment Needed
- Clean Jar: A glass jar works best, but any container with a wide mouth will do.
- Spoon: Use a wooden or plastic spoon to mix; metal can react with the starter.
- Cloth or Lid: A breathable cloth or loose lid to cover the jar.
- Kitchen Scale: Optional, but helpful for precise measurements.
Variations
- Whole Wheat Flour: Substitute half of the rye flour with whole wheat flour for a nuttier flavor and added nutrients.
- Spelt Flour: Try using spelt flour instead of rye for a lighter, slightly sweet taste.
- Herb-Infused Starter: Add dried herbs like rosemary or thyme to the mixture for a fragrant twist.
- Gluten-Free Option: Use a gluten-free flour blend to create a gluten-free sourdough starter.
- Fruit Juice: Incorporate a splash of apple or pineapple juice during the mixing stage to kickstart fermentation with natural sugars.
Serving Suggestions
- Fresh Butter: Spread a generous layer of creamy butter on warm slices of your sourdough bread.
- Cheese Pairing: Serve with a selection of cheeses like sharp cheddar or tangy goat cheese for a delightful contrast.
- Soup Companion: Enjoy your bread alongside a hearty bowl of tomato or vegetable soup.
- Salad Side: Pair with a fresh garden salad drizzled with vinaigrette for a light meal.
- Presentation: Slice your bread and arrange it on a wooden board for a rustic touch.
FAQs about Easy Rye Flour Sourdough Starter from Scratch
Can I use all-purpose flour instead of rye flour?
While you can use all-purpose flour, I highly recommend sticking with rye flour for your starter. Rye flour ferments more easily, giving you a stronger and more flavorful sourdough starter. It’s like the secret ingredient that makes all the difference!
How do I know when my sourdough starter is ready to use?
Your Easy Rye Flour Sourdough Starter is ready when it’s bubbly, has doubled in size, and has a pleasant, tangy aroma. This usually happens after about 5-7 days of consistent feeding. Trust me, you’ll know when it’s ready!
What should I do if my starter isn’t bubbling?
If your starter isn’t bubbling, don’t fret! It may just need more time or a warmer environment. Ensure it’s in a cozy spot and keep feeding it daily. Sometimes, starters take a little longer to wake up, and that’s perfectly normal.
Can I store my sourdough starter in the fridge?
Absolutely! Once your starter is established, you can store it in the refrigerator. Just remember to feed it weekly to keep it healthy and active. When you’re ready to bake, take it out, feed it, and let it come to room temperature before using.
How can I revive a neglected sourdough starter?
If your starter has been sitting in the fridge for a while, it may look a bit sad. Don’t worry! Just give it a good feeding and let it sit at room temperature for a few hours. With a little love and attention, it should bounce back to life!
Final Thoughts
Creating your own Easy Rye Flour Sourdough Starter from Scratch is more than just a baking project; it’s a delightful journey filled with anticipation and joy. Each day brings new bubbles and growth, reminding us that good things take time. The aroma of freshly baked bread will fill your home, creating warm memories with loved ones. Plus, there’s something incredibly satisfying about nurturing your starter and watching it transform. So, roll up your sleeves, embrace the process, and enjoy the delicious rewards that come from your kitchen. Happy baking, my fellow culinary adventurers!
Print
Easy Rye Flour Sourdough Starter from Scratch: Start Today!
- Total Time: 7 days
- Yield: 1 active sourdough starter
- Diet: Vegan
Description
A simple guide to creating a rye flour sourdough starter from scratch, perfect for baking delicious bread.
Ingredients
- Rye flour – 100g
- Water – 100ml
Instructions
- In a clean jar, mix 100g of rye flour with 100ml of water until well combined.
- Cover the jar loosely with a lid or cloth to allow airflow.
- Let the mixture sit at room temperature for 24 hours.
- After 24 hours, check for bubbles indicating fermentation.
- Feed the starter by discarding half of the mixture and adding another 100g of rye flour and 100ml of water.
- Repeat the feeding process every 24 hours for about 5-7 days until the starter is bubbly and has doubled in size.
Notes
- Use filtered or bottled water for best results.
- Keep the starter in a warm place, ideally around 75°F (24°C).
- Once established, the starter can be stored in the refrigerator and fed weekly.
- Prep Time: 5 minutes
- Cook Time: 0 minutes
- Category: Baking
- Method: Fermentation
- Cuisine: Bread
Nutrition
- Serving Size: 100g
- Calories: 330
- Sugar: 0g
- Sodium: 0mg
- Fat: 1g
- Saturated Fat: 0g
- Unsaturated Fat: 0g
- Trans Fat: 0g
- Carbohydrates: 70g
- Fiber: 10g
- Protein: 10g
- Cholesterol: 0mg