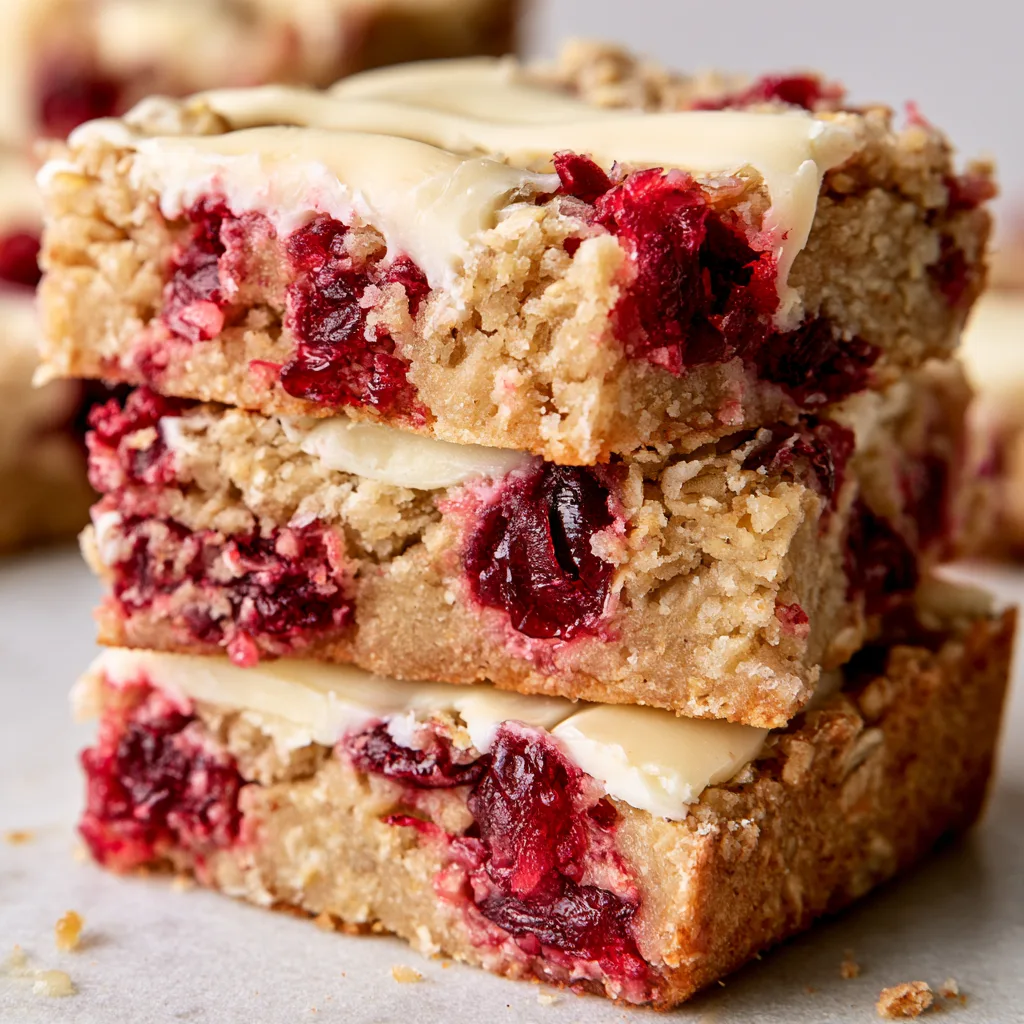
Introduction to Gluten-Free Cranberry Bliss Bars Recipe
Welcome to my kitchen, where deliciousness meets simplicity! If you’re looking for a delightful treat that’s both gluten-free and utterly scrumptious, you’ve landed in the right place. This Gluten-Free Cranberry Bliss Bars Recipe is perfect for busy days when you need a quick pick-me-up or a sweet surprise for your loved ones. Imagine biting into a chewy bar filled with tart cranberries and creamy white chocolate—pure bliss! Trust me, these bars will become your go-to dessert, whether for a family gathering or a cozy night in.
Why You’ll Love This Gluten-Free Cranberry Bliss Bars Recipe
This Gluten-Free Cranberry Bliss Bars Recipe is a game-changer for busy moms and professionals alike. It’s quick to whip up, taking just 45 minutes from start to finish. The combination of chewy oats, tart cranberries, and sweet white chocolate creates a flavor explosion that’s hard to resist. Plus, these bars are perfect for any occasion, whether you’re hosting a gathering or simply treating yourself after a long day. You’ll love how easy it is to impress your family and friends!
Ingredients for Gluten-Free Cranberry Bliss Bars Recipe
Gathering the right ingredients is the first step to creating these delightful bars. Here’s what you’ll need:
- Gluten-free all-purpose flour: This is the base of our bars, providing structure without the gluten. Look for a blend that includes xanthan gum for the best results.
- Rolled oats: They add a chewy texture and heartiness. Make sure to choose certified gluten-free oats to keep everything safe for those with gluten sensitivities.
- Brown sugar: This brings a rich, caramel-like sweetness that complements the tart cranberries beautifully.
- Granulated sugar: A touch of white sugar balances the flavors and enhances the sweetness.
- Unsalted butter: Melted butter adds moisture and richness. If you prefer a dairy-free option, coconut oil works well too!
- Vanilla extract: A splash of vanilla elevates the flavor, making these bars taste even more indulgent.
- Salt: Just a pinch enhances all the flavors, making each bite more delicious.
- Dried cranberries: These little gems provide a burst of tartness and a pop of color. Feel free to substitute with dried cherries or raisins if you prefer.
- White chocolate chips: They add a creamy sweetness that pairs perfectly with the cranberries. For a healthier twist, you can use dark chocolate chips instead.
For exact measurements, check the bottom of the article where you can find everything listed for easy printing. Happy baking!
How to Make Gluten-Free Cranberry Bliss Bars Recipe
Now that we have our ingredients ready, let’s dive into the fun part—making these delightful bars! Follow these simple steps, and you’ll have a batch of Gluten-Free Cranberry Bliss Bars that will impress everyone.
Step 1: Preheat the Oven
First things first, preheat your oven to 350°F (175°C). This step is crucial because it ensures even baking. While the oven warms up, line an 8×8 inch baking pan with parchment paper. This makes it easy to lift the bars out later and keeps cleanup a breeze!
Step 2: Mix Dry Ingredients
In a large bowl, combine the gluten-free flour, rolled oats, brown sugar, granulated sugar, and salt. Stir them together until they’re well mixed. This step is important because it helps distribute the flavors evenly throughout the bars. Plus, it’s a great way to get your kids involved—let them help with the mixing!
Step 3: Combine Wet Ingredients
Next, pour in the melted butter and add the vanilla extract to your dry mixture. Mix everything together until it’s just combined. Be careful not to overmix; we want those bars to stay chewy and delicious. The aroma of vanilla will fill your kitchen, making it feel like a warm hug!
Step 4: Fold in Cranberries and Chocolate
Now comes the fun part! Gently fold in the dried cranberries and white chocolate chips. Folding is a technique that helps keep the mixture light and airy. Use a spatula to scoop from the bottom and turn it over, ensuring even distribution of those sweet and tart flavors throughout the batter.
Step 5: Spread and Bake
Spread the mixture evenly into your prepared baking pan. Use the spatula to smooth the top, making sure it’s level. Pop it into the preheated oven and bake for 25-30 minutes. You’ll know it’s ready when the edges turn golden brown and a toothpick inserted in the center comes out clean. The smell will be heavenly!
Step 6: Cool and Cut
Once baked, remove the pan from the oven and let it cool completely. This step is key! If you cut the bars too soon, they might crumble. Once cooled, lift the parchment paper out of the pan and cut the bars into squares. Enjoy the satisfaction of creating something delicious!
Tips for Success
- Measure your ingredients accurately for the best results.
- Let the butter cool slightly before mixing to avoid cooking the eggs.
- Use a toothpick to check for doneness; it should come out clean.
- For extra flavor, add a pinch of cinnamon or nutmeg to the dry ingredients.
- Store bars in an airtight container to keep them fresh longer.
Equipment Needed
- 8×8 inch baking pan: A square pan is ideal, but you can use a similar-sized round pan if needed.
- Parchment paper: This helps with easy removal; aluminum foil works too.
- Mixing bowls: Use any size, but a large bowl is best for mixing.
- Spatula: A rubber spatula is perfect for folding and spreading the mixture.
- Measuring cups and spoons: Essential for accurate ingredient measurements.
Variations
- Nutty Delight: Add 1/2 cup of chopped nuts like walnuts or pecans for an extra crunch.
- Fruit Fusion: Substitute dried cranberries with dried cherries or apricots for a different flavor profile.
- Spiced Up: Incorporate 1 teaspoon of pumpkin spice or cinnamon for a warm, cozy flavor.
- Vegan Option: Replace the butter with coconut oil and use a flax egg instead of regular eggs.
- Chocolate Lovers: Swap white chocolate chips for dark chocolate or even add cocoa powder to the batter for a chocolatey twist.
Serving Suggestions
- Pair these bars with a warm cup of herbal tea for a cozy afternoon treat.
- Serve with a scoop of vanilla ice cream for an indulgent dessert.
- For a festive touch, drizzle melted white chocolate over the top before serving.
- Garnish with fresh cranberries or mint leaves for a pop of color.
- Wrap them in pretty parchment paper for a delightful homemade gift.
FAQs about Gluten-Free Cranberry Bliss Bars Recipe
As you embark on your baking adventure with this Gluten-Free Cranberry Bliss Bars Recipe, you might have a few questions. Here are some common queries I’ve encountered, along with helpful answers to guide you along the way.
Can I use fresh cranberries instead of dried?
While fresh cranberries are delicious, they’re quite tart and contain more moisture. If you want to use them, consider adding a bit more sugar to balance the flavors. Dried cranberries work best for this recipe, giving that perfect chewy texture.
How do I store the bars to keep them fresh?
Store your gluten-free cranberry bliss bars in an airtight container at room temperature for up to a week. If you want to keep them longer, you can freeze them! Just wrap each bar in plastic wrap and place them in a freezer-safe bag.
Can I make these bars dairy-free?
Absolutely! Simply substitute the unsalted butter with coconut oil or a dairy-free butter alternative. This way, you can enjoy the same delicious flavors without the dairy.
What can I serve with these bars?
These bars pair wonderfully with a cup of coffee or tea. You can also serve them with a scoop of vanilla ice cream for a delightful dessert experience. They’re versatile enough to be enjoyed any time of day!
Can I double the recipe?
Yes, you can double the recipe! Just use a larger baking pan, like a 9×13 inch, and adjust the baking time slightly. Keep an eye on them as they bake, and enjoy the extra bars!
Final Thoughts
Creating these Gluten-Free Cranberry Bliss Bars is more than just baking; it’s about sharing joy and deliciousness with those you love. Each bite is a delightful blend of chewy oats, tart cranberries, and creamy white chocolate that brings smiles to faces. Whether you’re enjoying them with a cup of tea or sharing them at a gathering, these bars are sure to become a cherished recipe in your home. So, roll up your sleeves, embrace the mess, and let the sweet aroma fill your kitchen. Trust me, you’ll be glad you did!
Print
Gluten-Free Cranberry Bliss Bars Recipe You’ll Love!
- Total Time: 45 minutes
- Yield: 16 bars 1x
- Diet: Gluten Free
Description
Delicious and chewy gluten-free cranberry bliss bars that are perfect for any occasion.
Ingredients
- 1 cup gluten-free all-purpose flour
- 1/2 cup rolled oats
- 1/2 cup brown sugar
- 1/4 cup granulated sugar
- 1/2 cup unsalted butter, melted
- 1/2 teaspoon vanilla extract
- 1/4 teaspoon salt
- 1 cup dried cranberries
- 1/2 cup white chocolate chips
Instructions
- Preheat the oven to 350°F (175°C) and line an 8×8 inch baking pan with parchment paper.
- In a large bowl, mix together the gluten-free flour, oats, brown sugar, granulated sugar, and salt.
- Add the melted butter and vanilla extract to the dry ingredients and mix until combined.
- Fold in the dried cranberries and white chocolate chips.
- Spread the mixture evenly in the prepared baking pan.
- Bake for 25-30 minutes or until the edges are golden brown.
- Allow to cool completely before cutting into bars.
Notes
- Store in an airtight container for up to a week.
- For a festive touch, sprinkle extra cranberries and white chocolate on top before baking.
- Prep Time: 15 minutes
- Cook Time: 30 minutes
- Category: Dessert
- Method: Baking
- Cuisine: American
Nutrition
- Serving Size: 1 bar
- Calories: 180
- Sugar: 12g
- Sodium: 50mg
- Fat: 8g
- Saturated Fat: 5g
- Unsaturated Fat: 3g
- Trans Fat: 0g
- Carbohydrates: 24g
- Fiber: 1g
- Protein: 2g
- Cholesterol: 20mg