Introduction to Loaded Chicken Nachos (Crowd Favorite)
Hey there, fellow food lovers! If you’re anything like me, you know that life can get pretty hectic. Between juggling work, family, and everything in between, finding time to whip up a delicious meal can feel like a daunting task. That’s where my Loaded Chicken Nachos (Crowd Favorite) come in! This dish is not only a quick solution for a busy day, but it’s also a surefire way to impress your loved ones. Picture crispy tortilla chips piled high with seasoned chicken and gooey cheese—what’s not to love? Let’s dive into this tasty adventure together!
Why You’ll Love This Loaded Chicken Nachos (Crowd Favorite)
These Loaded Chicken Nachos are a game-changer for busy nights! They come together in just 30 minutes, making them perfect for a quick dinner or a fun snack. The combination of flavors is simply irresistible, with each bite bursting with cheesy goodness and zesty chicken. Plus, they’re customizable, so everyone can add their favorite toppings. Trust me, this dish will quickly become a family favorite!
Ingredients for Loaded Chicken Nachos (Crowd Favorite)
Gathering the right ingredients is the first step to creating your Loaded Chicken Nachos (Crowd Favorite). Here’s what you’ll need:
- Tortilla Chips: The crispy base of your nachos. Choose your favorite brand or make your own for an extra crunch!
- Cooked Chicken: Shredded chicken adds protein and flavor. You can use rotisserie chicken for convenience or cook your own.
- Shredded Cheese: Cheddar or a Mexican blend works beautifully. The gooey melted cheese is what makes nachos so irresistible!
- Black Beans: Rinsed and drained, these add a hearty texture and a boost of fiber.
- Diced Tomatoes: Fresh tomatoes bring a juicy burst of flavor. You can also use canned tomatoes if you’re short on time.
- Sliced Jalapeños: For those who like a kick! Adjust the amount based on your spice tolerance.
- Sour Cream: A creamy topping that balances the heat and adds richness.
- Guacamole: This creamy avocado delight is a must for a fresh finish. You can make your own or buy pre-made.
- Chopped Green Onions: These add a pop of color and a mild onion flavor that brightens up the dish.
- Taco Seasoning: A blend of spices that infuses the chicken with flavor. You can use store-bought or make your own mix!
Feel free to customize your nachos with other toppings like olives, corn, or even a drizzle of hot sauce. For exact measurements, check the bottom of the article where you can find everything available for printing!
How to Make Loaded Chicken Nachos (Crowd Favorite)
Now that you have all your ingredients ready, let’s dive into the fun part—making these Loaded Chicken Nachos (Crowd Favorite)! Follow these simple steps, and you’ll have a delicious dish that’s sure to impress.
Step 1: Preheat the Oven
First things first, preheat your oven to 350°F (175°C). Preheating is crucial because it ensures that your nachos bake evenly. No one wants soggy chips, right? This temperature is perfect for melting the cheese while keeping the chips crispy.
Step 2: Prepare the Tortilla Chips
Next, spread the tortilla chips evenly on a baking sheet. Make sure they’re in a single layer for optimal crispiness. Overlapping chips can lead to uneven baking, and we want every chip to be a crunchy delight!
Step 3: Season the Chicken
In a bowl, mix your shredded chicken with taco seasoning. This step is where the magic happens! The seasoning infuses the chicken with flavor, making it the star of your nachos. Toss it well until every piece is coated.
Step 4: Assemble the Nachos
Now it’s time to layer! Start by evenly distributing the seasoned chicken over the tortilla chips. Then, sprinkle a generous amount of shredded cheese on top. This cheesy goodness is what makes Loaded Chicken Nachos so irresistible!
Step 5: Add Toppings
Before baking, add the black beans and diced tomatoes over the cheese. These ingredients not only enhance the flavor but also add a pop of color. Plus, they make your nachos more filling and nutritious!
Step 6: Bake the Nachos
Pop the baking sheet into your preheated oven and bake for 10-15 minutes. Keep an eye on them! You want the cheese to be melted and bubbly, but not burnt. The aroma will be heavenly, trust me!
Step 7: Final Touches
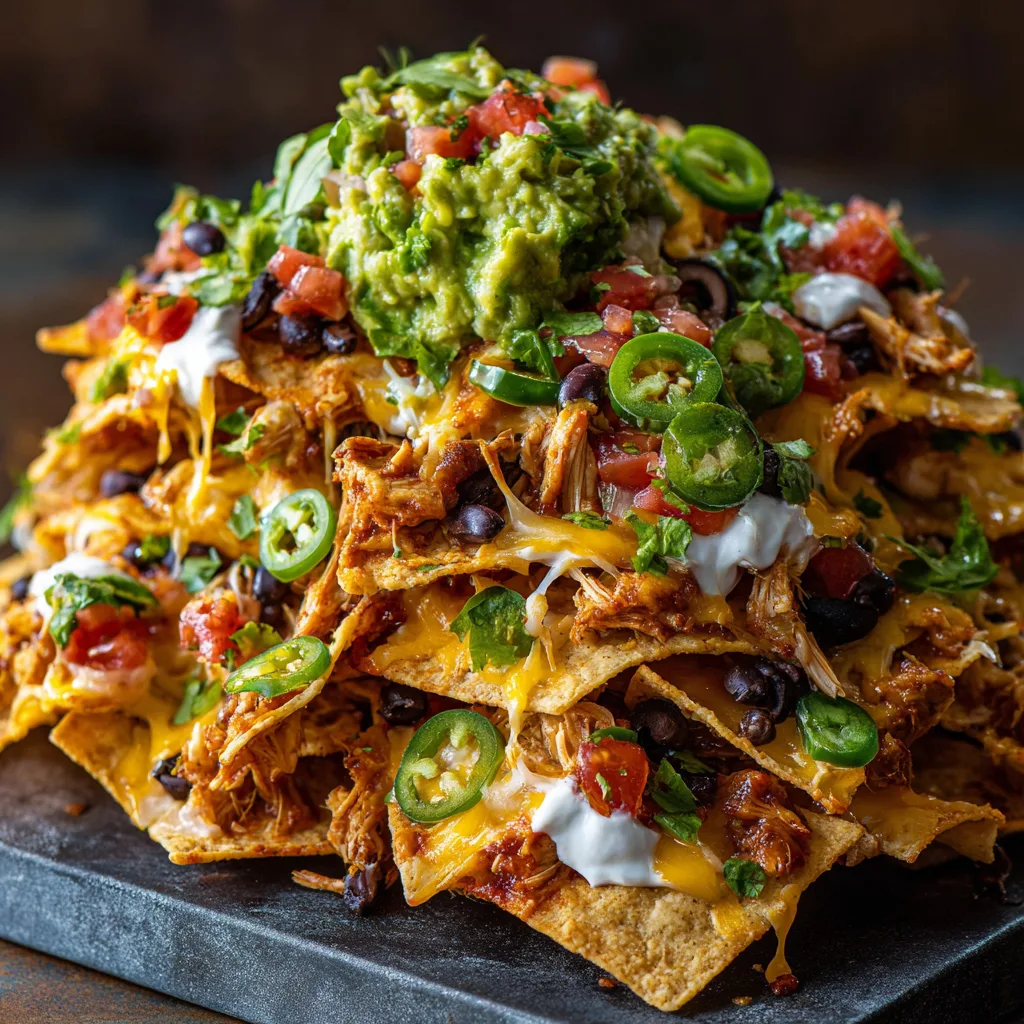
Once out of the oven, it’s time for the finishing touches. Top your nachos with sliced jalapeños, a dollop of sour cream, a scoop of guacamole, and a sprinkle of chopped green onions. These fresh toppings add a vibrant finish and a burst of flavor!
Tips for Success
- Use a large baking sheet to avoid overcrowding the chips.
- For extra crunch, bake the chips for a few minutes before adding toppings.
- Mix and match toppings based on your family’s preferences.
- Keep an eye on the nachos while baking to prevent burning.
- Serve immediately for the best texture and flavor.
Equipment Needed
- Baking Sheet: A standard baking sheet works well. You can also use a cast-iron skillet for a fun presentation.
- Mixing Bowl: Any bowl will do for mixing the chicken and seasoning. A large one is ideal.
- Spatula: Use a spatula to help layer the nachos and serve them easily.
Variations
- Vegetarian Version: Swap the chicken for sautéed bell peppers and mushrooms for a delicious meatless option.
- Spicy Kick: Add diced green chilies or a drizzle of hot sauce for an extra layer of heat.
- Cheesy Delight: Experiment with different cheeses like pepper jack or queso blanco for a unique flavor twist.
- Southwestern Style: Incorporate corn and avocado for a fresh, summery vibe.
- Gluten-Free Option: Ensure your tortilla chips are certified gluten-free to accommodate dietary needs.
Serving Suggestions
- Pair your Loaded Chicken Nachos with a refreshing margarita or iced tea for a perfect balance.
- Serve with a side of fresh salsa or pico de gallo for an extra flavor boost.
- For a fun presentation, use colorful plates or a wooden board to display your nachos.
- Consider adding a simple green salad on the side for a light, healthy contrast.
FAQs about Loaded Chicken Nachos (Crowd Favorite)
Can I make Loaded Chicken Nachos ahead of time?
Absolutely! You can prepare the nachos in advance and store them in the fridge. Just bake them right before serving for that fresh, melty goodness.
What can I substitute for chicken?
If you’re looking for alternatives, shredded beef, pulled pork, or even a mix of sautéed veggies work wonderfully. The key is to keep the flavors bold!
How do I store leftovers?
Store any leftovers in an airtight container in the fridge. They’re best enjoyed within a day or two, but you can reheat them in the oven for a quick snack.
Can I use different types of cheese?
Definitely! Feel free to experiment with different cheeses like pepper jack or mozzarella. Each will give your Loaded Chicken Nachos a unique twist!
What toppings can I add for extra flavor?
Get creative! Consider adding olives, corn, or even a drizzle of ranch dressing. The possibilities are endless, and everyone can customize their plate!
Final Thoughts
Making Loaded Chicken Nachos (Crowd Favorite) is more than just cooking; it’s about creating moments. Whether it’s a cozy family night or a lively gathering with friends, this dish brings everyone together. The joy of sharing a plate piled high with cheesy goodness and vibrant toppings is simply unmatched. Plus, the ease of preparation means you can focus on what truly matters—enjoying time with your loved ones. So, roll up your sleeves, gather your ingredients, and let the deliciousness unfold. Trust me, these nachos will become a cherished tradition in your home!
Print
Loaded Chicken Nachos (Crowd Favorite) to Wow Your Guests!
- Total Time: 30 minutes
- Yield: 4 servings 1x
- Diet: Gluten Free
Description
A delicious and crowd-pleasing dish featuring crispy tortilla chips topped with seasoned chicken, melted cheese, and a variety of toppings.
Ingredients
- 2 cups tortilla chips
- 1 cup cooked chicken, shredded
- 1 cup shredded cheese (cheddar or Mexican blend)
- 1/2 cup black beans, rinsed and drained
- 1/2 cup diced tomatoes
- 1/4 cup sliced jalapeños
- 1/4 cup sour cream
- 1/4 cup guacamole
- 1/4 cup chopped green onions
- 1 tablespoon taco seasoning
Instructions
- Preheat the oven to 350°F (175°C).
- Spread the tortilla chips evenly on a baking sheet.
- In a bowl, mix the shredded chicken with taco seasoning.
- Evenly distribute the seasoned chicken over the tortilla chips.
- Sprinkle the shredded cheese on top of the chicken.
- Add black beans and diced tomatoes over the cheese.
- Bake in the preheated oven for 10-15 minutes, or until the cheese is melted and bubbly.
- Remove from the oven and top with jalapeños, sour cream, guacamole, and green onions.
- Serve immediately and enjoy!
Notes
- Feel free to customize toppings based on your preferences.
- For a spicier version, add more jalapeños or hot sauce.
- This dish can be made ahead of time and baked just before serving.
- Prep Time: 15 minutes
- Cook Time: 15 minutes
- Category: Appetizer
- Method: Baking
- Cuisine: Mexican
Nutrition
- Serving Size: 1/4 of the recipe
- Calories: 450
- Sugar: 2g
- Sodium: 800mg
- Fat: 25g
- Saturated Fat: 10g
- Unsaturated Fat: 15g
- Trans Fat: 0g
- Carbohydrates: 40g
- Fiber: 5g
- Protein: 25g
- Cholesterol: 70mg