Introduction to No-Bake Flag Cheesecake Bars
As a busy mom, I know how precious time can be, especially during the summer when gatherings are in full swing. That’s why I absolutely adore these No-Bake Flag Cheesecake Bars! They’re not just a quick solution for a busy day; they’re a delightful treat that will wow your guests. With their vibrant colors and creamy texture, these bars are perfect for any celebration. Plus, they require no baking, which means less time in the kitchen and more time enjoying the company of loved ones. Trust me, this recipe is a game-changer!
Why You’ll Love This No-Bake Flag Cheesecake Bars
These No-Bake Flag Cheesecake Bars are a dream come true for anyone who loves delicious desserts without the fuss. They come together in just 20 minutes, making them perfect for busy days. The creamy filling paired with a buttery crust is simply irresistible. Plus, the patriotic design adds a festive touch, making them ideal for summer gatherings. You’ll impress your family and friends without breaking a sweat!
Ingredients for No-Bake Flag Cheesecake Bars
Gathering the right ingredients is the first step to creating these delightful No-Bake Flag Cheesecake Bars. Here’s what you’ll need:
- Graham cracker crumbs: These form the base of your crust, providing a sweet and crunchy texture.
- Unsalted butter: Melted butter binds the crumbs together, adding richness to the crust.
- Powdered sugar: This sweetener gives the cheesecake filling its smooth, creamy sweetness without any graininess.
- Cream cheese: The star of the show! Softened cream cheese creates that luscious, velvety filling we all love.
- Vanilla extract: A splash of vanilla enhances the flavor, making the cheesecake taste even more delightful.
- Whipped topping: This lightens the filling, giving it a fluffy texture that melts in your mouth.
- Blueberries: These juicy berries not only add a pop of color but also a burst of freshness.
- Strawberries: Sliced strawberries bring a sweet-tart flavor and vibrant red hue, perfect for our flag design.
For those looking to mix things up, feel free to substitute other fruits like raspberries or kiwi for decoration. You can find all the exact quantities for these ingredients at the bottom of the article, ready for printing!
How to Make No-Bake Flag Cheesecake Bars
Step 1: Prepare the Crust
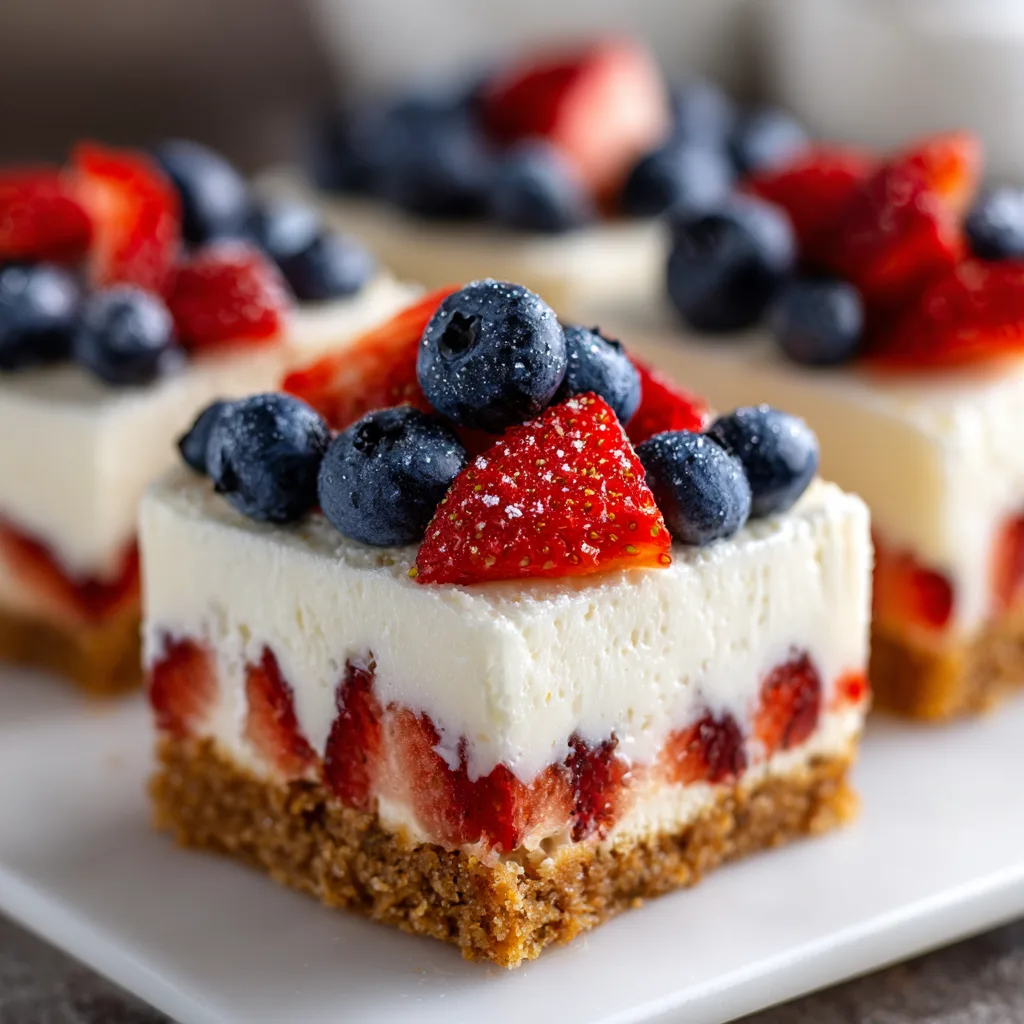
Let’s kick things off by preparing the crust. In a mixing bowl, combine the graham cracker crumbs with the melted butter. Use a fork to mix them until they resemble wet sand. This step is crucial for a sturdy base. Once combined, press the mixture firmly into the bottom of a 9×13 inch pan. I like to use the bottom of a measuring cup to get an even layer. This crust will hold all that creamy goodness, so make sure it’s packed tight!
Step 2: Make the Cheesecake Filling
Now, let’s whip up that luscious cheesecake filling! In a separate bowl, beat the softened cream cheese until it’s smooth and creamy. Add in the powdered sugar and vanilla extract, mixing until everything is well combined. The sweetness should be just right! Next, gently fold in the whipped topping. This lightens the mixture, giving it that airy texture we all crave. Be careful not to overmix; we want to keep it fluffy and delightful!
Step 3: Assemble the Bars
It’s time to bring it all together! Spread the cheesecake mixture evenly over the prepared crust. Use a spatula to smooth it out, making sure every corner is filled. Once it looks perfect, cover the pan with plastic wrap and pop it into the refrigerator. Let it chill for at least 4 hours, or overnight if you can wait. This step is essential for the bars to set properly, ensuring they hold their shape when sliced.
Step 4: Decorate with Fruit
Finally, the fun part—decorating! Once your cheesecake bars are set, it’s time to create that stunning flag design. Start by arranging the blueberries in the top left corner to form the blue field. Then, create rows of sliced strawberries to represent the stripes. This not only looks beautiful but adds a fresh burst of flavor. Slice the bars into squares, serve chilled, and watch your guests’ faces light up with delight!
Tips for Success
- Use full-fat cream cheese for a richer flavor and creamier texture.
- Let the cheesecake bars chill overnight for the best results.
- Press the crust firmly to prevent it from crumbling when sliced.
- Experiment with different fruits for decoration based on seasonal availability.
- Keep the bars covered in the fridge to maintain freshness.
Equipment Needed
- 9×13 inch pan: A standard baking dish works perfectly for this recipe.
- Mixing bowls: Use any size you have on hand; just make sure they’re large enough for mixing.
- Spatula: A rubber spatula is great for spreading the cheesecake mixture evenly.
- Fork: Handy for mixing the crust ingredients together.
- Plastic wrap: Essential for covering the pan while it chills in the fridge.
Variations
- Chocolate Lovers: Add cocoa powder to the cheesecake filling for a chocolate twist. You can also drizzle melted chocolate on top for extra indulgence.
- Fruit Medley: Mix and match your favorite fruits! Try kiwi, raspberries, or even peaches for a colorful and flavorful topping.
- Gluten-Free Option: Substitute graham cracker crumbs with gluten-free cookies or almond flour for a delicious gluten-free crust.
- Vegan Version: Use vegan cream cheese and coconut whipped cream to create a plant-based version of these cheesecake bars.
- Nutty Crunch: Add crushed nuts like pecans or almonds to the crust for an extra crunch and flavor boost.
Serving Suggestions
- Pair these cheesecake bars with a refreshing glass of iced tea or lemonade for a perfect summer treat.
- Serve alongside a scoop of vanilla ice cream for an extra indulgent dessert experience.
- For a festive touch, garnish with fresh mint leaves or edible flowers.
- Present on a colorful platter to enhance the patriotic theme.
FAQs about No-Bake Flag Cheesecake Bars
Can I make No-Bake Flag Cheesecake Bars ahead of time?
Absolutely! These bars are perfect for making ahead. In fact, they taste even better after chilling overnight. Just cover them well in the fridge to keep them fresh.
What can I use instead of cream cheese?
If you’re looking for a lighter option, you can use Greek yogurt or a vegan cream cheese alternative. Both will give you a creamy texture, but the flavor will vary slightly.
How long do these cheesecake bars last in the fridge?
These No-Bake Flag Cheesecake Bars can last up to 5 days in the fridge. Just make sure they’re covered to maintain their freshness!
Can I freeze these cheesecake bars?
Yes, you can freeze them! Just slice them first, wrap each piece tightly in plastic wrap, and store them in an airtight container. They’ll keep for about a month.
What fruits can I use for decoration besides blueberries and strawberries?
Feel free to get creative! Raspberries, kiwi slices, or even blackberries can add a beautiful touch. Just make sure they’re colorful and fresh for that patriotic flair!
Final Thoughts
Creating these No-Bake Flag Cheesecake Bars is more than just whipping up a dessert; it’s about bringing joy to your gatherings. The vibrant colors and creamy texture make them a showstopper, while the no-bake method saves you precious time. I love how they spark conversations and smiles at summer celebrations. Whether it’s a backyard barbecue or a family picnic, these bars are sure to impress. So, roll up your sleeves, gather your ingredients, and let the fun begin! You’ll not only enjoy making them but also savor every delightful bite with your loved ones.
Print
No-Bake Flag Cheesecake Bars That Wow Every Guest!
- Total Time: 4 hours 20 minutes
- Yield: 12 bars 1x
- Diet: Vegetarian
Description
Delicious no-bake cheesecake bars decorated like the American flag, perfect for summer gatherings and celebrations.
Ingredients
- 2 cups graham cracker crumbs
- 1/2 cup unsalted butter, melted
- 1 cup powdered sugar
- 16 oz cream cheese, softened
- 1 tsp vanilla extract
- 2 cups whipped topping
- 1 cup blueberries
- 1 cup strawberries, sliced
Instructions
- In a bowl, mix graham cracker crumbs and melted butter until combined.
- Press the mixture into the bottom of a 9×13 inch pan to form the crust.
- In another bowl, beat together the cream cheese, powdered sugar, and vanilla extract until smooth.
- Fold in the whipped topping until well combined.
- Spread the cream cheese mixture over the crust evenly.
- Refrigerate for at least 4 hours or until set.
- Once set, arrange blueberries and sliced strawberries on top to create a flag design.
- Slice into bars and serve chilled.
Notes
- For best results, use full-fat cream cheese.
- Let the cheesecake bars chill overnight for a firmer texture.
- Feel free to substitute other fruits for decoration.
- Prep Time: 20 minutes
- Cook Time: 0 minutes
- Category: Dessert
- Method: No-Bake
- Cuisine: American
Nutrition
- Serving Size: 1 bar
- Calories: 250
- Sugar: 18g
- Sodium: 150mg
- Fat: 15g
- Saturated Fat: 9g
- Unsaturated Fat: 6g
- Trans Fat: 0g
- Carbohydrates: 30g
- Fiber: 1g
- Protein: 3g
- Cholesterol: 30mg