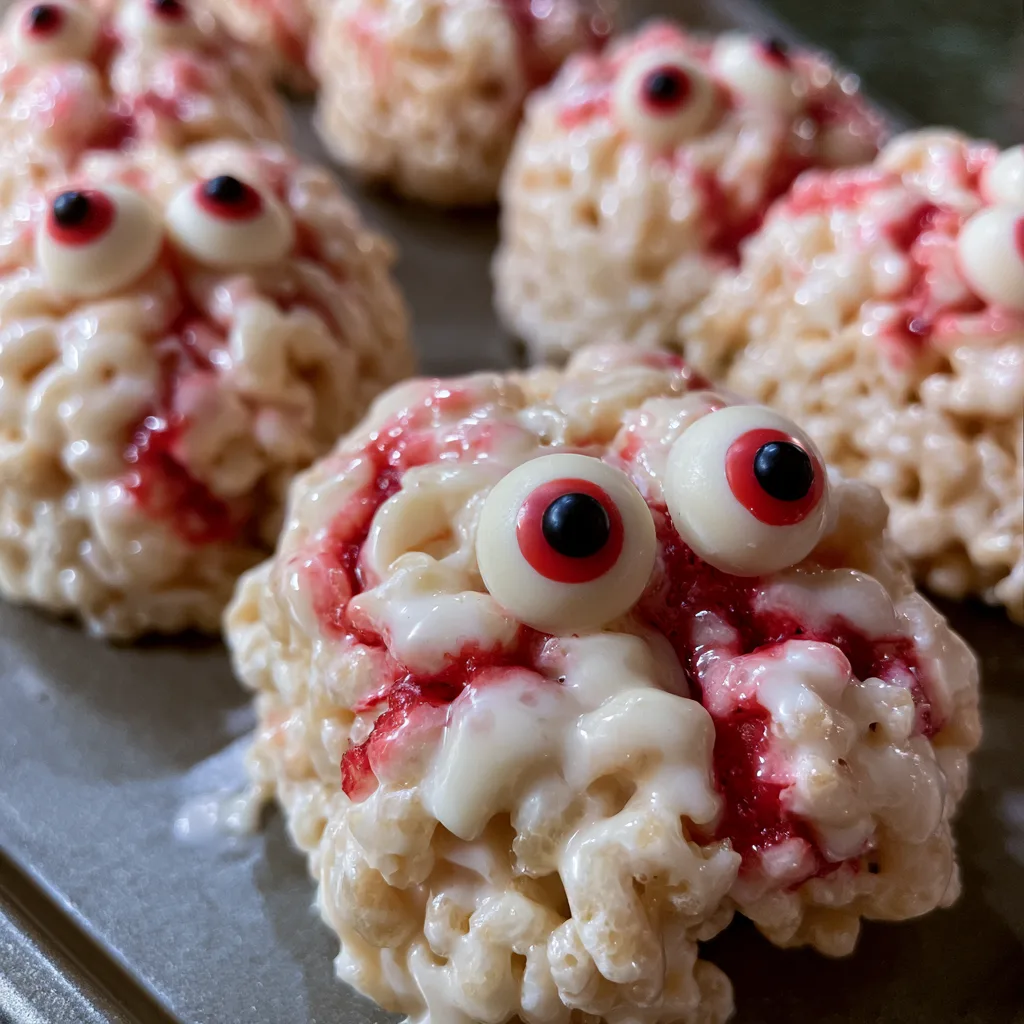
Introduction to Rice Krispies Brains
As a busy mom, I know how challenging it can be to whip up something fun and creative, especially during the hectic Halloween season. That’s why I absolutely adore these Rice Krispies Brains! They’re not just a treat; they’re a delightful way to bring a little spooky fun into your kitchen without spending hours slaving away. With just a few simple ingredients, you can create these adorable brain-shaped snacks that will impress your family and friends. Plus, they’re a fantastic way to get the kids involved in the kitchen, making memories while you cook!
Why You’ll Love This Rice Krispies Brains
These Rice Krispies Brains are the perfect blend of ease and creativity. In just 25 minutes, you can whip up a spooky treat that’s sure to delight everyone. The sweet, gooey marshmallows combined with the crunch of Rice Krispies create a texture that’s simply irresistible. Plus, they’re a no-bake dessert, which means less mess and more time for family fun. Who wouldn’t love a treat that’s as fun to make as it is to eat?
Ingredients for Rice Krispies Brains
Gathering the right ingredients is the first step to creating these delightful Rice Krispies Brains. Here’s what you’ll need:
- Butter: This is the base for your gooey mixture. It adds richness and helps everything stick together.
- Marshmallows: The star of the show! They provide that sweet, chewy texture we all love. Use mini marshmallows for easier melting.
- Rice Krispies cereal: This gives your treats that satisfying crunch. It’s the perfect contrast to the gooey marshmallows.
- Red food coloring: A few drops will transform your mixture into a spooky pinkish hue, making it look like real brains!
- White chocolate: Drizzling this on top not only adds sweetness but also enhances the brain-like appearance. You can use chocolate chips or a bar.
Feel free to get creative! You can swap the white chocolate for dark chocolate or even add sprinkles for a festive touch. If you’re looking for a healthier option, consider using brown rice cereal instead of Rice Krispies. For exact measurements, check the bottom of the article where you can find everything available for printing.
How to Make Rice Krispies Brains
Now that you have your ingredients ready, let’s dive into the fun part—making these Rice Krispies Brains! Follow these simple steps, and you’ll have a spooky treat in no time.
Step 1: Melt the Butter
Start by grabbing a large saucepan. Place it on the stove over low heat and add your butter. As it melts, keep an eye on it. You want it to become a lovely golden liquid, not browned. This buttery base is essential for that gooey goodness!
Step 2: Add the Marshmallows
Once the butter is melted, it’s time to add the marshmallows. Pour them in and stir continuously. You’ll want to keep stirring until they’re completely melted and smooth. This is where the magic happens! The marshmallows should blend seamlessly with the butter, creating a sticky, sweet mixture.
Step 3: Mix in the Rice Krispies
Now, it’s time to add the Rice Krispies cereal. Pour it into the melted marshmallow mixture and stir gently. Make sure every piece of cereal is coated with that gooey goodness. This is where the crunch comes in, and it’s oh-so-satisfying!
Step 4: Add Food Coloring
To give your treats that spooky vibe, add a few drops of red food coloring. Stir it in until you achieve a pinkish hue that resembles real brains. Don’t be shy—if you want a more intense color, feel free to add more! Just remember, a little goes a long way.
Step 5: Shape the Mixture
Next, grab your brain-shaped molds. Lightly grease them with cooking spray to prevent sticking. Now, take handfuls of the mixture and press it firmly into the molds. Make sure to pack it in well so they hold their shape. This is where your creativity shines!
Step 6: Drizzle with White Chocolate
While your brain shapes are setting, melt some white chocolate in a microwave-safe bowl. Heat it in short bursts, stirring in between, until it’s smooth. Once melted, drizzle it over the top of your brain treats. This adds a delicious touch and enhances the brain-like appearance!
Step 7: Let Set and Serve
Allow the Rice Krispies Brains to set for about 30 minutes. Once they’re firm, gently remove them from the molds. Place them on a serving platter, and voilà! You’ve created a spooky treat that’s sure to impress. Enjoy your culinary creation!
Tips for Success
- Use fresh marshmallows for the best texture and flavor.
- Don’t rush the melting process; low heat is key to avoid burning.
- Grease your molds well to ensure easy removal.
- Experiment with colors and toppings to make your treats unique.
- Store leftovers in an airtight container to keep them fresh.
Equipment Needed
- Large saucepan: A non-stick option works best for easy cleanup.
- Wooden spoon: Perfect for stirring; a spatula can also do the trick.
- Brain-shaped molds: Silicone molds are great for easy release; you can use muffin tins as an alternative.
- Microwave-safe bowl: For melting chocolate; any heatproof bowl will suffice.
Variations
- Chocolate Rice Krispies Brains: Substitute half of the Rice Krispies with cocoa rice cereal for a chocolatey twist.
- Nut Butter Addition: Stir in a few tablespoons of peanut or almond butter for added flavor and creaminess.
- Vegan Option: Use vegan marshmallows and dairy-free chocolate for a plant-based treat.
- Gluten-Free Version: Ensure your Rice Krispies are labeled gluten-free to accommodate dietary needs.
- Colorful Brains: Use different food coloring to create a rainbow of brain treats for a fun twist!
Serving Suggestions
- Pair your Rice Krispies Brains with spooky-themed drinks like a fizzy punch or apple cider.
- Serve them on a platter decorated with fake spider webs for a festive touch.
- For a fun twist, add gummy worms or candy eyeballs on top for extra creepiness!
- Consider using Halloween-themed napkins and plates to enhance the presentation.
FAQs about Rice Krispies Brains
Can I make Rice Krispies Brains ahead of time?
Absolutely! These treats can be made a day or two in advance. Just store them in an airtight container to keep them fresh. They’re perfect for prepping ahead of a Halloween party!
What can I use instead of brain-shaped molds?
If you don’t have brain-shaped molds, don’t worry! You can use muffin tins or even shape them by hand. Just make sure to grease whatever you use to prevent sticking.
How do I store leftover Rice Krispies Brains?
Store any leftovers in an airtight container at room temperature. They’ll stay fresh for up to a week, but I doubt they’ll last that long!
Can I customize the colors of my Rice Krispies Brains?
Definitely! Feel free to experiment with different food coloring. You can create vibrant colors or even mix colors for a unique look. The sky’s the limit!
Are Rice Krispies Brains suitable for kids?
Yes! These treats are kid-friendly and fun to make together. Just keep an eye on the melted chocolate and hot mixture to ensure safety while cooking.
Final Thoughts
Creating these Rice Krispies Brains is more than just making a treat; it’s about sharing joy and laughter with loved ones. The smiles on my kids’ faces as they help shape the mixture and drizzle the chocolate are priceless. This recipe is a wonderful way to embrace the spirit of Halloween while making lasting memories in the kitchen. Plus, the simplicity of it all means you can whip them up even on the busiest days. So, gather your family, unleash your creativity, and enjoy the delightful experience of making these spooky snacks together!
Print
Rice Krispies Brains: Unleash Your Culinary Creativity!
- Total Time: 25 minutes
- Yield: 12 servings 1x
- Diet: Vegetarian
Description
A fun and creative treat perfect for Halloween or any spooky occasion, these Rice Krispies Brains are made with marshmallows and cereal, shaped into brain molds for a unique presentation.
Ingredients
- 3 tablespoons butter
- 1 package (10 oz) marshmallows
- 6 cups Rice Krispies cereal
- Red food coloring
- White chocolate (for drizzling)
Instructions
- In a large saucepan, melt the butter over low heat.
- Add the marshmallows and stir until completely melted.
- Remove from heat and add the Rice Krispies cereal, mixing until well coated.
- Let the mixture cool slightly, then add a few drops of red food coloring and mix to create a pinkish hue.
- Press the mixture into brain-shaped molds and let it set for about 30 minutes.
- Once set, drizzle melted white chocolate over the top to create a brain-like appearance.
- Allow the chocolate to harden before removing from molds.
Notes
- For a more intense color, add more red food coloring.
- These treats can be stored in an airtight container for up to a week.
- Feel free to experiment with different colors and toppings!
- Prep Time: 15 minutes
- Cook Time: 10 minutes
- Category: Dessert
- Method: No-Bake
- Cuisine: American
Nutrition
- Serving Size: 1 treat
- Calories: 150
- Sugar: 10g
- Sodium: 50mg
- Fat: 5g
- Saturated Fat: 3g
- Unsaturated Fat: 2g
- Trans Fat: 0g
- Carbohydrates: 22g
- Fiber: 0g
- Protein: 1g
- Cholesterol: 10mg